I’ve had a few emails asking for information on how my app Heart Rate - Free works.
There’s nothing particularly clever about it, it just uses the camera to pick up the slight change in the colour of the light coming from the flash as the blood flows in and out of the finger.
You can make a few modifications to the code posted in the Augmented Reality Post or download the demo code.
Setting up the capture session is pretty much the same as usual. The main differences are that we don’t need to preview the image (it’s not very interesting to look at…) and that we need to turn on the flash to illuminate the finger.
// switch on the flash in torch mode
if([camera isTorchModeSupported:AVCaptureTorchModeOn]) {
 [camera lockForConfiguration:nil];
 camera.torchMode=AVCaptureTorchModeOn;
 [camera unlockForConfiguration];
}
We’ll also set the frame size to low as we don’t need high resolution images:
[session setSessionPreset:AVCaptureSessionPresetLow];
The capture setup code looks like this now:
// Create the AVCapture Session
session = [[AVCaptureSession alloc] init];

// Get the default camera device
AVCaptureDevice* camera = [AVCaptureDevice defaultDeviceWithMediaType:AVMediaTypeVideo];
if([camera isTorchModeSupported:AVCaptureTorchModeOn]) {
 [camera lockForConfiguration:nil];
 camera.torchMode=AVCaptureTorchModeOn;
 [camera unlockForConfiguration];
}
// Create a AVCaptureInput with the camera device
NSError *error=nil;
AVCaptureInput* cameraInput = [[AVCaptureDeviceInput alloc] initWithDevice:camera error:&error];
if (cameraInput == nil) {
 NSLog(@"Error to create camera capture:%@",error);
}

// Set the output
AVCaptureVideoDataOutput* videoOutput = [[AVCaptureVideoDataOutput alloc] init];

// create a queue to run the capture on
dispatch_queue_t captureQueue=dispatch_queue_create("catpureQueue", NULL);

// setup our delegate
[videoOutput setSampleBufferDelegate:self queue:captureQueue];

// configure the pixel format
videoOutput.videoSettings = [NSDictionary dictionaryWithObjectsAndKeys:[NSNumber numberWithUnsignedInt:kCVPixelFormatType_32BGRA], (id)kCVPixelBufferPixelFormatTypeKey,
         nil];
// cap the framerate
videoOutput.minFrameDuration=CMTimeMake(1, 10);
// and the size of the frames we want
[session setSessionPreset:AVCaptureSessionPresetLow];

// Add the input and output
[session addInput:cameraInput];
[session addOutput:videoOutput];

// Start the session
[session startRunning];
In out capture callback we’ll pull out the RGB values from the preview image:
- (void)captureOutput:(AVCaptureOutput *)captureOutput didOutputSampleBuffer:(CMSampleBufferRef)sampleBuffer fromConnection:(AVCaptureConnection *)connection {
 // this is the image buffer
 CVImageBufferRef cvimgRef = CMSampleBufferGetImageBuffer(sampleBuffer);
 // Lock the image buffer
 CVPixelBufferLockBaseAddress(cvimgRef,0);
 // access the data
 int width=CVPixelBufferGetWidth(cvimgRef);
 int height=CVPixelBufferGetHeight(cvimgRef);
 // get the raw image bytes
 uint8_t *buf=(uint8_t *) CVPixelBufferGetBaseAddress(cvimgRef);
 size_t bprow=CVPixelBufferGetBytesPerRow(cvimgRef);
 // get the average red green and blue values from the image
 float r=0,g=0,b=0;
 for(int y=0; y<height; y++) {
  for(int x=0; x<width*4; x+=4) {
   b+=buf[x];
   g+=buf[x+1];
   r+=buf[x+2];
  }
  buf+=bprow;
 }
 r/=255*(float) (width*height);
 g/=255*(float) (width*height);
 b/=255*(float) (width*height);

 NSLog(@"%f,%f,%f", r, g, b);
}
If we run this and plot the values for red and green (blue is pretty uninteresting as it’s almost zero) we can see that there’s definitely some kind of change when the heart beats:
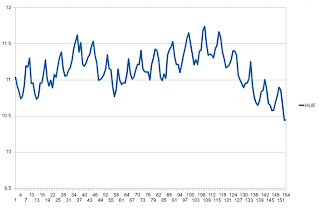
The peaks in both the red and green values correspond to your pulse. We can combine the values into something a lot more convenient if we convert the RGB values to HSV (hue, saturation, value) and just use the value of hue.
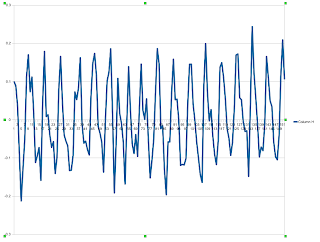
We can now see a definite pattern that corresponds to the heart beat. You’ll probably want to do some filtering on the results from this - I’d suggest running it through a simple notch filter (highpass and lowpass filter) to get rid of DC component and apply a bit of smoothing to isolate the heart beat:
You can then pass these values into whatever mechanism you plan to use to detect and measure the beats.
Here’s the sample project in action:
You can download it from here. You’ll need to replace the filtering with something a bit more sensible, the code I’ve put there is purely for demo purposes.


