View All Posts
read
Want to keep up to date with the latest posts and videos? Subscribe to the newsletter
HELP SUPPORT MY WORK: If you're feeling flush then please stop by Patreon Or you can make a one off donation via ko-fi
#DS18B20 #RASPBERRY PI #STARTER KIT #TECHNOLOGY #TEMPERATURE SENSOR

I recently got hold of a Raspberry Pi along with a starter kit. My starter kit came with a couple of sensors and components.

The temperature sensor is the DS18B20

DS18B20

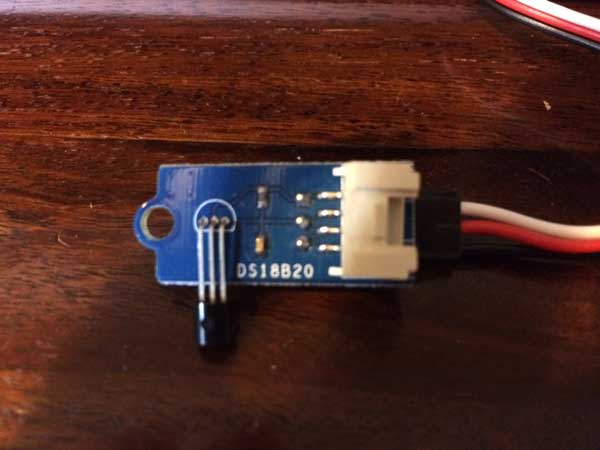
Getting this up and running was pretty straightforward following various instructions on the internet - the most useful being the one from Adafruit

My sensor already comes with a resistor on it’s circuit board so the wiring was just a case of plugging the red wire to the 3.3v supply, the black wire to ground, and the white wire to Pin 7 on my breakout board.

wiring disagram

To load up support for the device follow these steps:

sudo modprobe w1-gpio
sudo modprobe w1-therm
cd /sys/bus/w1/devices
ls
28-0000057cc14e  w1_bus_master1
cd 28-0000057cc14e
cat w1_slave
68 01 4b 46 7f ff 08 10 05 : crc=05 YES
68 01 4b 46 7f ff 08 10 05 t=22500

The second line of text is the temperature.

If you want to change the pin that w1 devices can connect to then you need to edit /boot/cmdline.txt and add this parameter:

bcm2708.w1_gpio_pin=<GPIO_pin_number> (for examplebcm2708.w1_gpio_pin=17).
#DS18B20 #RASPBERRY PI #STARTER KIT #TECHNOLOGY #TEMPERATURE SENSOR

Related Posts

Raspberry pi Infrared Receiver - In this fun tech adventure, I successfully managed to sync my infrared receiver to my Raspberry Pi. This involved correctly wiring up my IR sensor, installing and setting up LIRC, and creating a new lirc config file. I explained each step in detail and shared my major milestones, which included seeing a list of pulses when the remote was pointed at the receiver. Now my Raspberry Pi is fully controlled by my remote.
Connecting up the MCP23S17 and HD44780U based LCD - Ever wondered how to hook up an LCD display with your Raspberry Pi without using up all your GPIO pins? With the right tools, such as the MCP23S17 and wiringPi, you can effortlessly keep your I2C, UART, and SPI functionalities free for other worthwhile endeavors. This blog post truly proves that the GPIO is quite flexible with the I2C or SPI pins and setting up the MCP23S17 is as simple as connecting the pins. And with support for 5v LCD modules, I can assure you that this setup is definitely lit!
Raspberry Pi iBeacon - In today's blog post, I successfully turned my Raspberry Pi into an iBeacon using a Bluetooth dongle and following an Adafruit tutorial. I had to go under the hood a bit to make sure my dongle was recognized, but after adding some udev rules, it was good to go. Then, with a string of terminal commands, I was able to set it up as an iBeacon broadcasting a specific UUID. Testing it out with a basic iOS app, I was able to detect the signal strength from the beacon! While it wasn't the flashiest project, it was definitely satisfying to see it work.
Raspberry Pi BTLE Device - Just wrapped up the first iOSCon hackathon and had a blast tinkering with my Raspberry Pi, turning it into a full-fledged Bluetooth device in sync with an iPhone app. Used node for setting up and Bleno for creating Bluetooth low energy peripherals. Penned down each step for you to replicate, right from writing strings on my LCD to reading temperatures and getting notified of IR remote button clicks. Ran it on an app store or GitHub test application. Also, explored the Core Bluetooth framework for iOS app creation, for reading and writing data to the Raspberry Pi. Let's keep creating magic with technology!

Related Videos

Getting started with Raspberry Pi Pico - MicroPython - Learn how to get started with Raspberry Pi Pico by soldering headers, writing codes, and building a classic blinking LED project in this tutorial.
Live GPIO Viewer - In my latest discovery, I found an incredibly efficient visualization tool from the last outpost workshop that upgrades how I check the status of the GPIO pins on my ESP32. It's super simple to use and allows me to monitor pin activities directly. I set up a couple of LEDs and a button on various GPIO pins to demonstrate its effectiveness and the results were fantastic. Although it currently supports only digital input and output and PWM, I'm optimistic it will expand with time. Thanks to the open-source community, you can find the setup instructions in a GitHub repo. This tool is a revelation and I highly recommend it.
Lovely High Res E-Paper Display - Just when we thought we'd done with our mailbag, some exciting new stuff tips up. This time, we've got a soldering kit, a fun-looking Dash, and extra bonus, an ink plate 10, which is a cool e-paper display from Soldered. We've unboxed it, pulling out a board with an esp32 module, an SD card, and a battery connector. One of the major selling points is its open-source nature, you can download all the schematics from GitHub, and for those inclined, learn about how to build pcbs. Also showcased a Simon Says game soldering kit, despite my modest soldering skills (we all need practice, eh?), it turned out to be good fun. Plus, we've got a Dev board fitted with an at Mega 328p and an ultra-bright ws2812 RGB LED. Let's see if I can turn this e-paper display into a weather display or maybe you have more exciting ideas, drop them down in the comments!
A Lot of Hot Air - Soldering ESP32-S3 Boards - In this video, I test out the new hot air rework station I just got to solder my Mini esp32 S3 boards. I dissect the hot air gun, encountering an Australian plug and a couple of interesting quirks inside the control PCB. I attempt to understand the circuit, welcome your thoughts on the build quality, and then solder on a new, hopefully safer, UK-compliant plug. Post-assembly, I apply way too much solder paste thanks to these tricky solder syringes, before setting the station to 300 degrees C for some hands-on rework. After some trials, I successfully fix some solder bridges with my soldering iron and behold, everything is connected and it works! It's just another blink sketch, but hey, it's confirmed – The new hot air station works!
Happiness is a Working Blink Sketch - ESP32-S3 PCBs Are Here! - In this video, I explore the functions of my newly arrived little boards - essentially a PCB that an esp32 S3 room module can be connected to. I put the board's voltage regulator, battery charger, and a 3 watt class D amplifier to the test, and damn, they work perfectly! I even use breadboards, connecting them together to facilitate a wider workspace. I gave the pcbs a spin, conducting sanity checks to ensure full functionality. With a successful battery charge and impressive voltage measurements, my PCB's are up to the challenge. I also dabble in some circuit jargon, explaining schematics, amplifiers, battery chargers and a clever mosfet approach. To top it off, I solder on an ESP32 module and prove that yes, it actually works. Stay tuned for a following video where we'll work with a speaker and display!
HELP SUPPORT MY WORK: If you're feeling flush then please stop by Patreon Or you can make a one off donation via ko-fi
Want to keep up to date with the latest posts and videos? Subscribe to the newsletter
Blog Logo

Chris Greening


Published

> Image

atomic14

A collection of slightly mad projects, instructive/educational videos, and generally interesting stuff. Building projects around the Arduino and ESP32 platforms - we'll be exploring AI, Computer Vision, Audio, 3D Printing - it may get a bit eclectic...

View All Posts