View All Posts
read
Want to keep up to date with the latest posts and videos? Subscribe to the newsletter
HELP SUPPORT MY WORK: If you're feeling flush then please stop by Patreon Or you can make a one off donation via ko-fi
#BASTION SERVER #DATABASE #ELASTIC BEANSTALK #NETWORK SECURITY #POSTGRES #PRIVATE SUBNET #RAILS #RDS INSTANCE #VPC

In this third step we create an RDS instance running Postgres in our VPC using our private subnets. We connect to the database using our Bastion server and create dev and production databases.

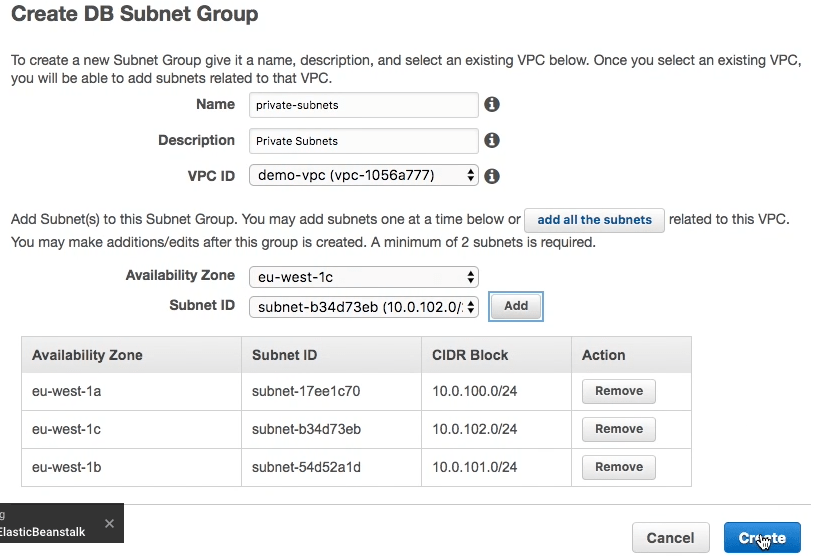
We are going to run our database in our private subnets - this should ensure maximum security as there is no way that we can accidentally make our database publicly accessible. The first thing we need to do is create a subnet group from our private subnets:

Create Subnet Group

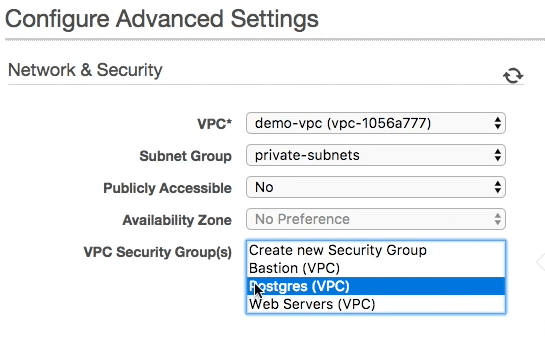
In the advanced settings of our database we place it in our new VPC and we tell it to use the subnet group that we have just created with our private subnets. We also specify the security group we created in step 1 that gives access to the Postgres port (5432) from our Web Severs security group and our Bastion security group.

Network and Security Settings

We can now create or RDS instance - we’ll create our database manually by logging into our Bastion server (see the video for how to launch this server) and connecting to our new RDS instance.

To create a database we use the following commands:

Connect to the database using the following command - the host should be copied from your RDS instance, the username should be the master username you configured when creating the RDS instance. You will be prompted for the master password.

sudo yum install postgresql95
psql -h [HOST] -U [USERNAME] -d postgres

We will create a dev and prod database using the following commands:

CREATE ROLE dev with encrypted password '[STRONG_PASSWORD1]' LOGIN;
GRANT dev TO [MASTER_USERNAME];
CREATE ROLE prod with encrypted password '[STRONG_PASSWORD2]' LOGIN;
GRANT prod TO [MASTER_USERNAME];
CREATE DATABASE dev with owner dev;
CREATE DATABASE prod with owner prod;

[STRONG_PASSWORD1] and [STRONG_PASSWORD2] should be replace by two different passwords that you generate using a strong password generator. [MASTER_USERNAME] should be replaced by the master username that you set the database instance up with.

Our RDS instance is now ready for use from our Rails application. You can now shut down the Bastion server until you need to perform any other database maintenance jobs.

In the next step we’ll deploy a real Rails application to the Elastic Beanstalk application we created in step2 and connect it to our new database.

#BASTION SERVER #DATABASE #ELASTIC BEANSTALK #NETWORK SECURITY #POSTGRES #PRIVATE SUBNET #RAILS #RDS INSTANCE #VPC

Related Posts

Connecting PSQL and Rails Console to Elastic Beanstalk - In this post, we explore a solution to the challenge of running the Rails console against a PostgreSQL database housed in a private subnet for security reasons. While it's a good security practice, it can limit access for bootstrapping users or debugging issues. By tunnelling through a Bastion server, we can establish a connection to the database as if it was running locally. We walk through code examples of SSH tunneling, database connection, and how to run Rails console. A key point is to ensure the Bastion server is shut down after use.
Step 1 - Setup VPC: Deploying a Rails Application to Elastic Beanstalk - In this blog post, I am guiding you through the process of deploying a Rails application to Elastic Beanstalk in a Virtual Private Cloud (VPC) on Amazon AWS. I detail the setup of a VPC, subnets, and internet gateways, as well as the configuration of NAT gateways and security groups. Ultimately, this will allow for a safe, internet-accessible environment for your application and its accompanying databases.
Step 4: Deploy Rails App To Elastic Beanstalk from Command Line - This post guides you through the essential steps of creating and deploying a Rails application into Elastic Beanstalk environment. Topics include creating an AWS user, configuring AWS CLI for deployment, and setting up the environment variables for your app. Also, it provides you the valuable knowledge of connecting your Rails app to RDS instance and ensuring it successfully connects with the dev database.
Step 2 - Setup Elastic Beanstalk: Deploying a Rails Application to Elastic Beanstalk - In this post, I describe how to set up, configure and deploy an Elastic Beanstalk application on a VPC in Amazon AWS, using Rails 5 and Ruby, using Puma for deployment and configuration of Public and Private subnets in Elastic Load Balancer. I also cover the details of network card settings, the selection process for subnets and security groups for Load Balancer and Instances, and finally shared the result of deploying the sample application on Elastic Beanstalk.
Step 5: Use CircleCI to Deploy To Elastic Beanstalk - In this blog post, we're going to set up an automated deployment pipeline using CircleCI, GitHub, and AWS Elastic Beanstalk. We'll begin by creating a GitHub repository for our Rails application. Next, we're going to help CircleCI understand our build environment by creating a `circle.yml` file to install the AWS EB CLI tools and to define commands for deploying our application. Lastly, we'll set up the required AWS credentials in CircleCI. Once completed, any changes pushed to the develop or master branch in GitHub will trigger a deployment to the respective environment in Elastic Beanstalk.

Related Videos

Revolutionize Your Raspberry Pi Development with VSCode Remote! - Learn how to develop code on Raspberry Pi using VSCode without needing VNC or a desktop environment by setting up a remote development environment. Develop your projects more conveniently and efficiently with this powerful tool!
The Hacker News Effect - The Website Didn't Catch Fire - Let's look at the traffic - Witness the Hacker News effect in action as the author's blog skyrocketed to popularity, easily handling massive traffic thanks to efficient hosting and Cloudfront!
Raspberry Pi Hidden Settings - Setup Hostname, SSH and WiFi from the Pi Imager Application. - Uncover a hidden screen in the Raspberry Pi Imager Application to easily set up SSH, WiFi, and hostnames for your device without creating additional files. Just press Ctrl+Shift+X!
Easy 8.8 Amp Power Supply Hook Up - But is it safe? - In this DIY assembly venture, I decided to tackle the challenge of designing a safer casing for the bare, open mains connections on my LRS-200-24 power supply. To add to the challenge, the connector size was surprisingly wide and deep, which created hurdles in 3D printing the perfect box. I tried several renditions, from printing in separate parts to changing the design into a tubular construction, but these ventures resulted in a bit of a printing scrap heap. After discovering a sturdy, push-fit, slimmer connector online, my 3D printing journey went a little smoother, resulting in a front panel that slid nicely onto the power supply unit. The project also involved some dexterous wire threading, soldering, securing switches, and sockets, and accommodating everything within the newly printed enclosure. An exciting yet fiddly bit of work, it has come along quite promisingly – a test run confirms functionality. On the agenda for the next round – possibly extending the enclosure for some more elbow room for the wires. Definitely been a 'shocking' fun electrical endeavour!
Bootlace Crimping - What?, Why?, How? - Learn about the benefits of using bootlace ferrules for stranded wires and how to easily crimp them for a secure connection in screw terminals.
HELP SUPPORT MY WORK: If you're feeling flush then please stop by Patreon Or you can make a one off donation via ko-fi
Want to keep up to date with the latest posts and videos? Subscribe to the newsletter
Blog Logo

Chris Greening


Published

> Image

atomic14

A collection of slightly mad projects, instructive/educational videos, and generally interesting stuff. Building projects around the Arduino and ESP32 platforms - we'll be exploring AI, Computer Vision, Audio, 3D Printing - it may get a bit eclectic...

View All Posts