View All Posts
read
Want to keep up to date with the latest posts and videos? Subscribe to the newsletter
HELP SUPPORT MY WORK: If you're feeling flush then please stop by Patreon Or you can make a one off donation via ko-fi
#AWS #CI SERVER #CUSTOM DOMAIN #ELASTIC BEANSTALK #RAILS #SSL

In this step we setup a custom domain name to point at our Elastic Beanstalk environment and configure it to use SSL.

To create a custom domain pointing at our environment we need to create either a CNAME or an ALIAS that points to our environment URL. You can find the URL for your environment on the dashboard screen.

Copy this URL and go to your domain registrar admin site. Follow the instructions for your domain registrar for adding a CNAME record that points to your environment URL.

It may take some time depending on your registrar for the new entries to propagate but once they have propagated you can test by navigating to your new domain name. You should see the app that you have deployed to your environment.

We now need to setup SSL for our environment so we can use HTTPS. The best way to do this is to use the AWS Certificate Manager.

AWS Certificate Manager

You can add both specific domain names to your certificate or wildcard domains. If you want to access your site using a bare name (e.g. cmgresearch.com) then you need to add that explicitly as a wildcard (*.cmgresearch.com) does not include it.

Add domains names to your certificate

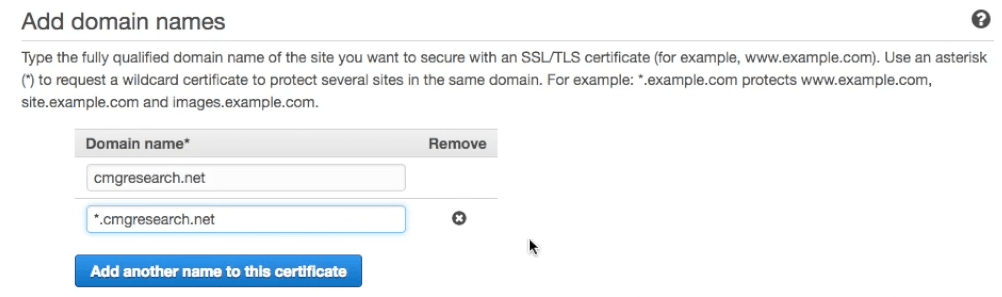
To validate the certificate Amazon will send an email to the contact email address associated with each domain you are requesting a certificate for. Once you have approved the certificate you can use it in Elastic Beanstalk.

Navigate to your Elastic Beanstalk environment and go to the configuration tab and then select the load balancer configuration. Enable the Secure listener port and in the SSL certificate ID dropdown pick your new certificate.

Enable HTTPS on the load balancer

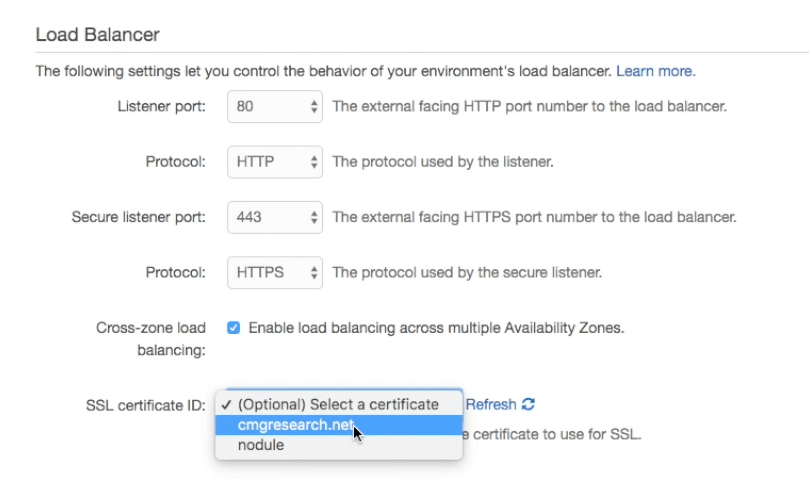
Once the configuration has finished updating check that you can access you site over HTTPS and that the certificate is valid.

If you followed all the previous steps you now have a Rails application that can be deployed by a CI server and is secured by HTTPS.

#AWS #CI SERVER #CUSTOM DOMAIN #ELASTIC BEANSTALK #RAILS #SSL

Related Posts

Step 4: Deploy Rails App To Elastic Beanstalk from Command Line - This post guides you through the essential steps of creating and deploying a Rails application into Elastic Beanstalk environment. Topics include creating an AWS user, configuring AWS CLI for deployment, and setting up the environment variables for your app. Also, it provides you the valuable knowledge of connecting your Rails app to RDS instance and ensuring it successfully connects with the dev database.
Step 5: Use CircleCI to Deploy To Elastic Beanstalk - In this blog post, we're going to set up an automated deployment pipeline using CircleCI, GitHub, and AWS Elastic Beanstalk. We'll begin by creating a GitHub repository for our Rails application. Next, we're going to help CircleCI understand our build environment by creating a `circle.yml` file to install the AWS EB CLI tools and to define commands for deploying our application. Lastly, we'll set up the required AWS credentials in CircleCI. Once completed, any changes pushed to the develop or master branch in GitHub will trigger a deployment to the respective environment in Elastic Beanstalk.
Step 1 - Setup VPC: Deploying a Rails Application to Elastic Beanstalk - In this blog post, I am guiding you through the process of deploying a Rails application to Elastic Beanstalk in a Virtual Private Cloud (VPC) on Amazon AWS. I detail the setup of a VPC, subnets, and internet gateways, as well as the configuration of NAT gateways and security groups. Ultimately, this will allow for a safe, internet-accessible environment for your application and its accompanying databases.
Step 2 - Setup Elastic Beanstalk: Deploying a Rails Application to Elastic Beanstalk - In this post, I describe how to set up, configure and deploy an Elastic Beanstalk application on a VPC in Amazon AWS, using Rails 5 and Ruby, using Puma for deployment and configuration of Public and Private subnets in Elastic Load Balancer. I also cover the details of network card settings, the selection process for subnets and security groups for Load Balancer and Instances, and finally shared the result of deploying the sample application on Elastic Beanstalk.
Step 8: Set up Active Job on Elastic Beanstalk - This blog post walks through setting up a worker environment on Elastic Beanstalk and using SQS as our Active Job queue, using the active-elastic-job Gem. We start by creating a new queue in our AWS account via Simple Queue Service. Then, we provide our Elastic Beanstalk environments access to the queue and add an AWS_REGION environment variable. We proceed to creating and configuring our worker environment. In our Rails app, we instruct Active Job to use our active-elastic-job queue adapter and create an Active Job. Finally, we deploy our changes to both the web and worker environments, ensuring our ActiveJobs run successfully.

Related Videos

The Hacker News Effect - The Website Didn't Catch Fire - Let's look at the traffic - Witness the Hacker News effect in action as the author's blog skyrocketed to popularity, easily handling massive traffic thanks to efficient hosting and Cloudfront!
Bootlace Crimping - What?, Why?, How? - Learn about the benefits of using bootlace ferrules for stranded wires and how to easily crimp them for a secure connection in screw terminals.
Raspberry Pi Hidden Settings - Setup Hostname, SSH and WiFi from the Pi Imager Application. - Uncover a hidden screen in the Raspberry Pi Imager Application to easily set up SSH, WiFi, and hostnames for your device without creating additional files. Just press Ctrl+Shift+X!
AR Sudoku Solver in Your Browser: TensorFlow & Image Processing Magic - Discover how to recreate a Sudoku app using browser APIs and ecosystem advancements, and explore the image processing pipeline technique for extracting Sudoku puzzles and solving them.
You Need Arduino GitHub Actions - Learn how to add GitHub badges to your Arduino projects, improving project visibility and attracting contributors. Set up automated build checks with GitHub Actions to prevent broken code merges.
HELP SUPPORT MY WORK: If you're feeling flush then please stop by Patreon Or you can make a one off donation via ko-fi
Want to keep up to date with the latest posts and videos? Subscribe to the newsletter
Blog Logo

Chris Greening


Published

> Image

atomic14

A collection of slightly mad projects, instructive/educational videos, and generally interesting stuff. Building projects around the Arduino and ESP32 platforms - we'll be exploring AI, Computer Vision, Audio, 3D Printing - it may get a bit eclectic...

View All Posts