View All Posts
read
Want to keep up to date with the latest posts and videos? Subscribe to the newsletter
HELP SUPPORT MY WORK: If you're feeling flush then please stop by Patreon Or you can make a one off donation via ko-fi
#BQ25570 #DEEP SLEEP MODE #DIY PROJECTS #ENERGY EFFICIENCY #ENERGY SCAVENGING #EPAPER DISPLAY #ESP32 #SOLAR POWER

A while back, I tried to power my Christmas lights using solar power, but it didn’t work out as planned - there simply wasn’t enough daylight (and more importantly sunlight) to charge up the battery.

Undeterred, I decided to see if I could power my low-energy ePaper weather display using the not-so-strong Scottish winter sun. The weather display is super energy-efficient, thanks to the ESP32’s deep sleep mode. With a 1000mAh battery, it can last up to 2-3 months without recharging. My goal? Extend that battery life even more with some solar power - maybe even keep it running indefinitely…

If you prefer to watch a video, you can do so here.

The Challenge

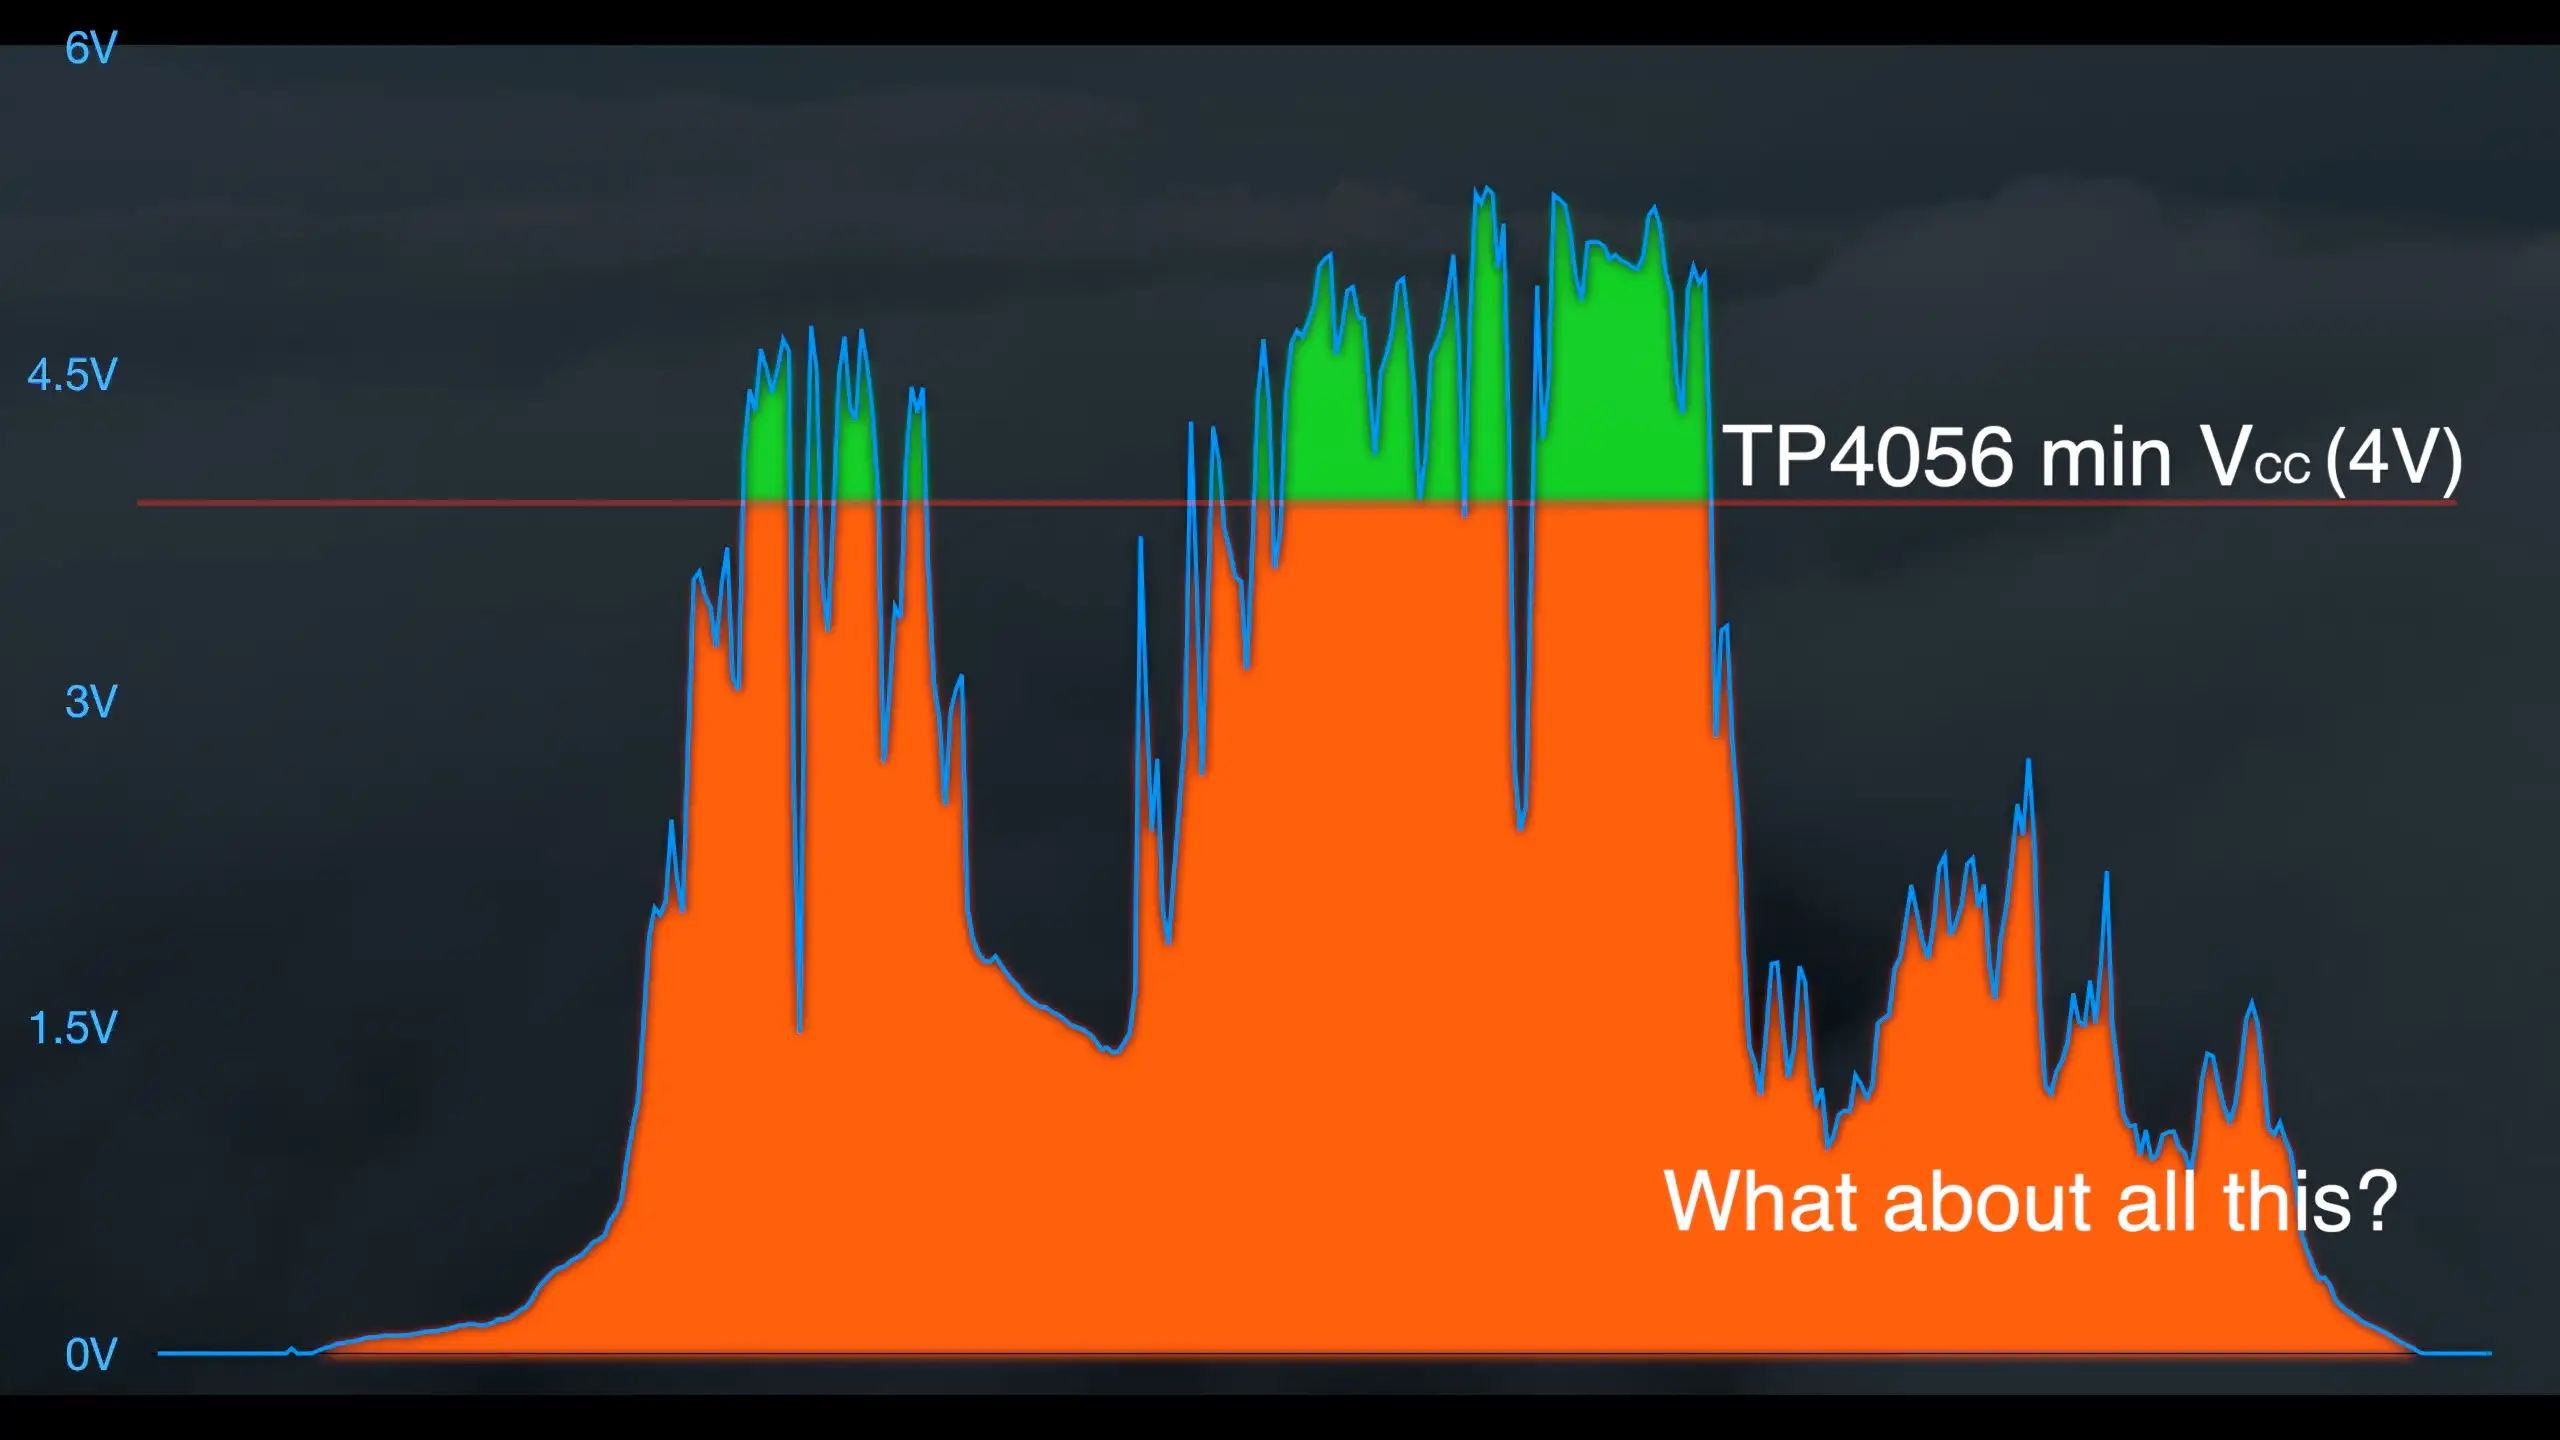
The biggest issue with solar power up here in Scotland is the short days and weak sun. When I was playing with solar power before it was very rare to get more than the 4 volts that the TP4056 charging board needs to run. And to actually fully charge a lithium cell, we would need more than 4.2 volts.

Available Power

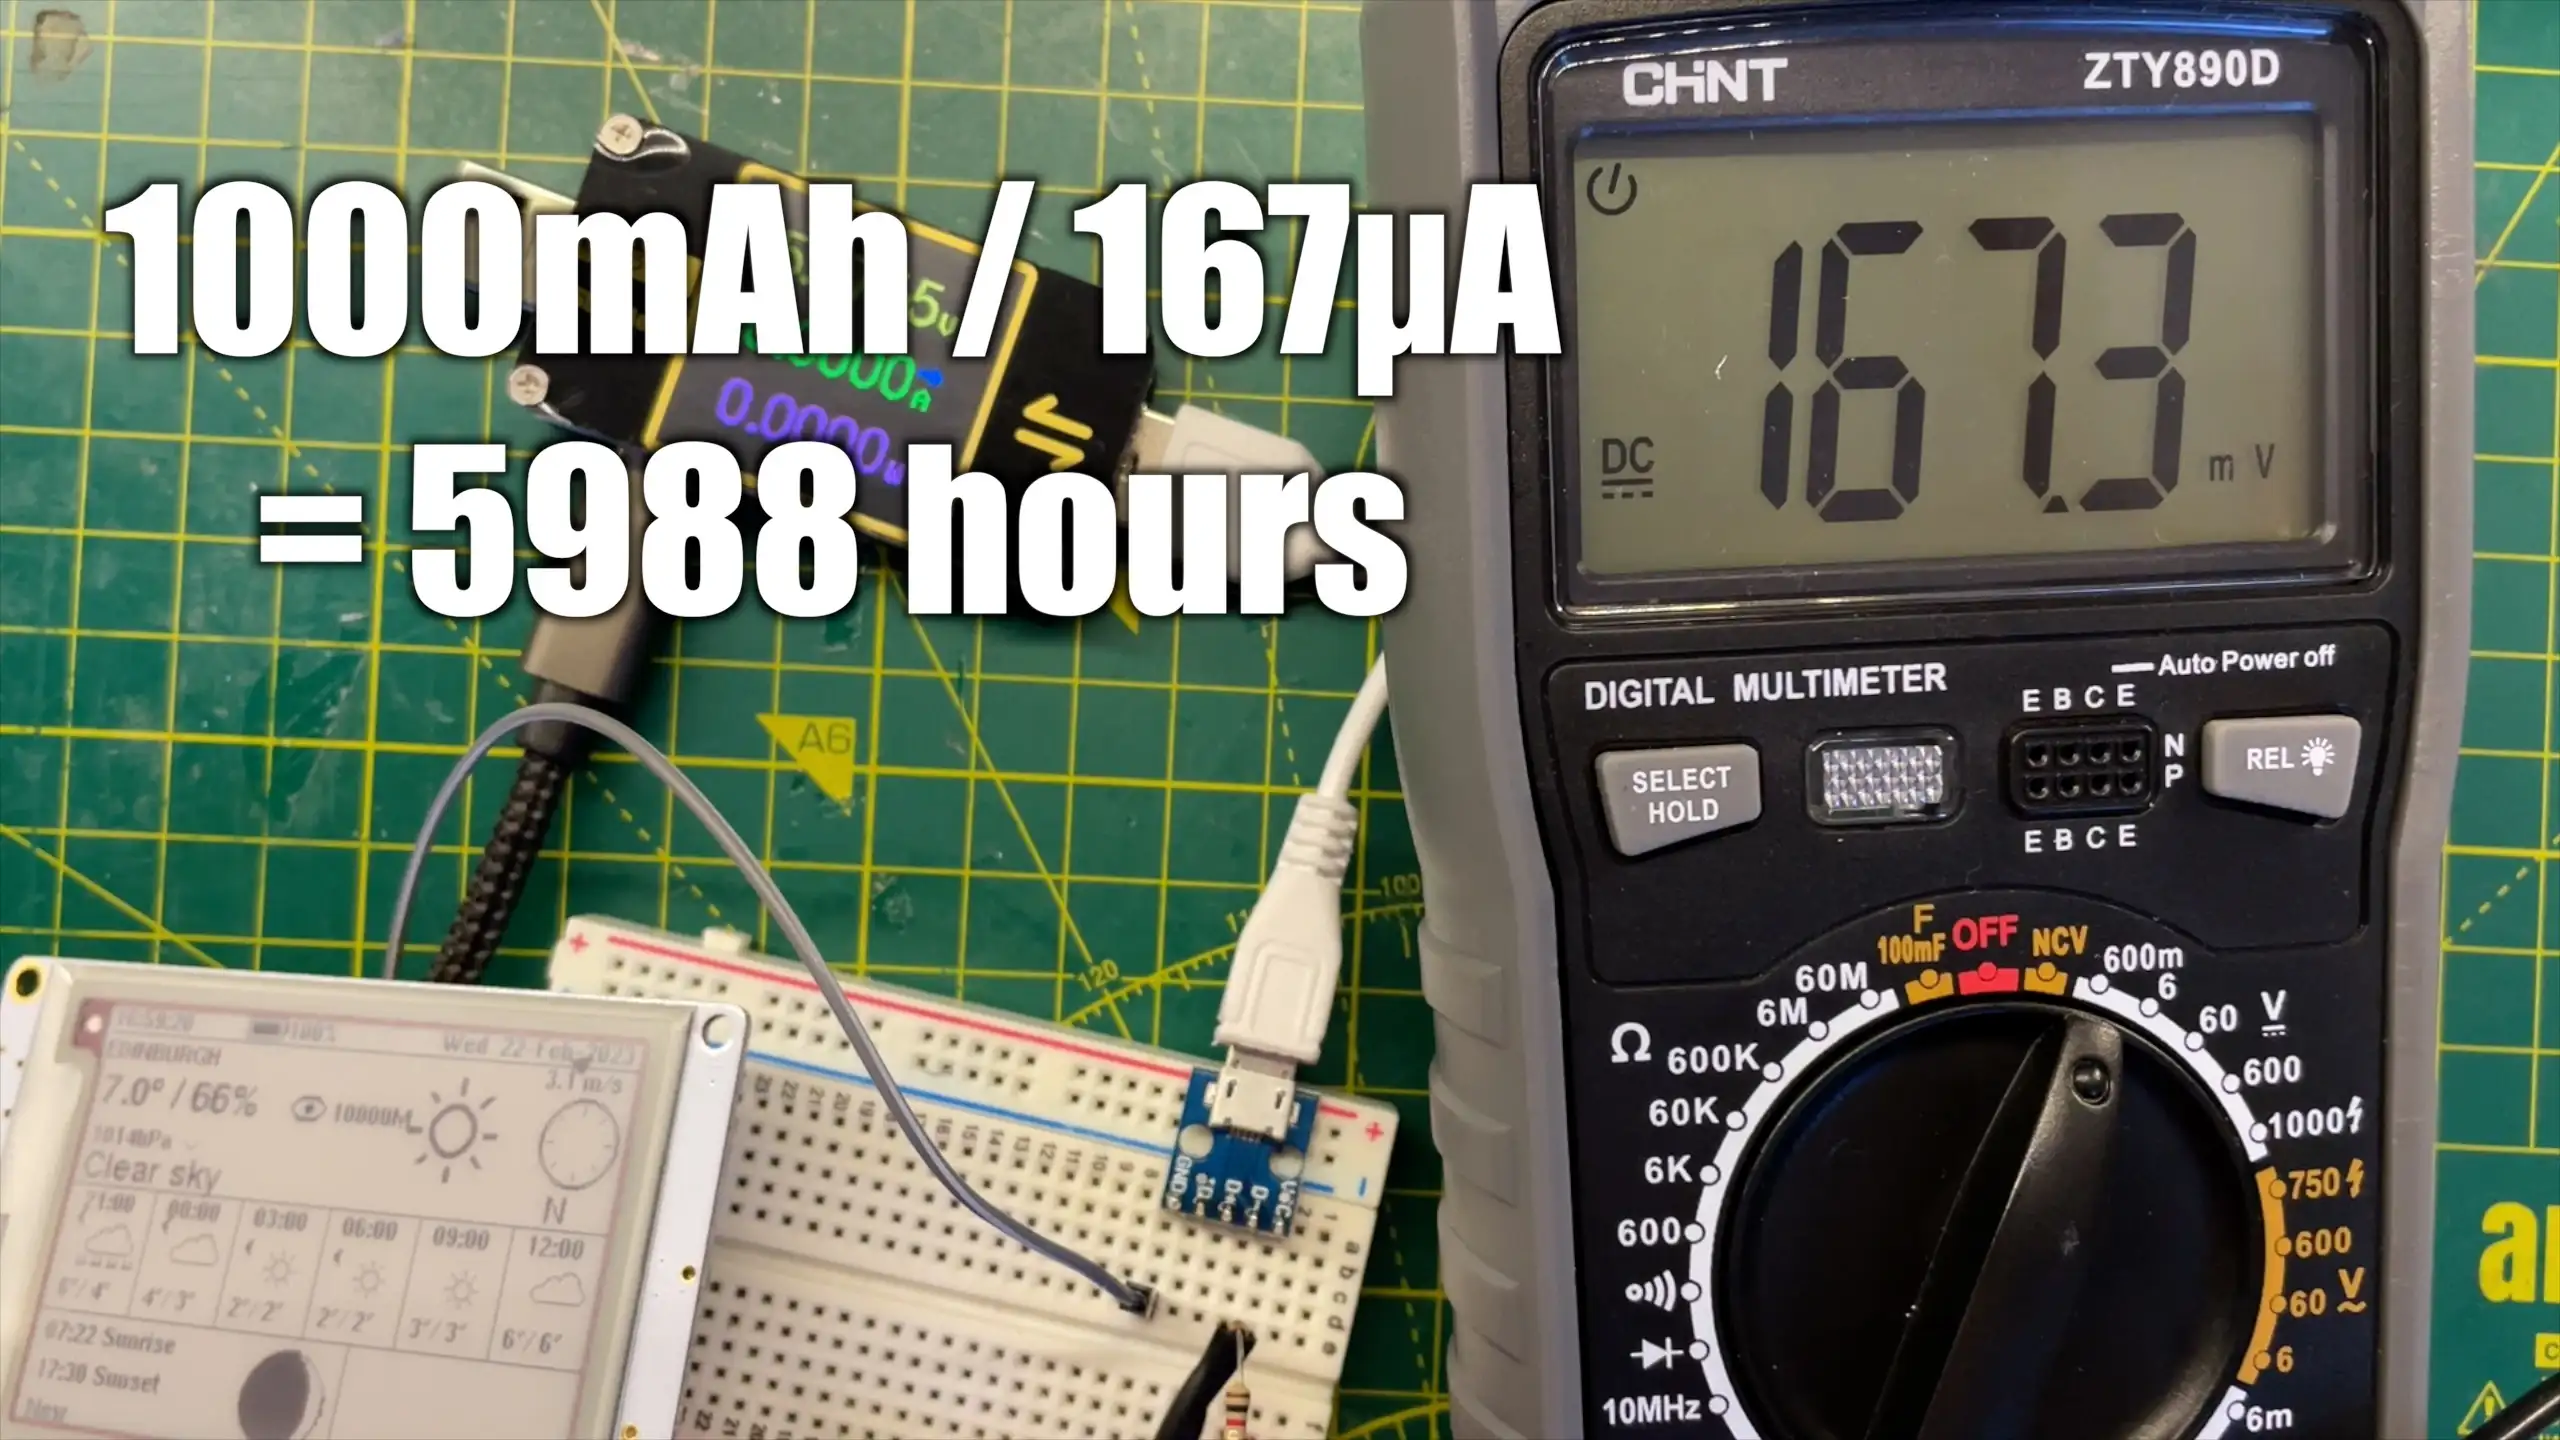
However, the ePaper weather display is amazingly power efficient. It spends almost all its time in deep sleep and the realy nice thing about ePaper displays is that they use zero power once the display has been set up. I measured the current draw of the weather display when it was in deep sleep and it was only 167uA. In theory the ESP32 can go down to 10uA so potentially there’s room for improvement here.

Power Usage

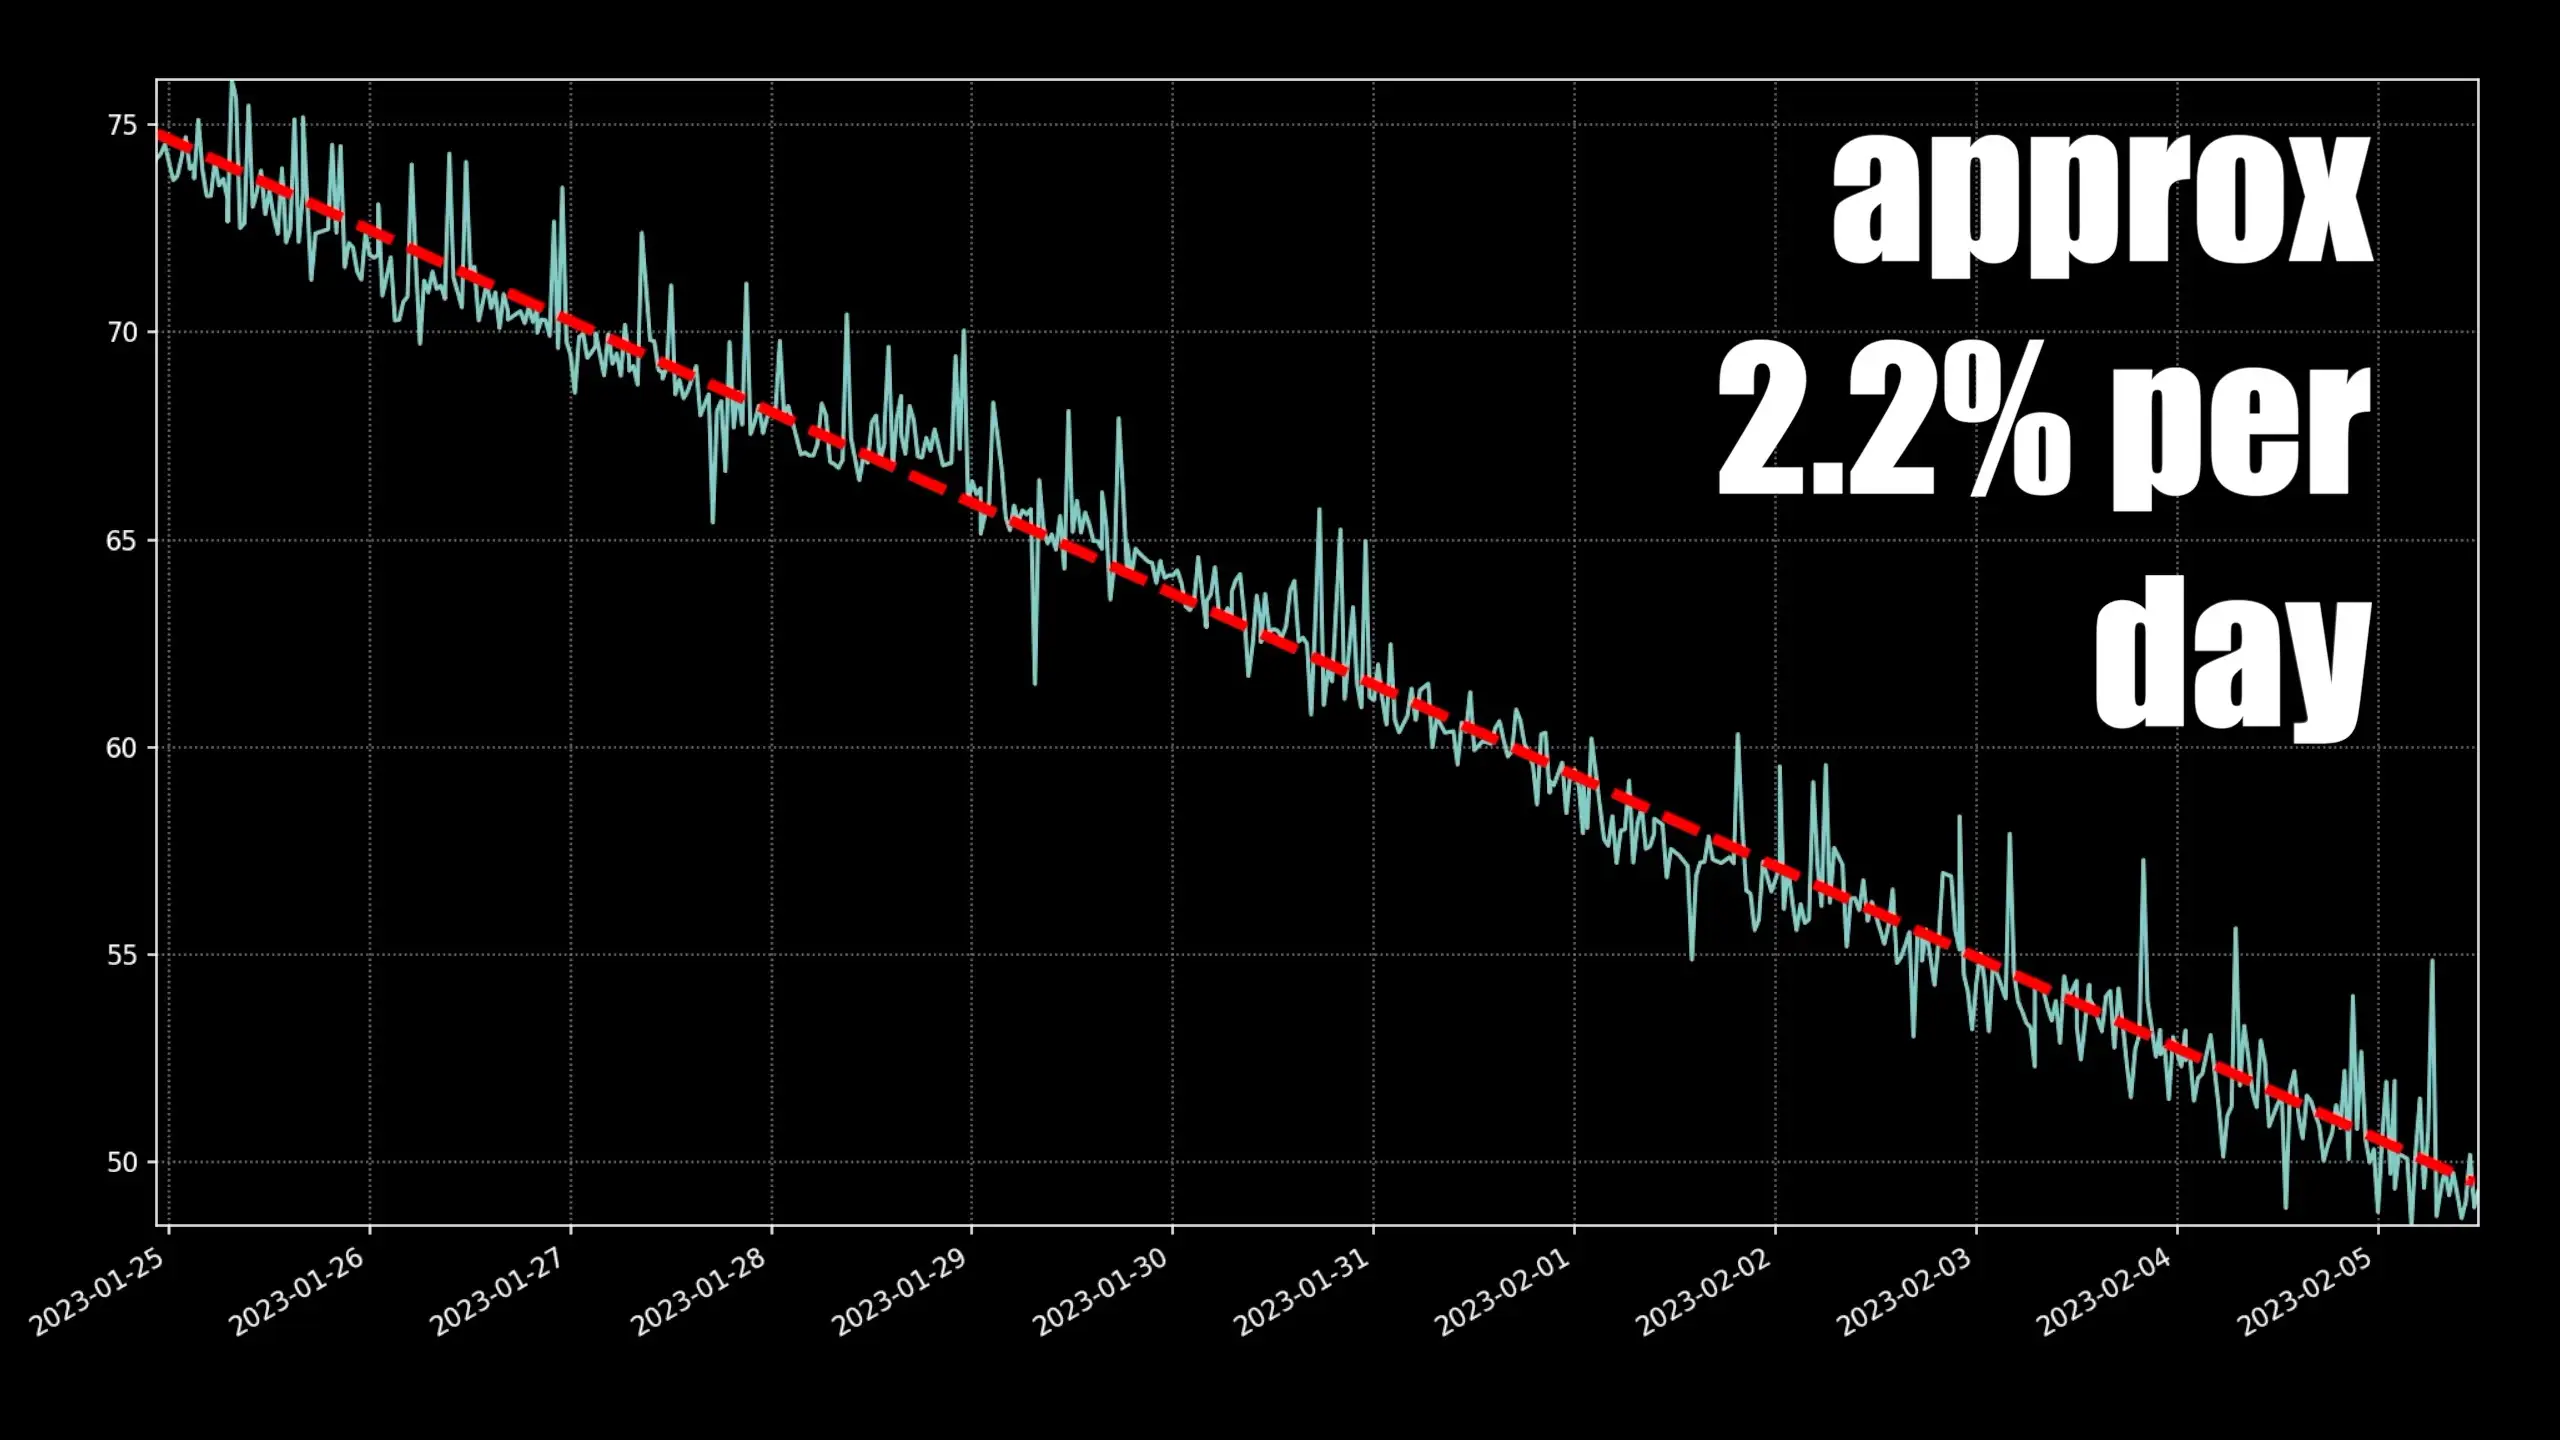
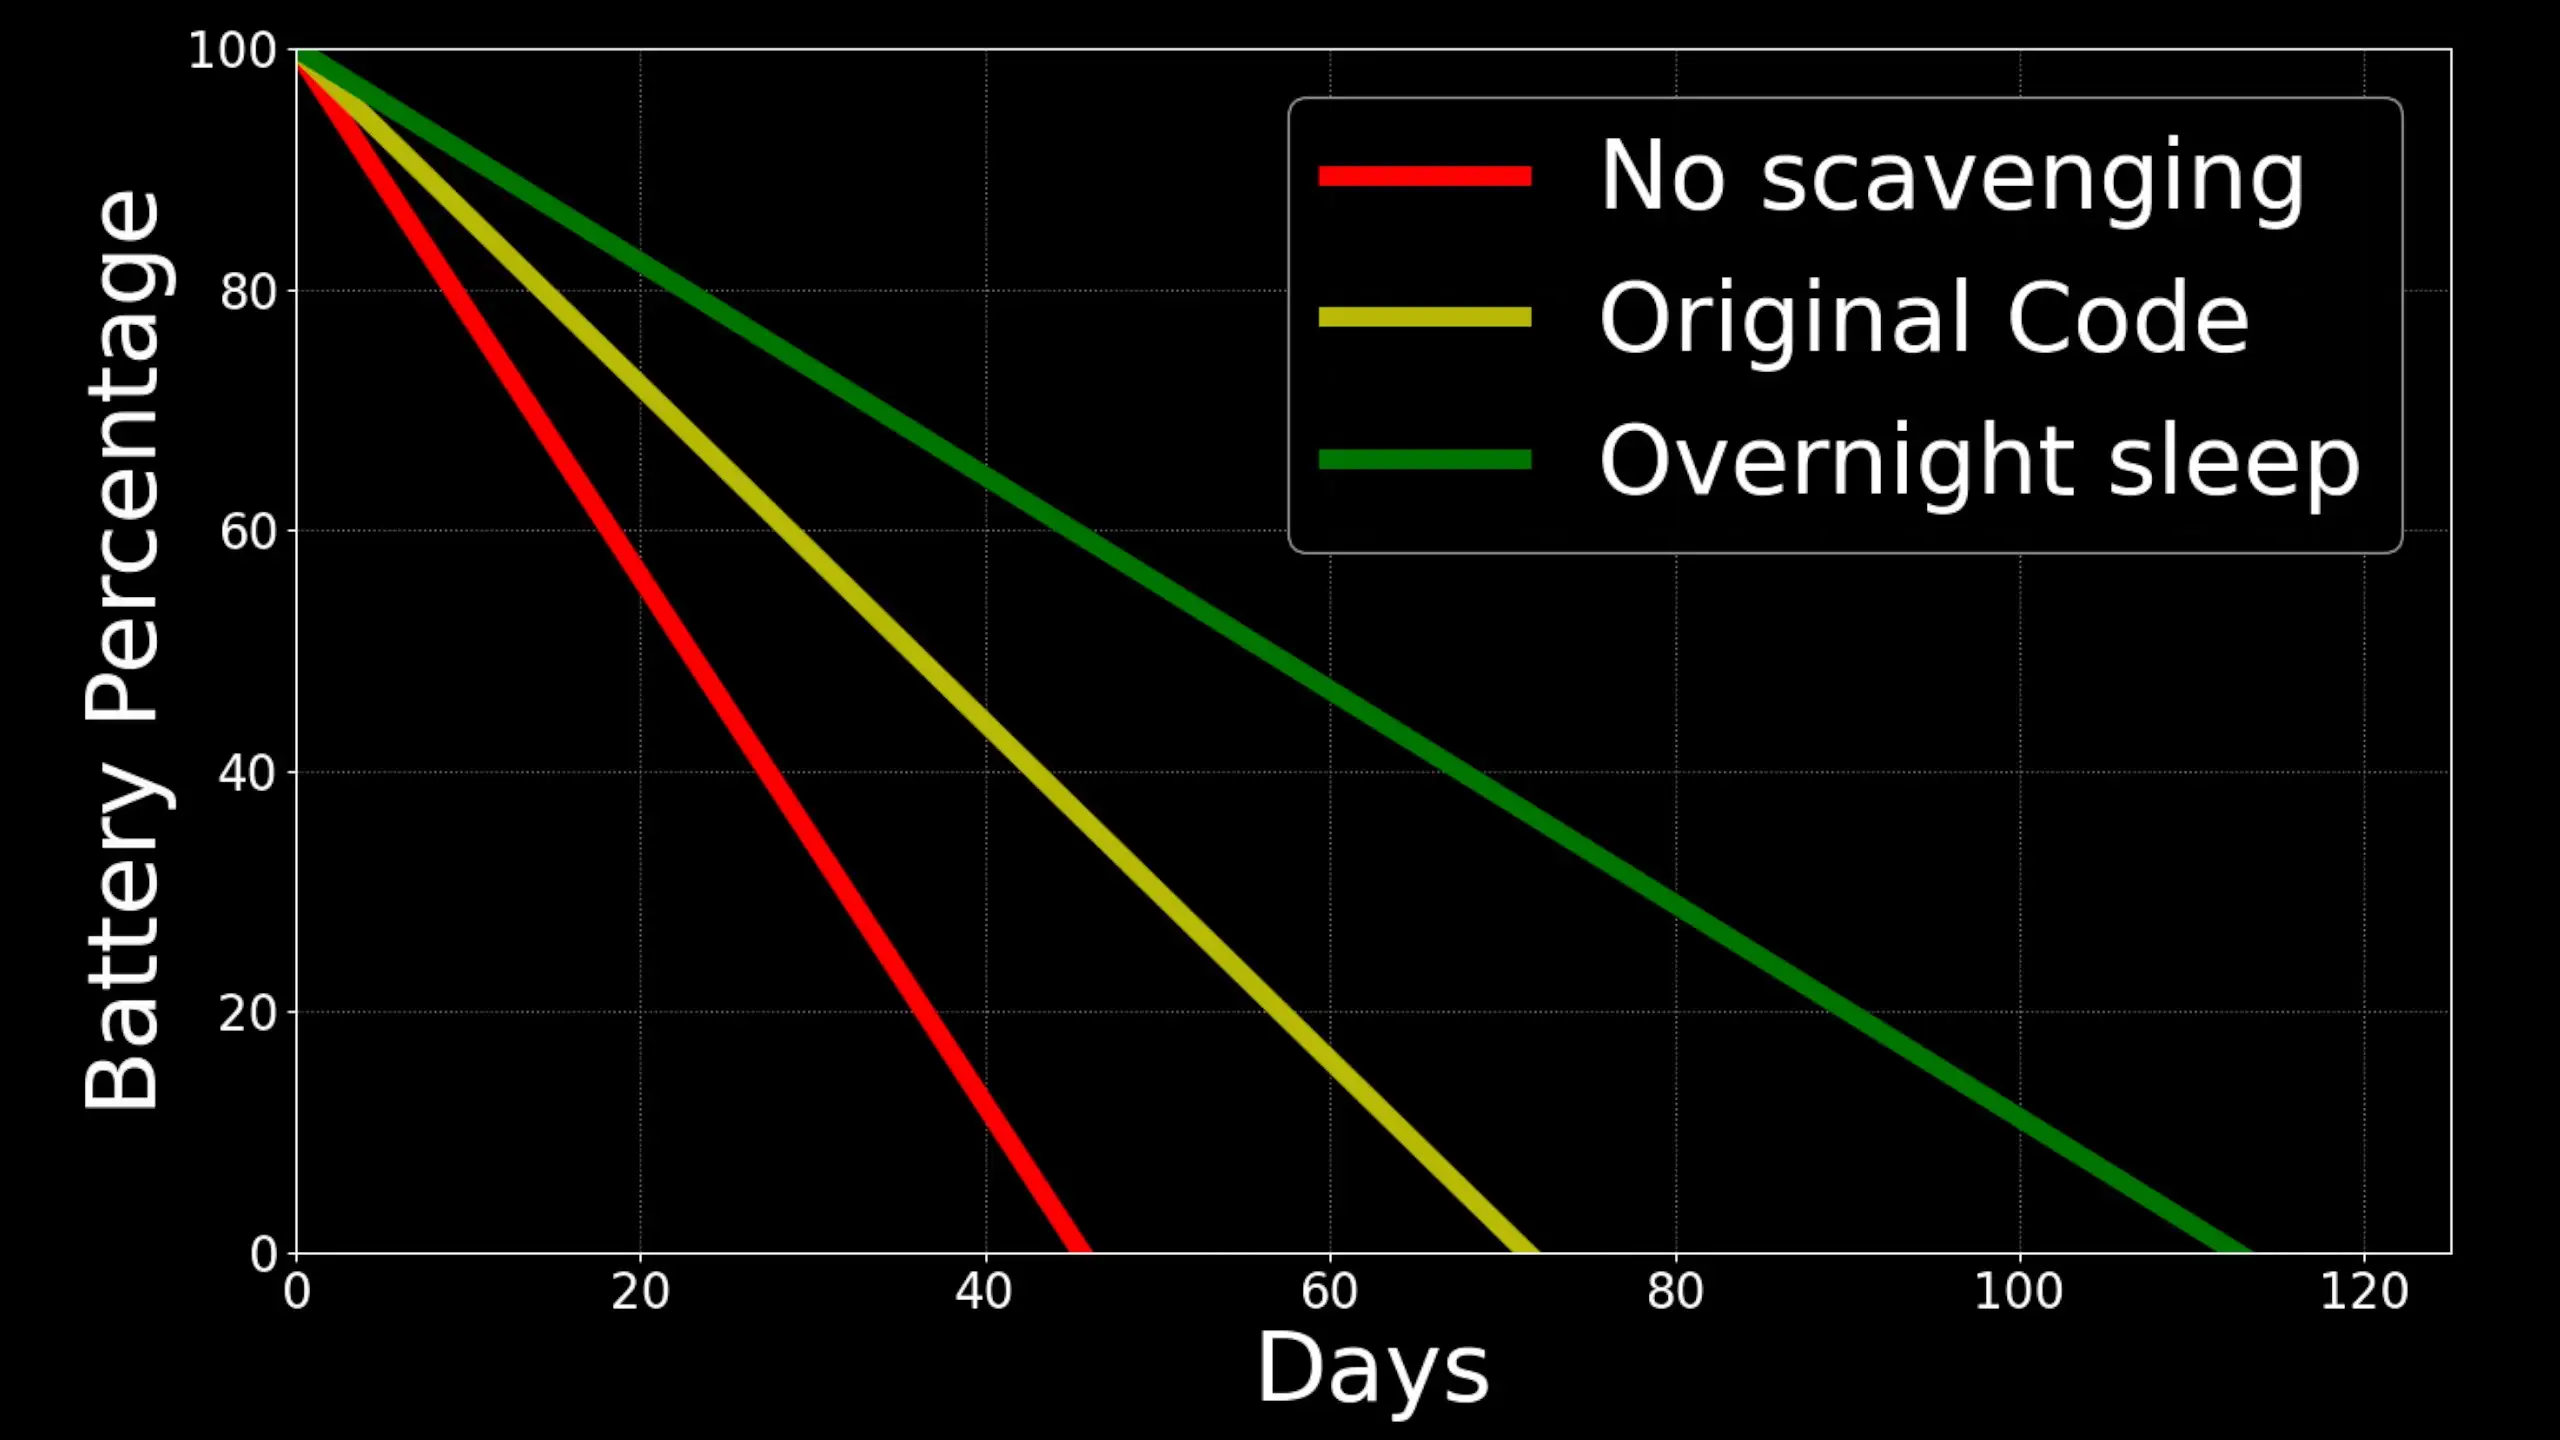
To get an idea of what I was dealing with I updated the code for the weather display so that it would send up the current battery level every time it woke up. This produced this slightly noisy graph. Looking at the slope the battery drains by about 2.2% every day.

Battery Drain

Playing with BQ25504 and BQ25570 Boards

To get the most from the solar cell, I decided to try a bit of energy scavenging. I tested two energy-harvesting boards from AliExpress, the BQ25504 and BQ25570, to see if they could help keep my battery happy.

BQ25504 and BQ25570

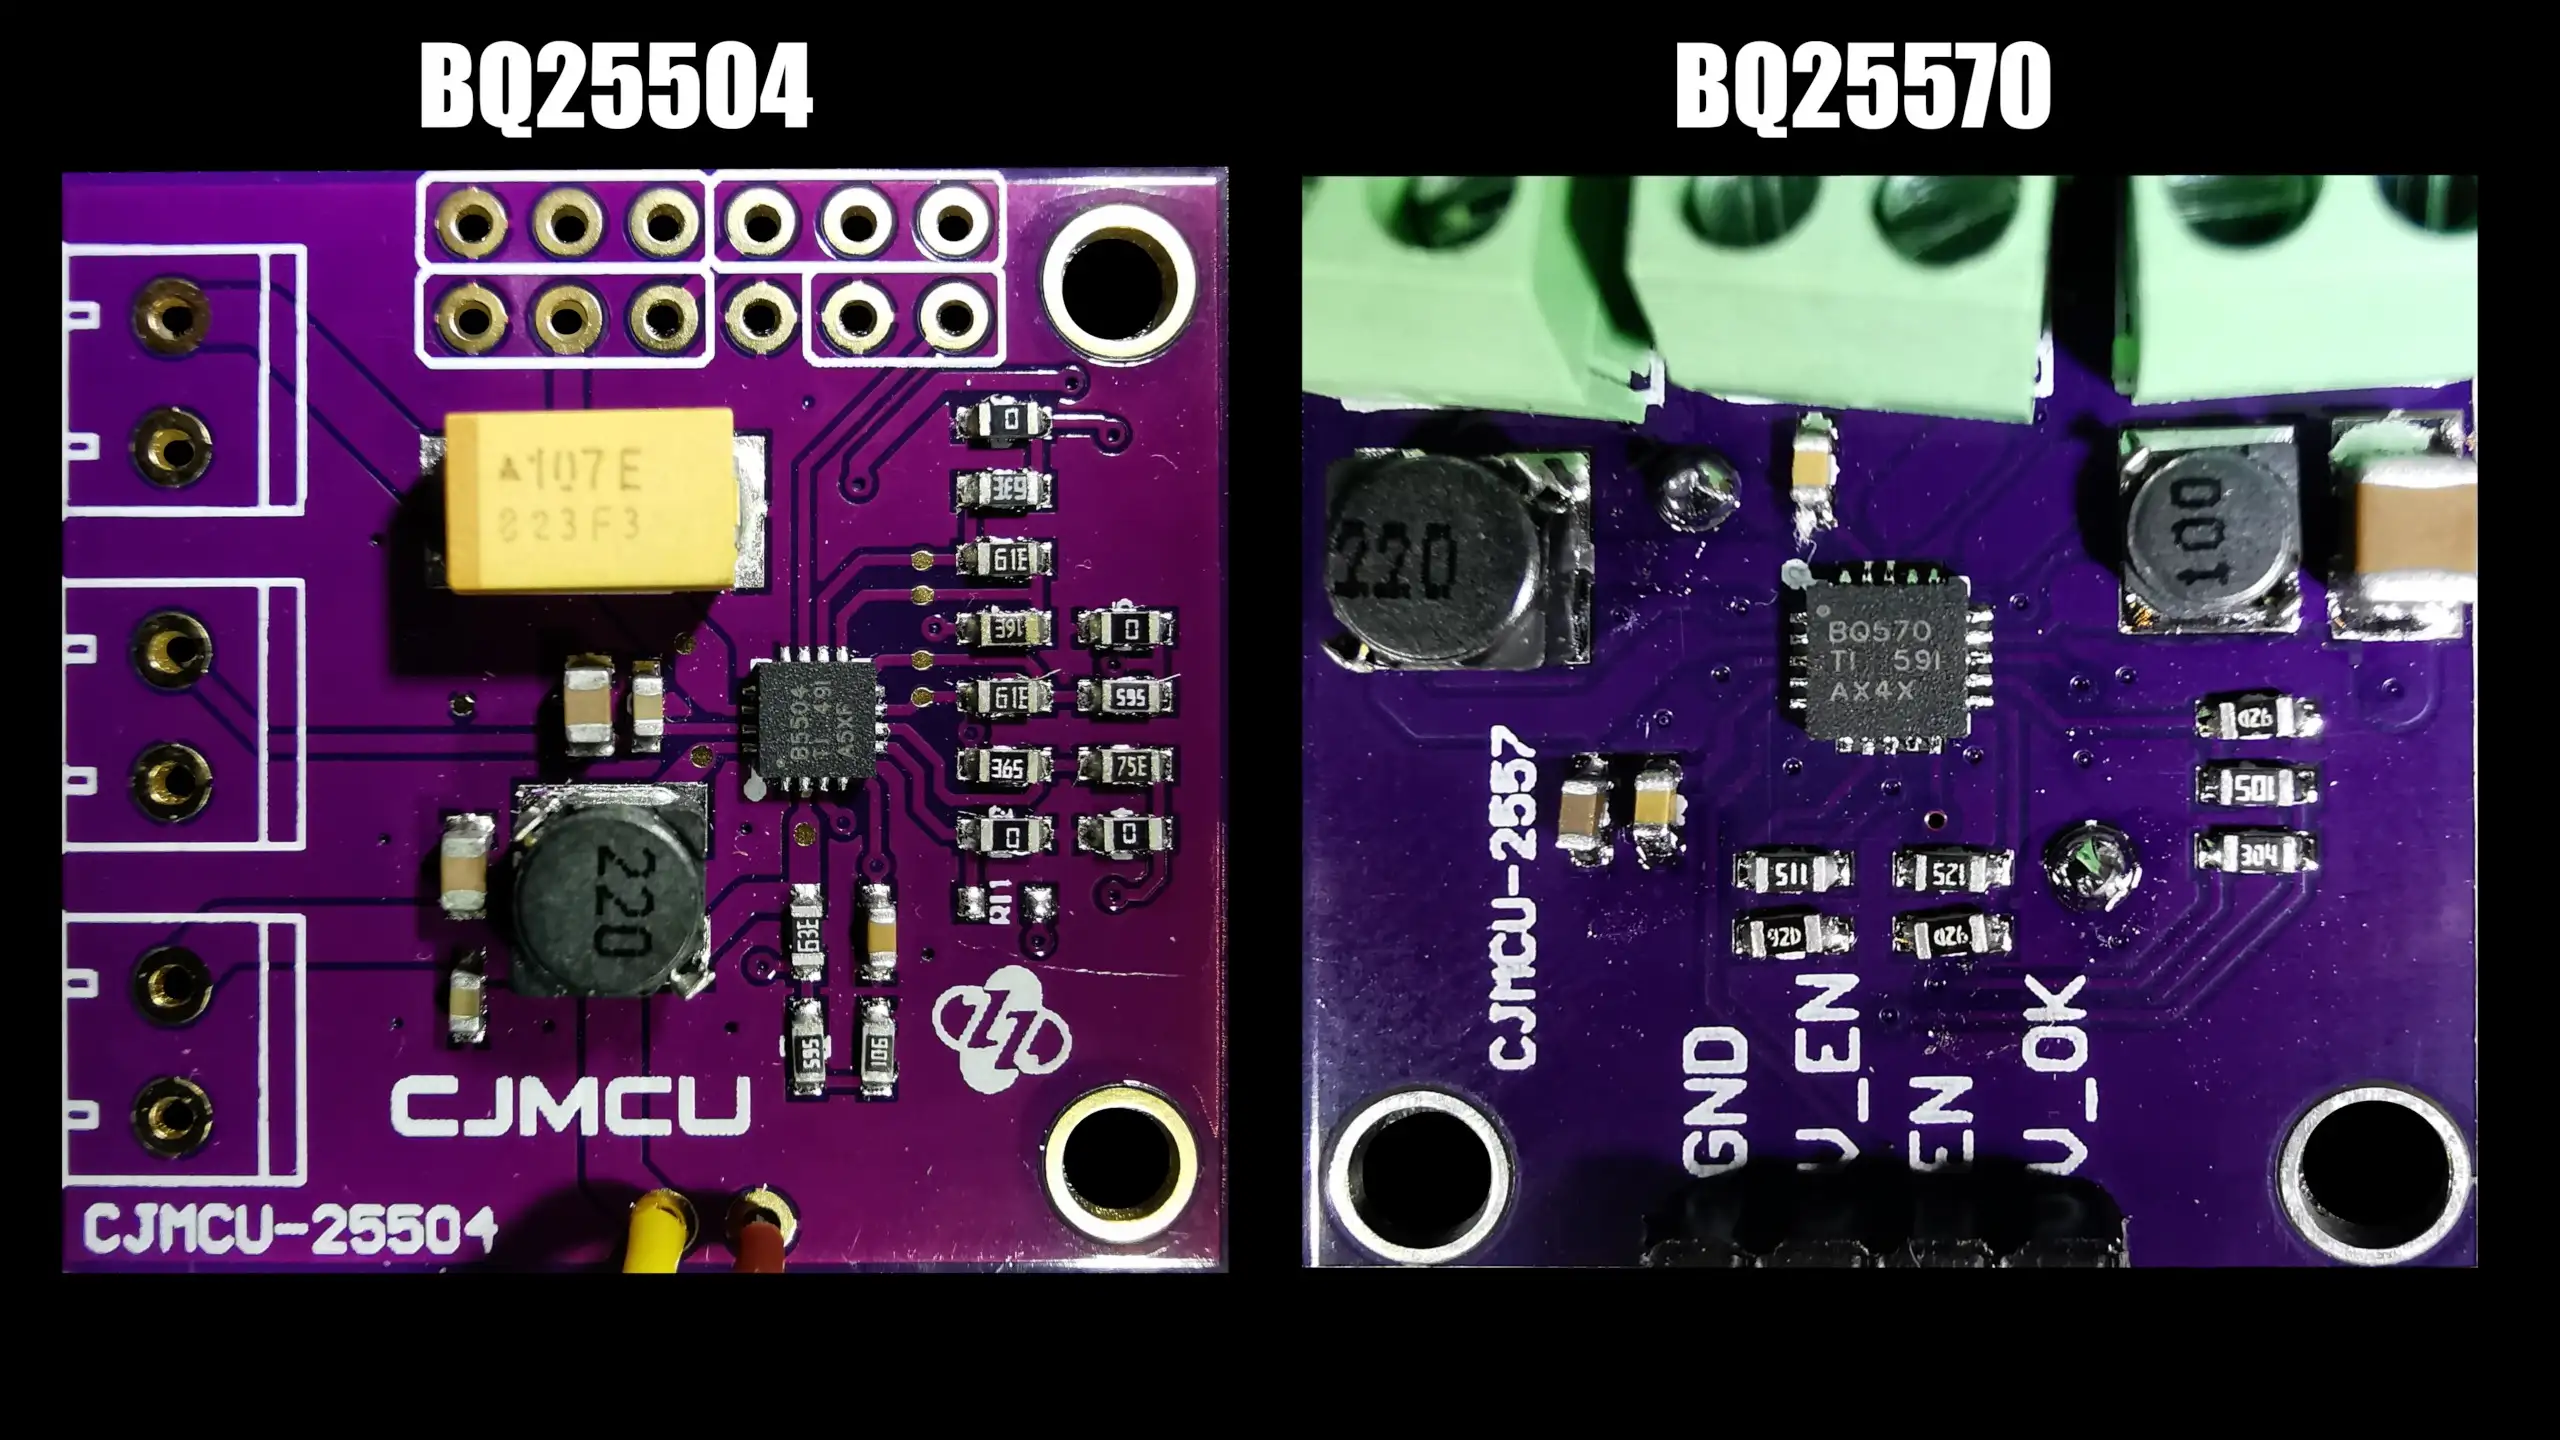
Initially I wanted to use the BQ25504 as it’s a bit simpler than the BQ25570 which includes a buck regulated output for powering the load. My initial experiments were pretty promising, even with the solar panel outputting quite a low voltage the board was able to charge up the built in capacitor to a much higher voltage. Unfortunately, it maxed out at 3.172 volts which is not enough to charge a lithium cell.

The maximum voltage is controlled by a couple of resistors on the board.

BQ25504 Schematic

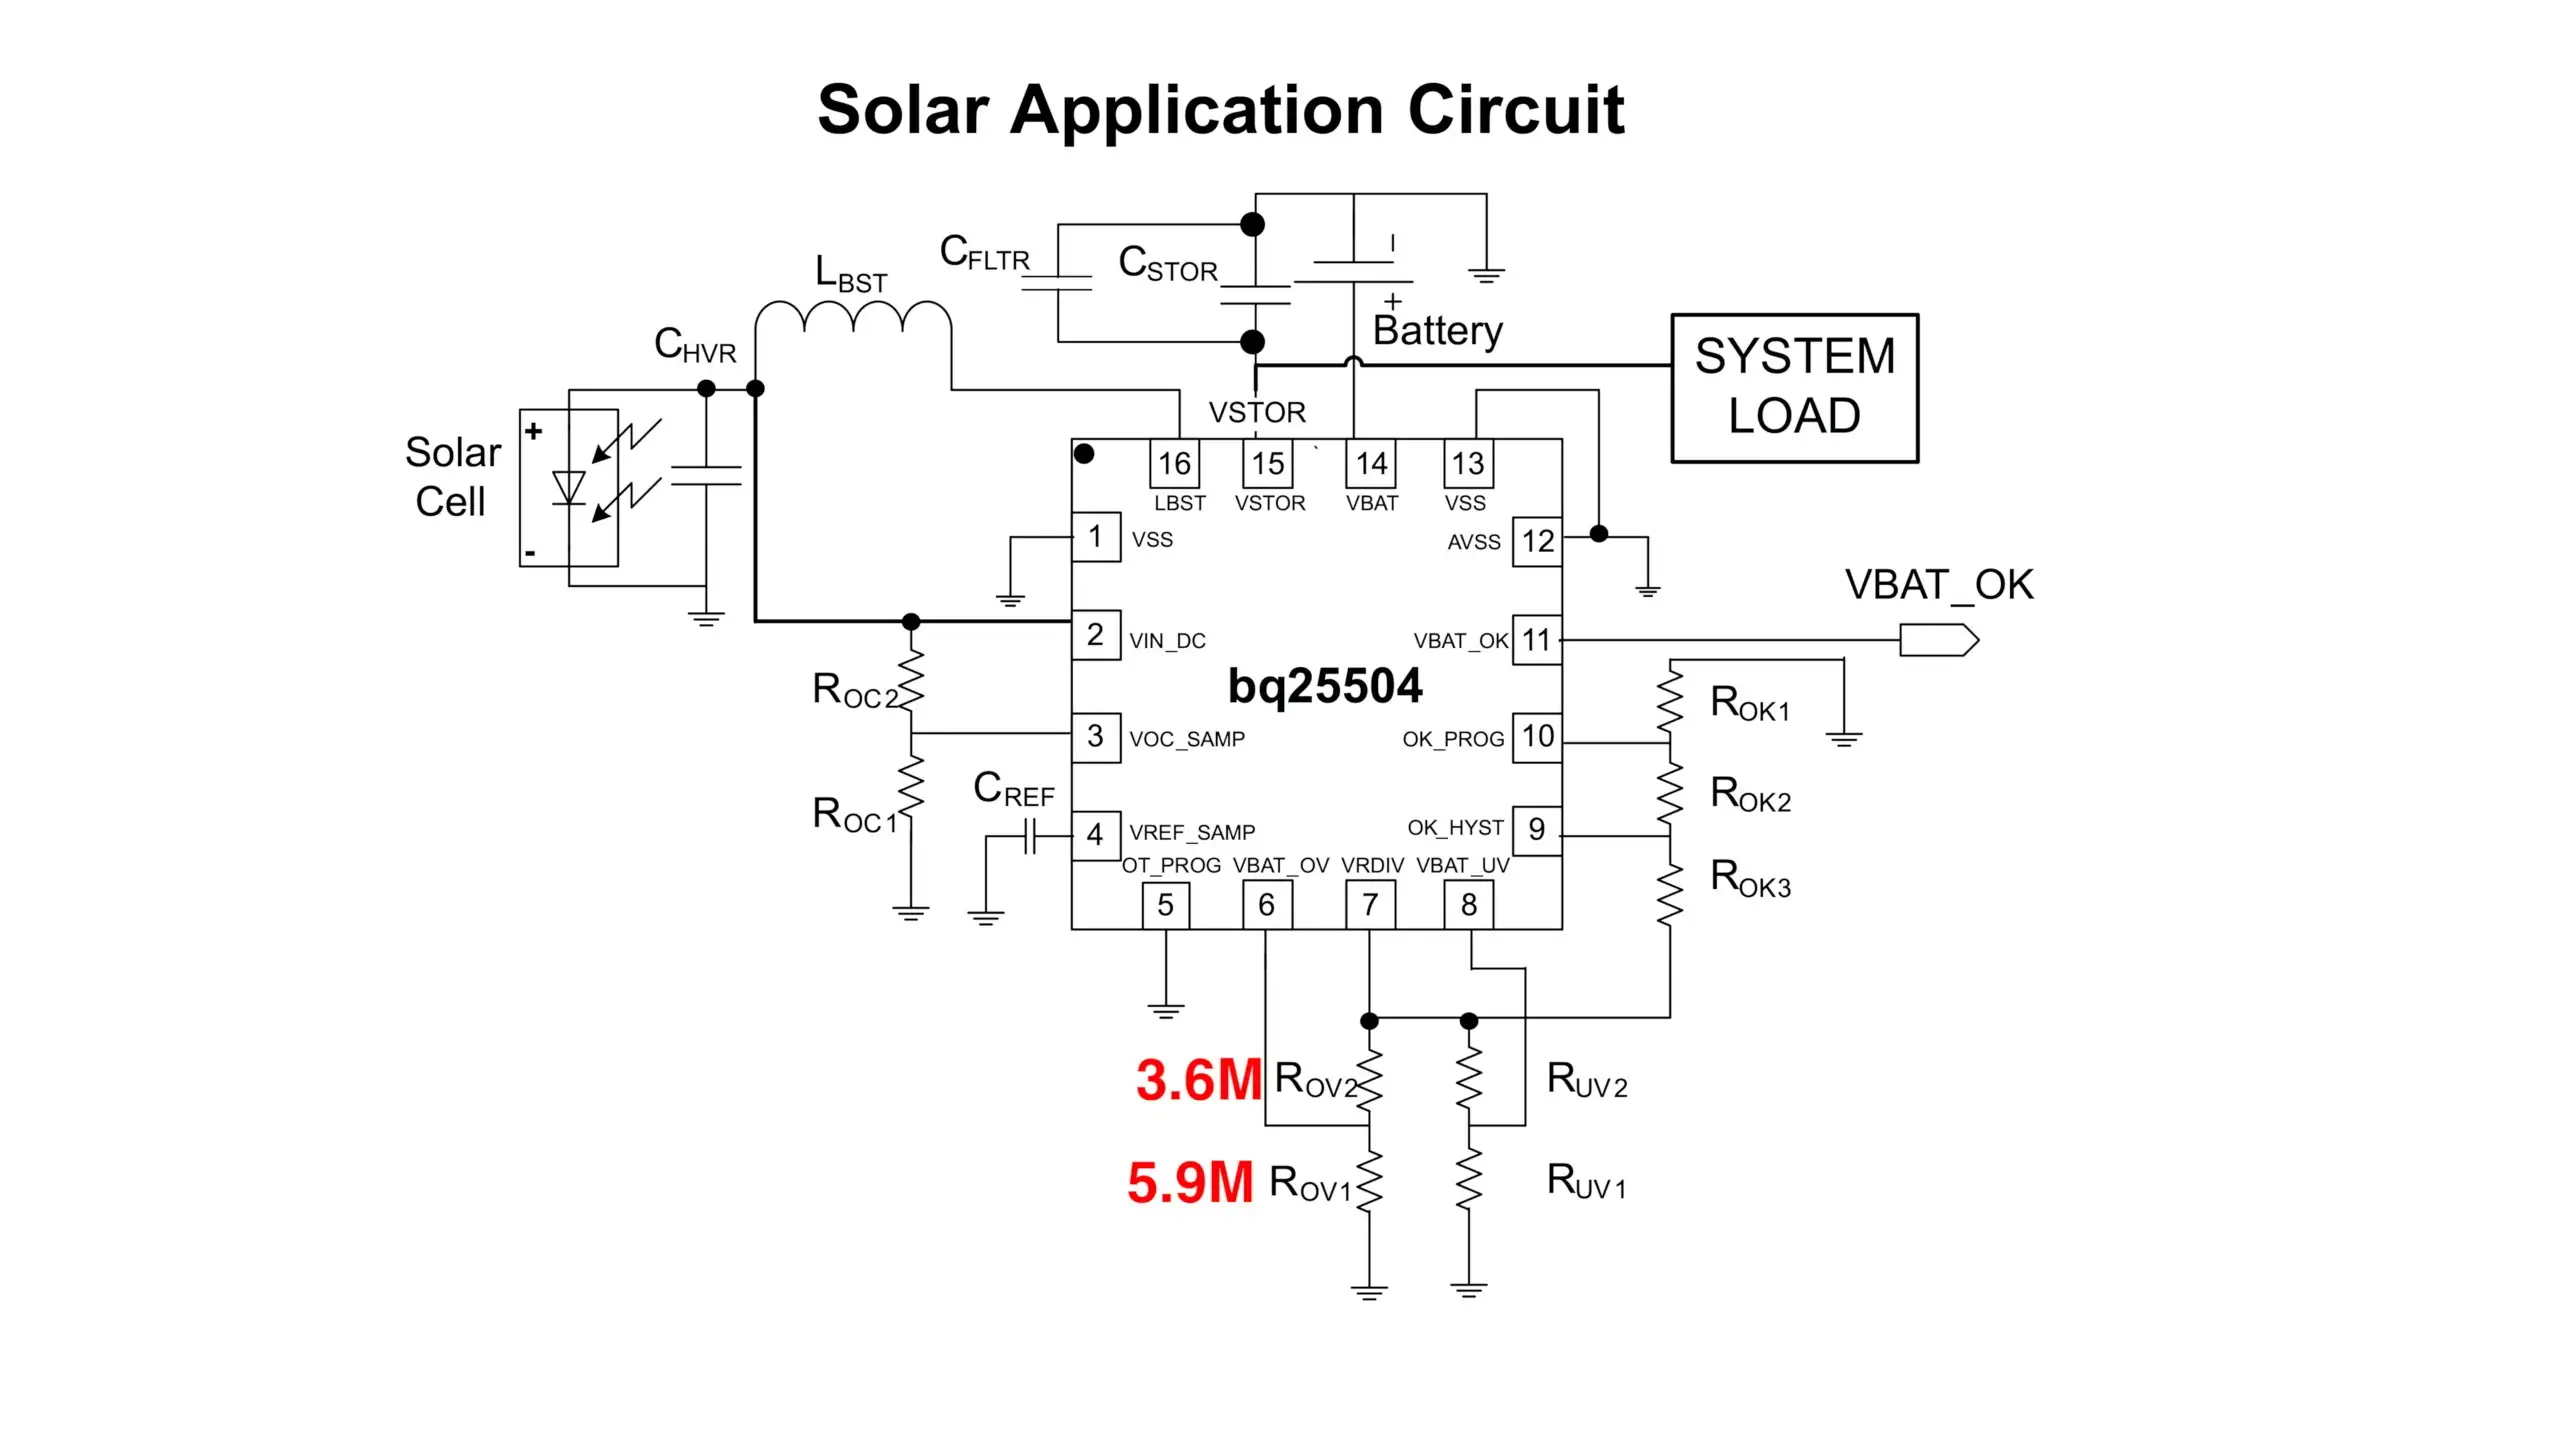
And can be worked out using the formula:

\[VBAT\_OV=\frac{3}{2}VBIAS\left(1+\frac{R_{OV2}}{R_{OV1}}\right)\]

Where VBIAS is typically 1.25 volts.

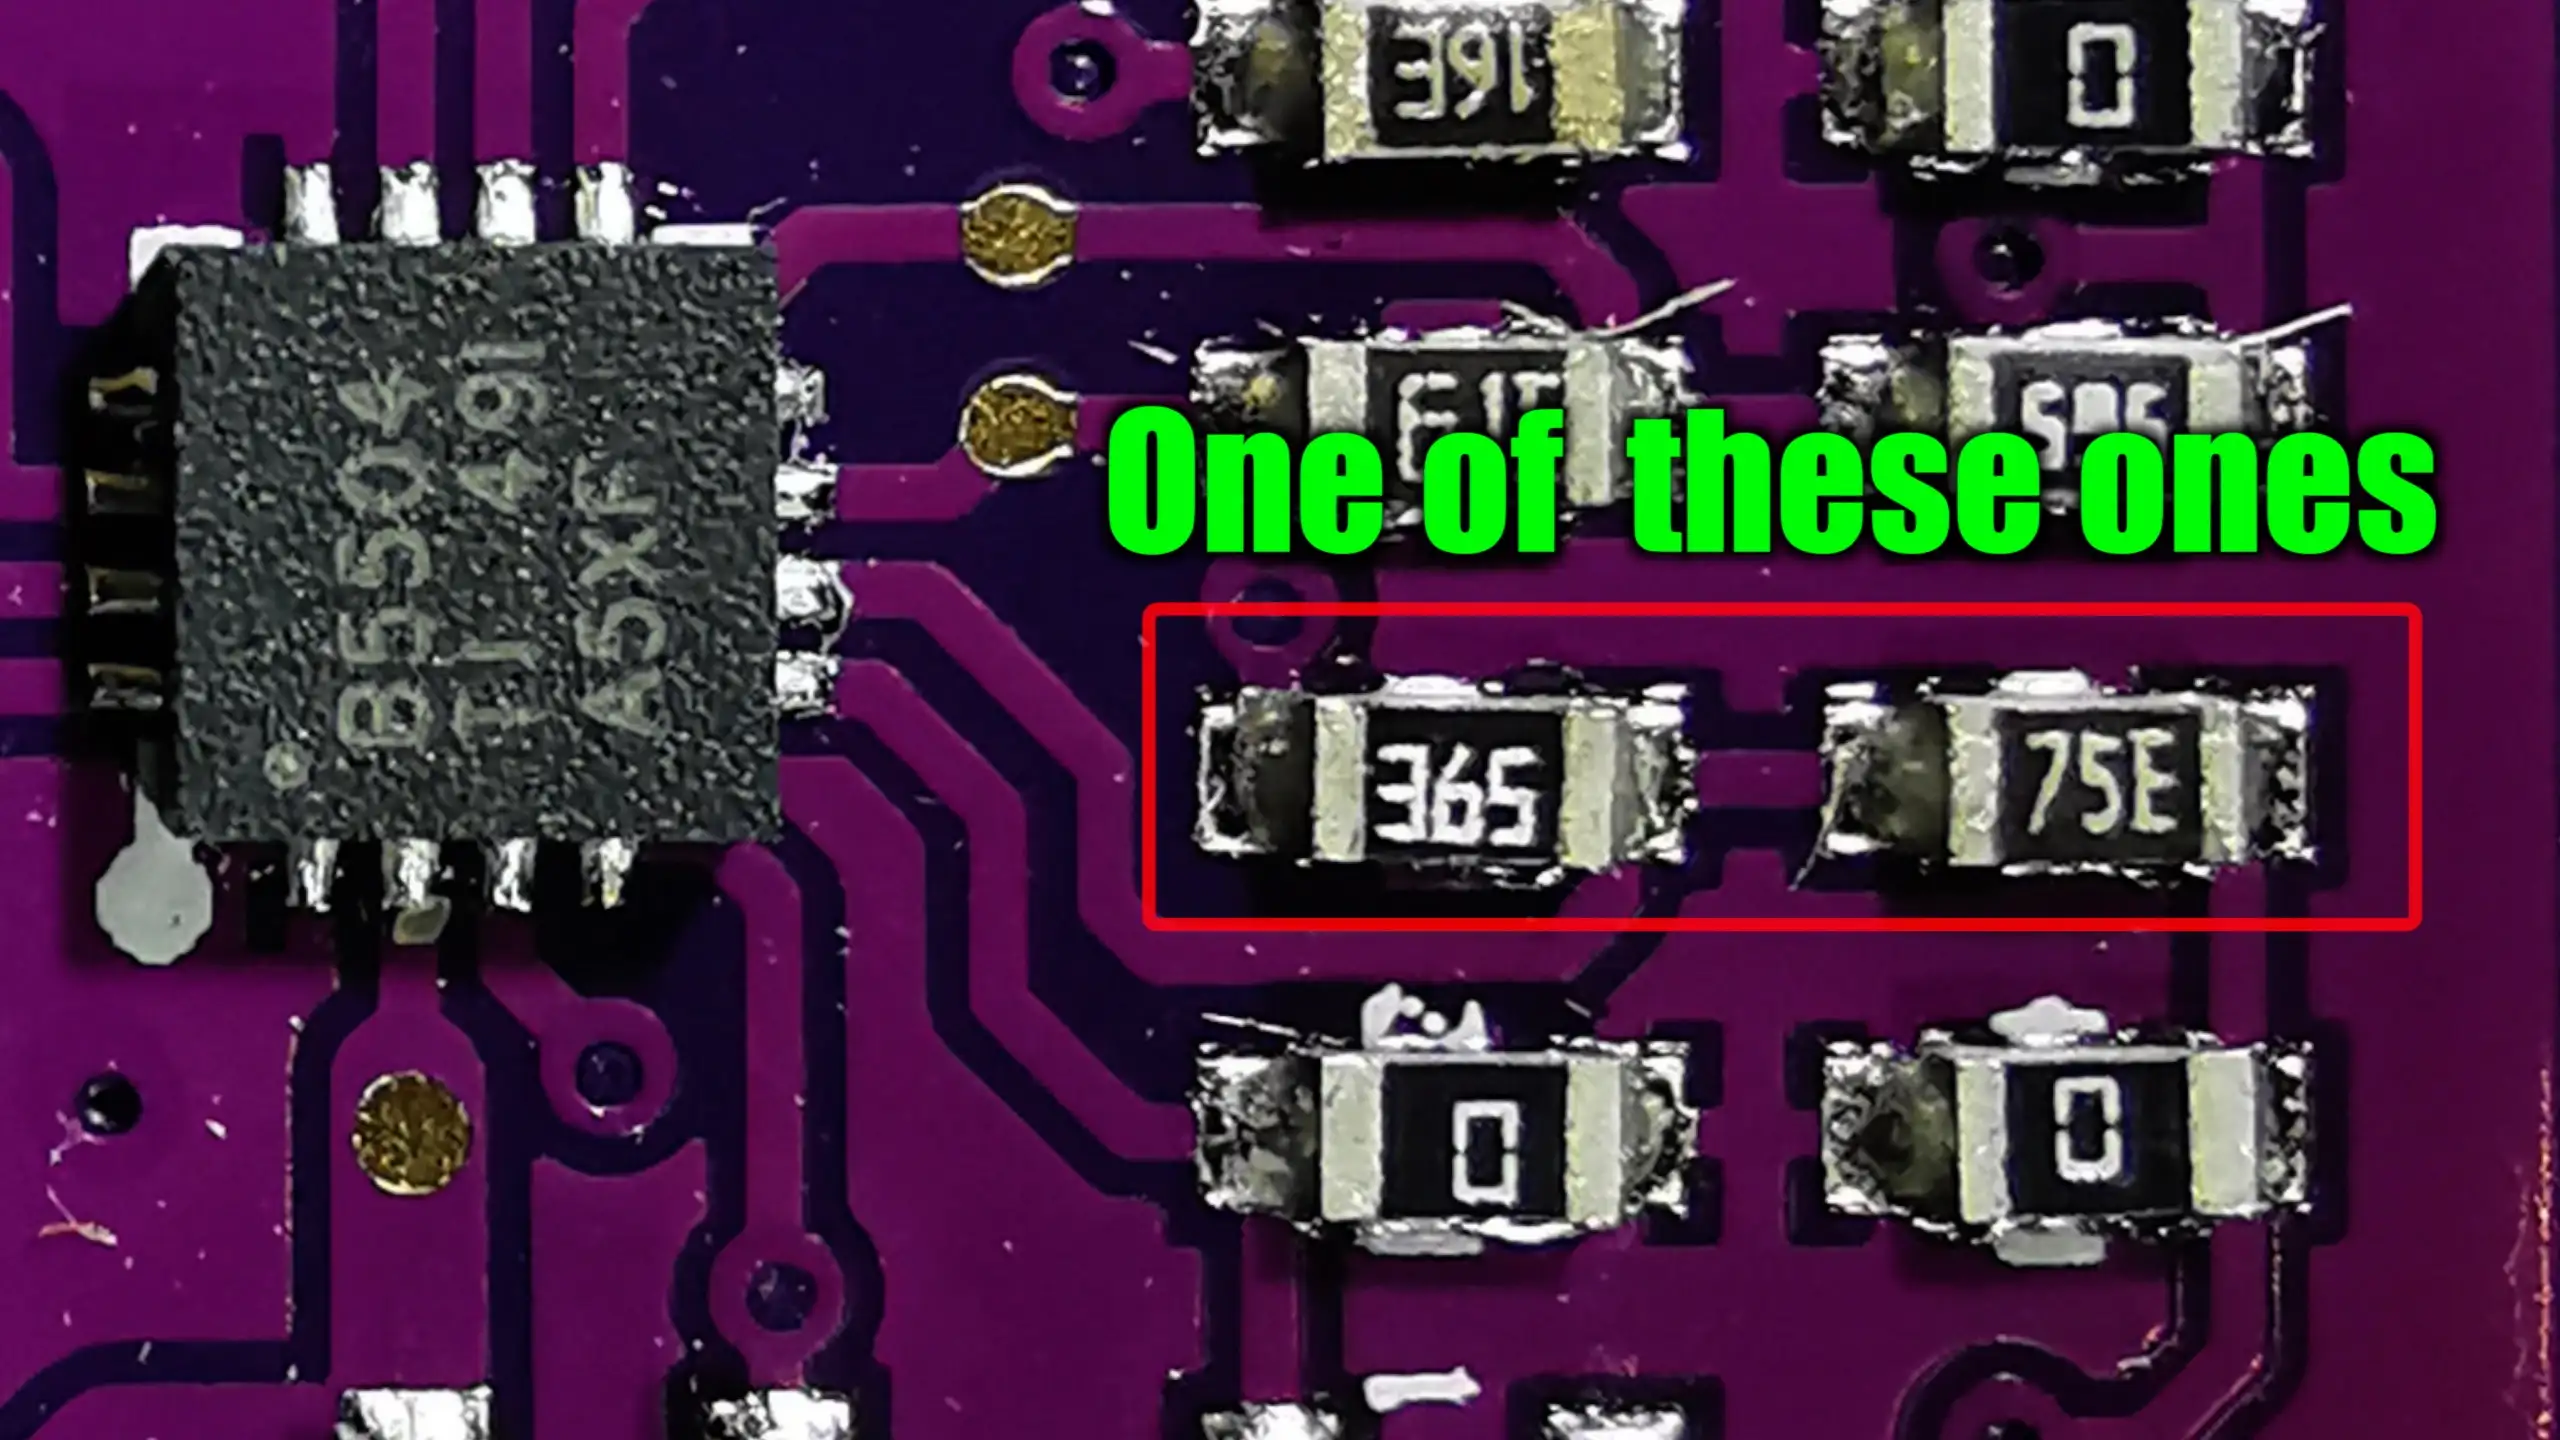
I could have changed the resistors on the board to get the correct output voltage - but honestly, life is a bit too short to be messing around with these tiny components.

BQ25504 Resistors

After looking at the BQ25570 board I found that it was already set up with the right voltage levels.

BQ@5570 Schematic

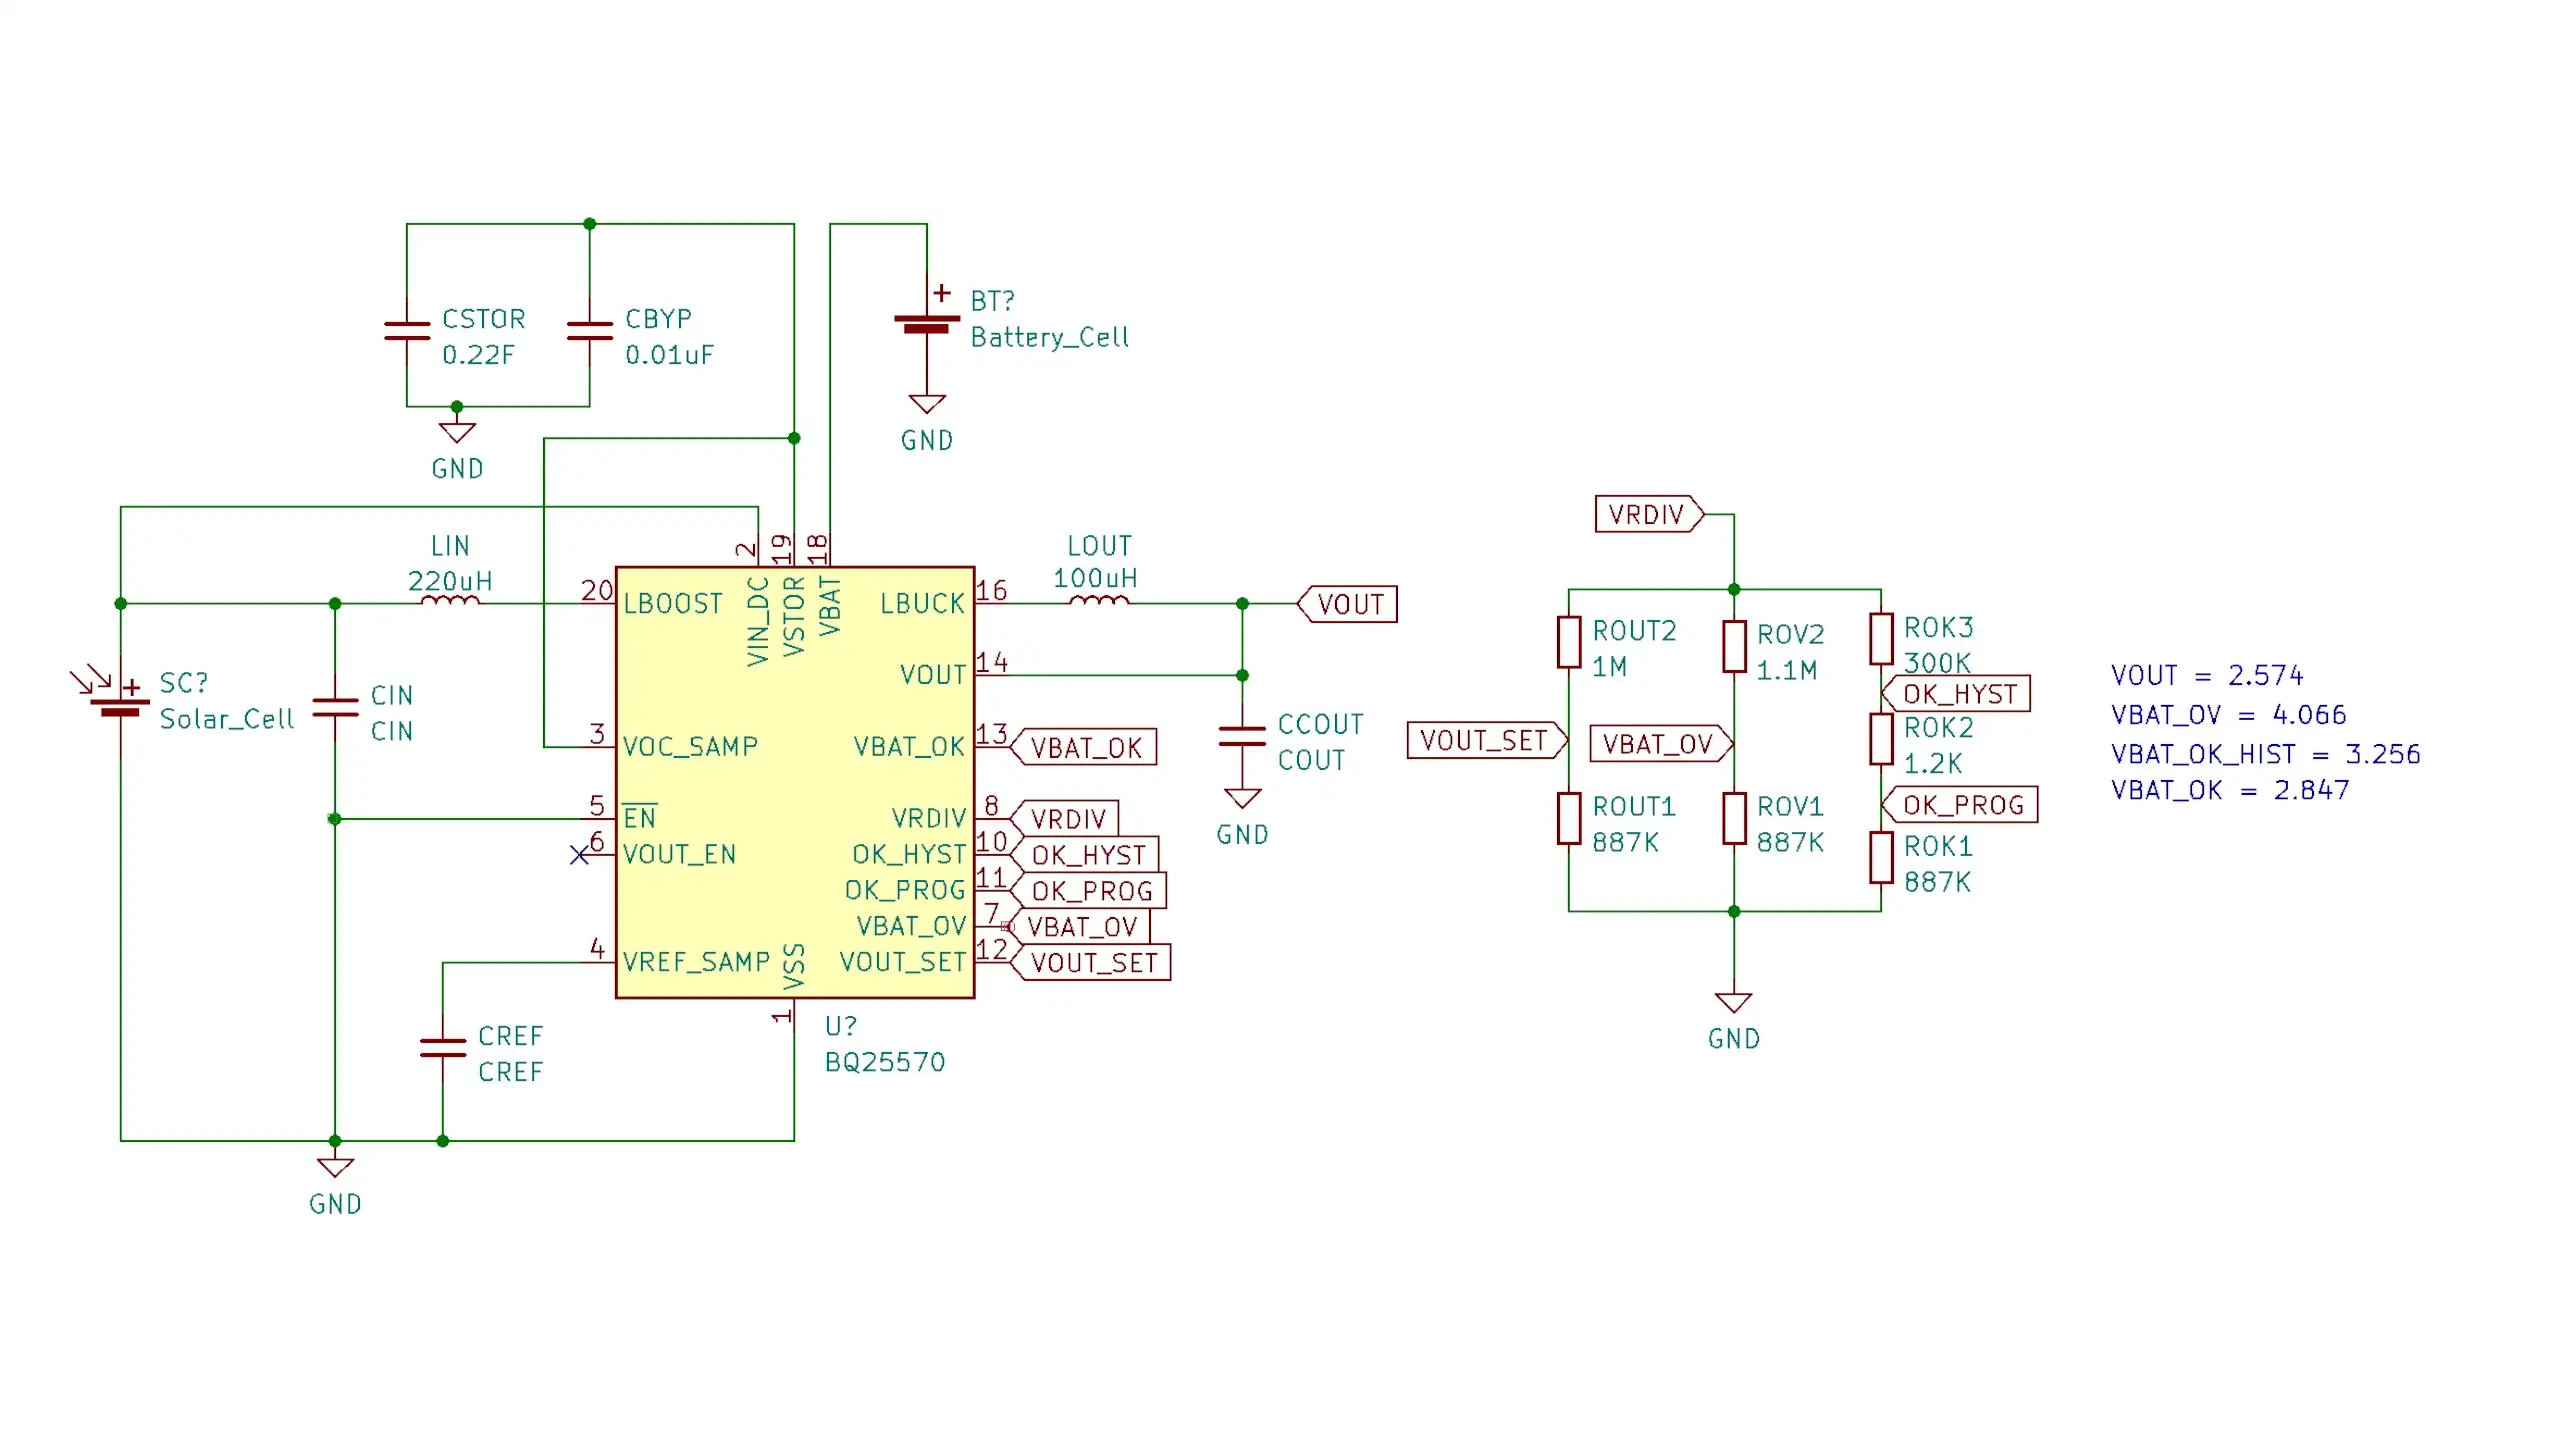
The BQ25570 board is a bit more complicated than the BQ25504, it includes a buck regulator that can be used to power the load - it’s quite nice as you can use the output of the VBAT_OK pin to enable and disable the buck regulator - so it will switch off the load if the battery voltage is too low. The buck regulator on my board was setup to output 2.5 volts. Initialy you might things this is too low to power an ESP32 which is typically run from 3.3 volts. But an ESP32 will actually run on anything between 2.3 and 3.6 volts.

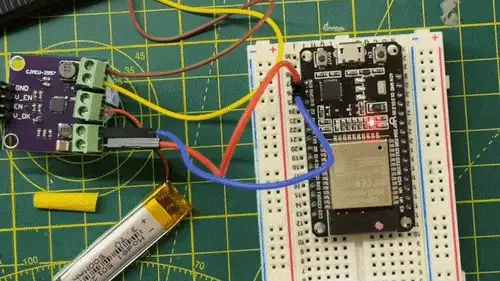
Here’s my ESP32 dev board running the blink sketch off the buck regulator. It’s completely happy.

Blink Sketch

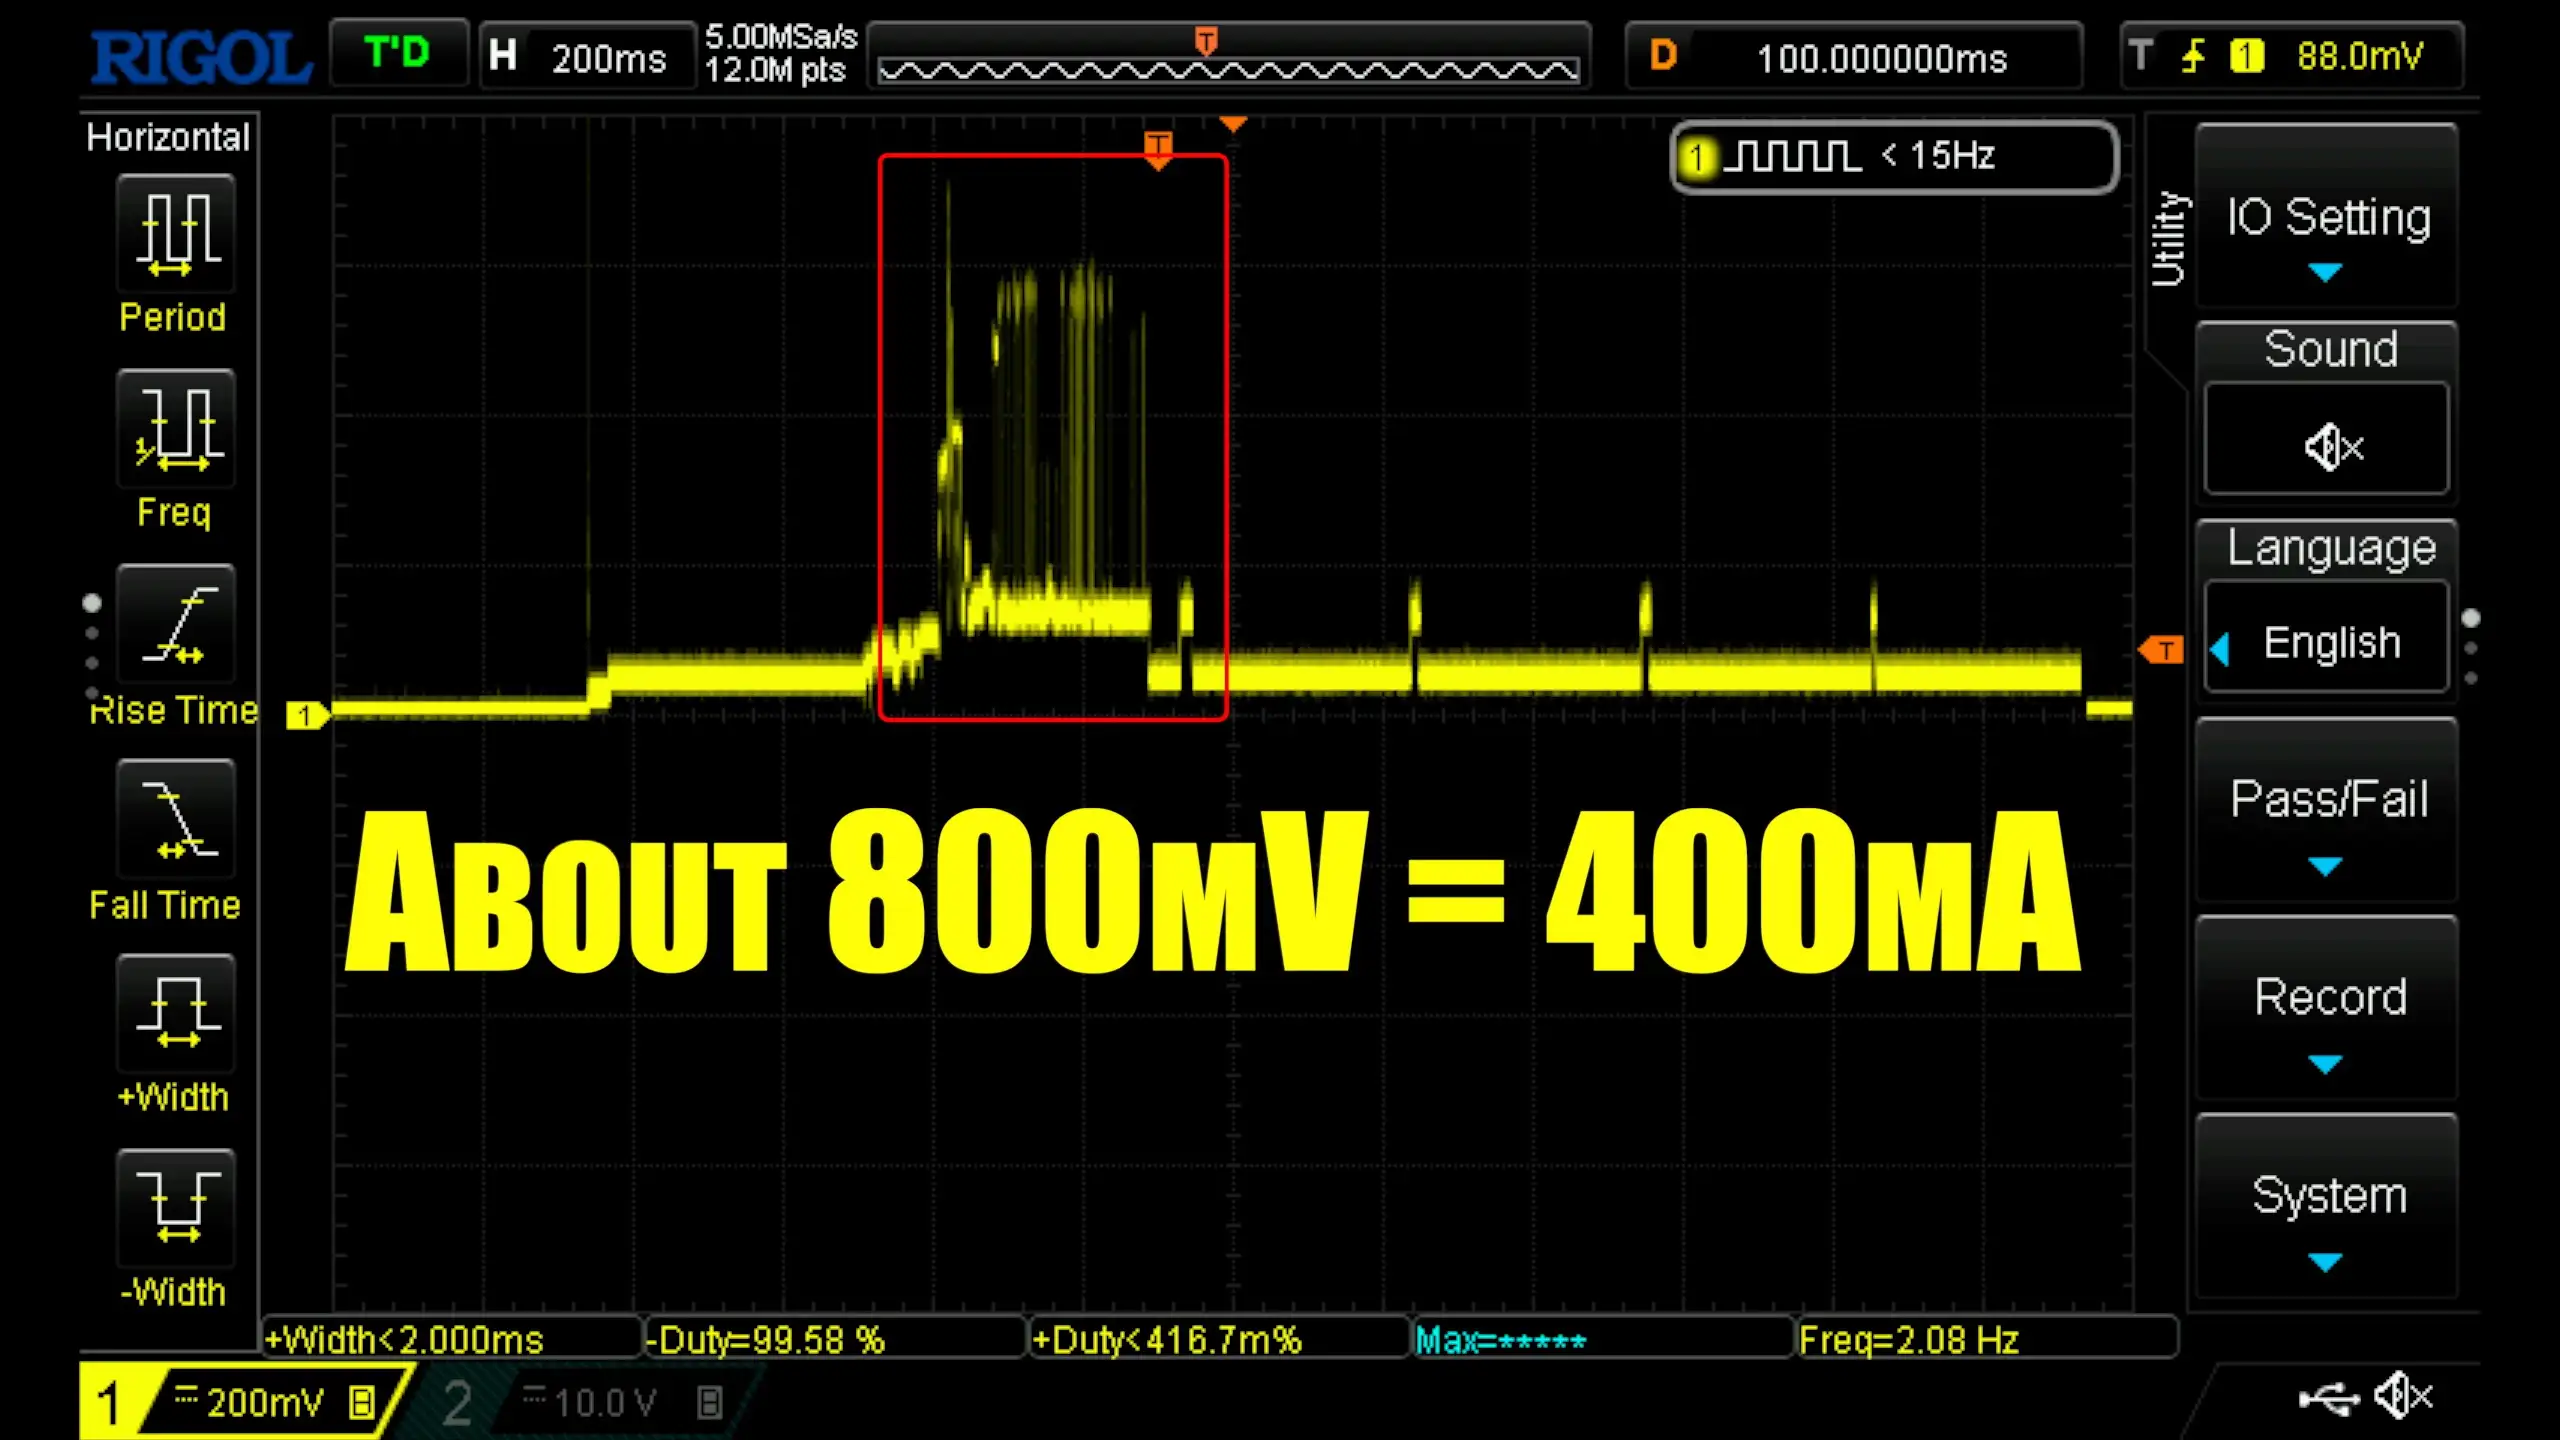
However, the buck regulator is limited to a maximum of 100mA. This is fine, unless you want to run WiFi, which is pretty important if you want to get a weather forecast. I checked how much current the ESP32 was drawing when it was refreshing the weather display and it has current spikes of 400-600mA.

Current Spikes

Fortunately, we can just ignore the buck regulator and directly connect the weather display to the battery without any issues.

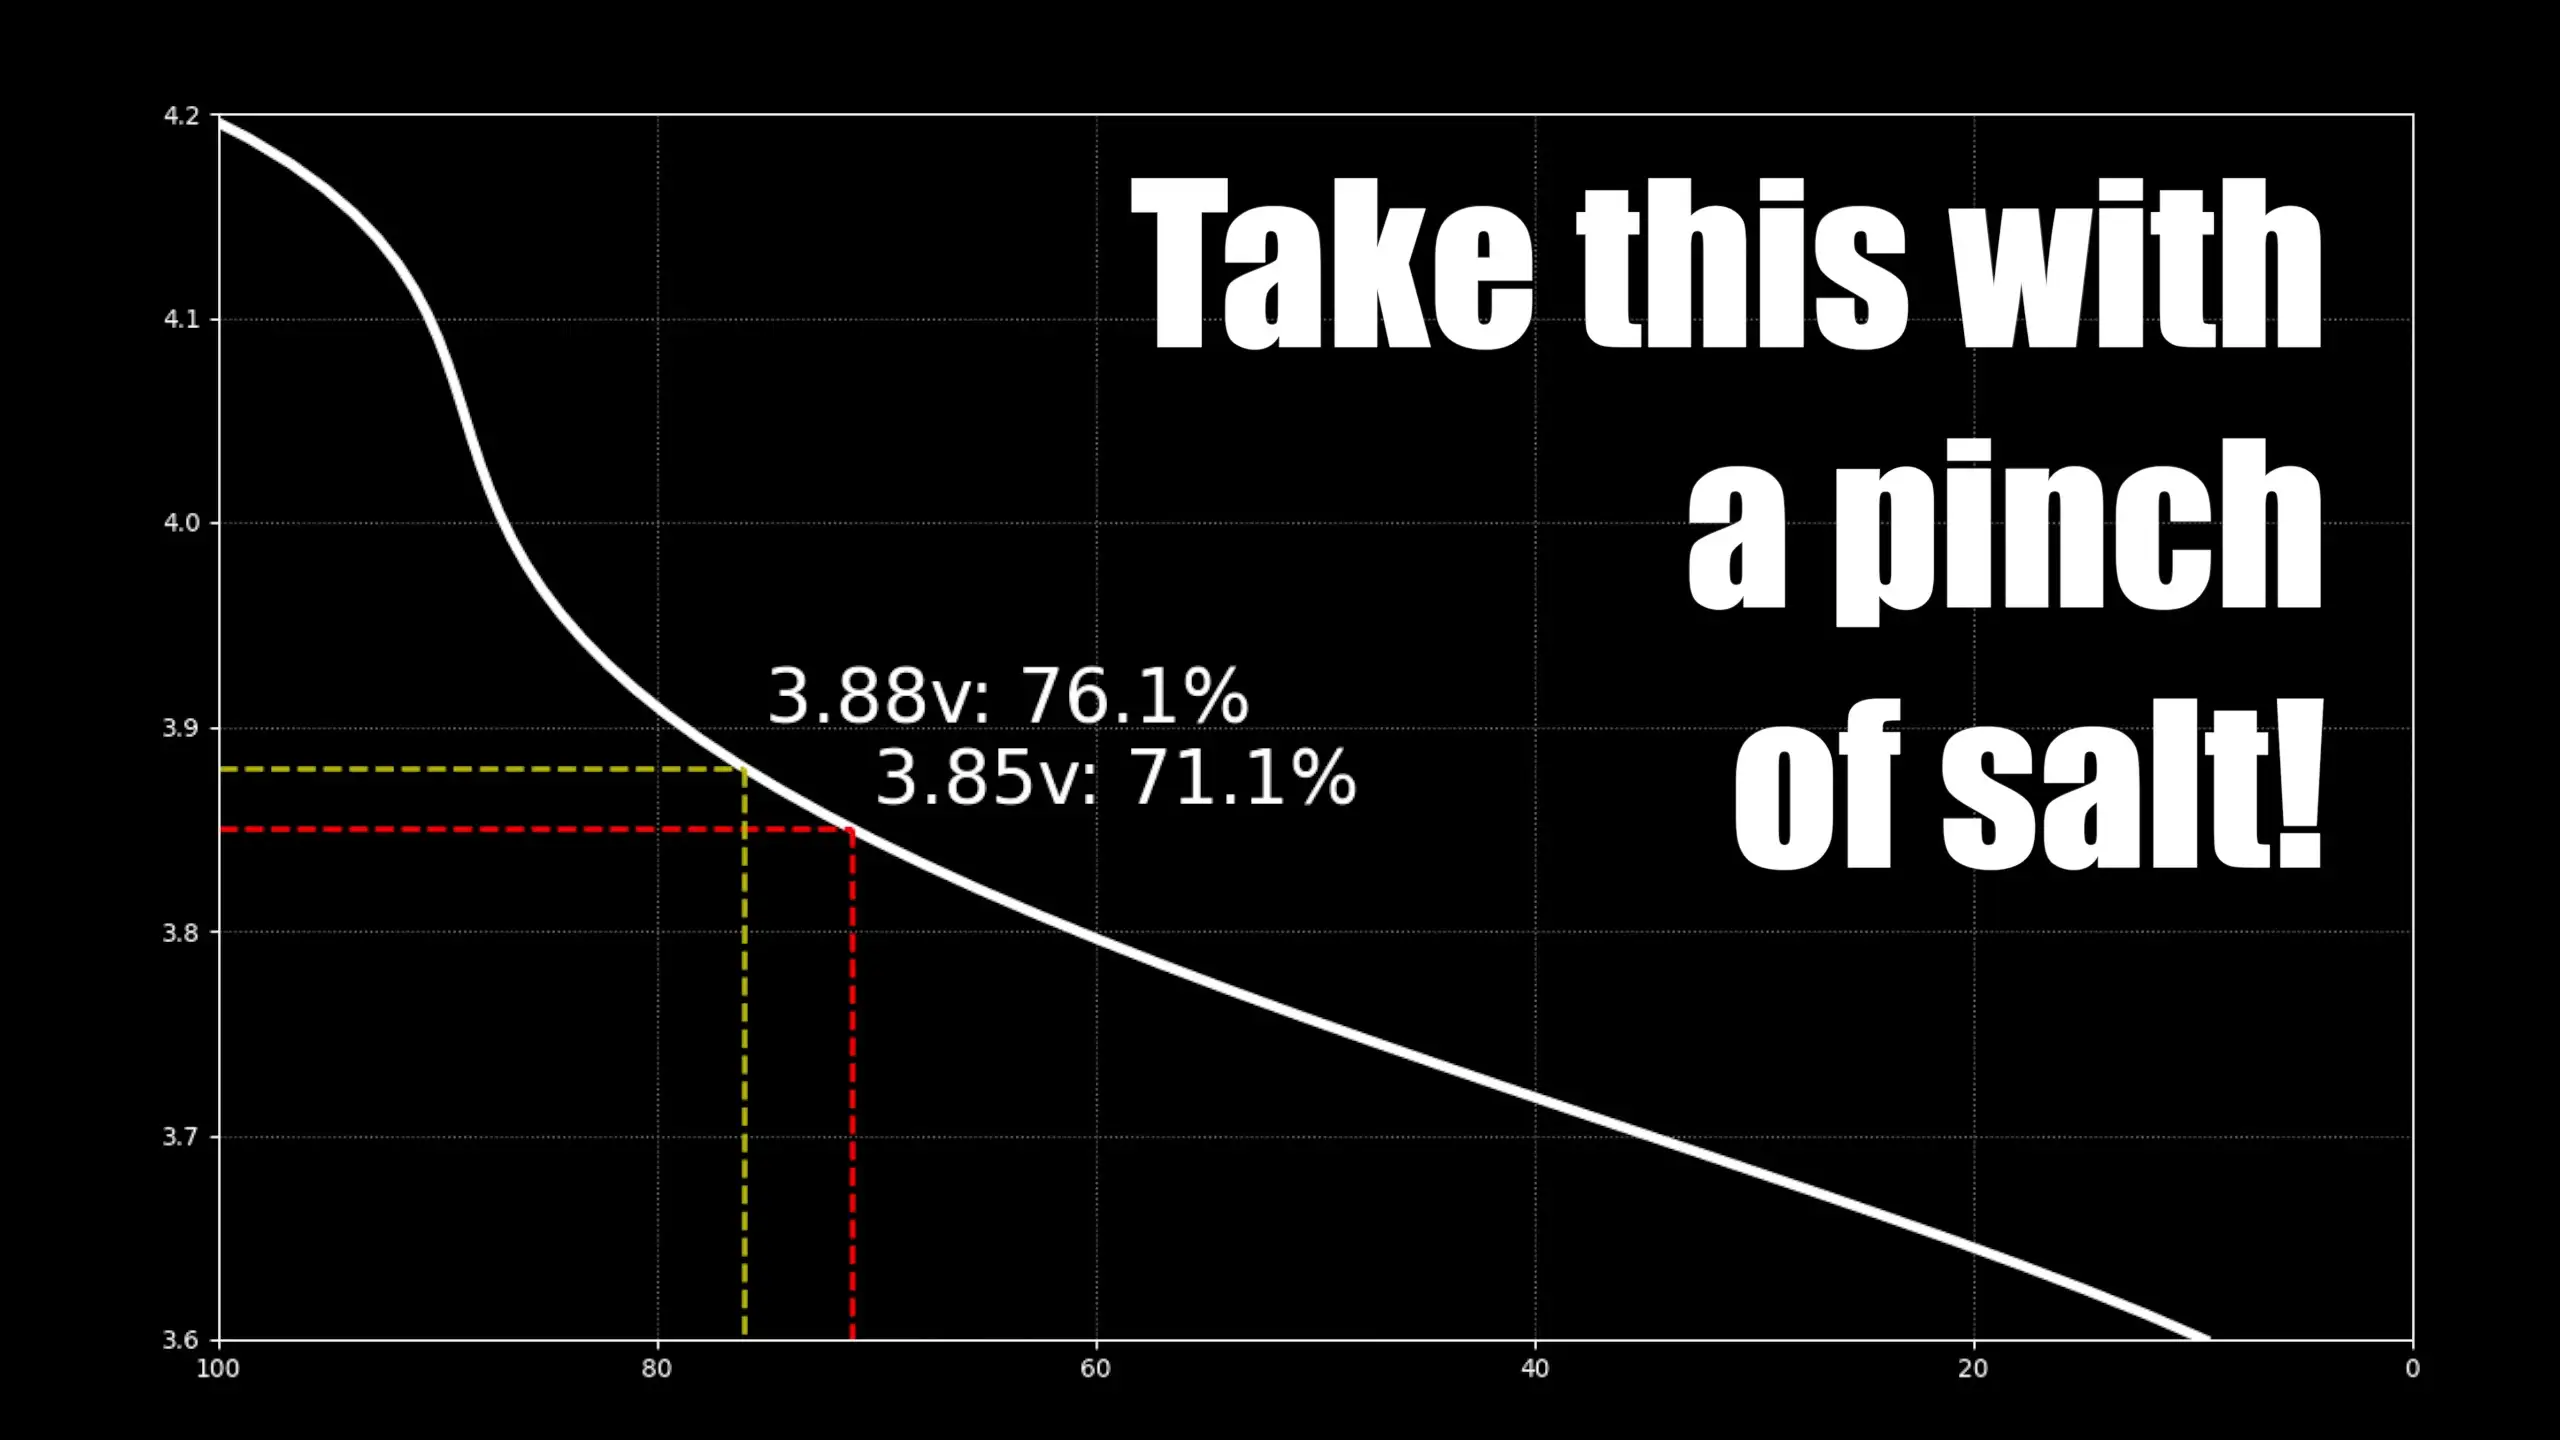
To check that the BQ25570 does actually work, I measured the battery level and left it on the window sill for a few hours. We actually got a small amount of sunshine and managed to charge the battery from 3.85 volts to 3.88 volts - now that doesn’t sound like very much, but if you map it onto a lithium cell discharge curve, it’s actually around 4-5% of the battery capacity (this has to be taken with a bit of salt as the battery discharge curve is very approximate).

Battery Charging

Initial Results

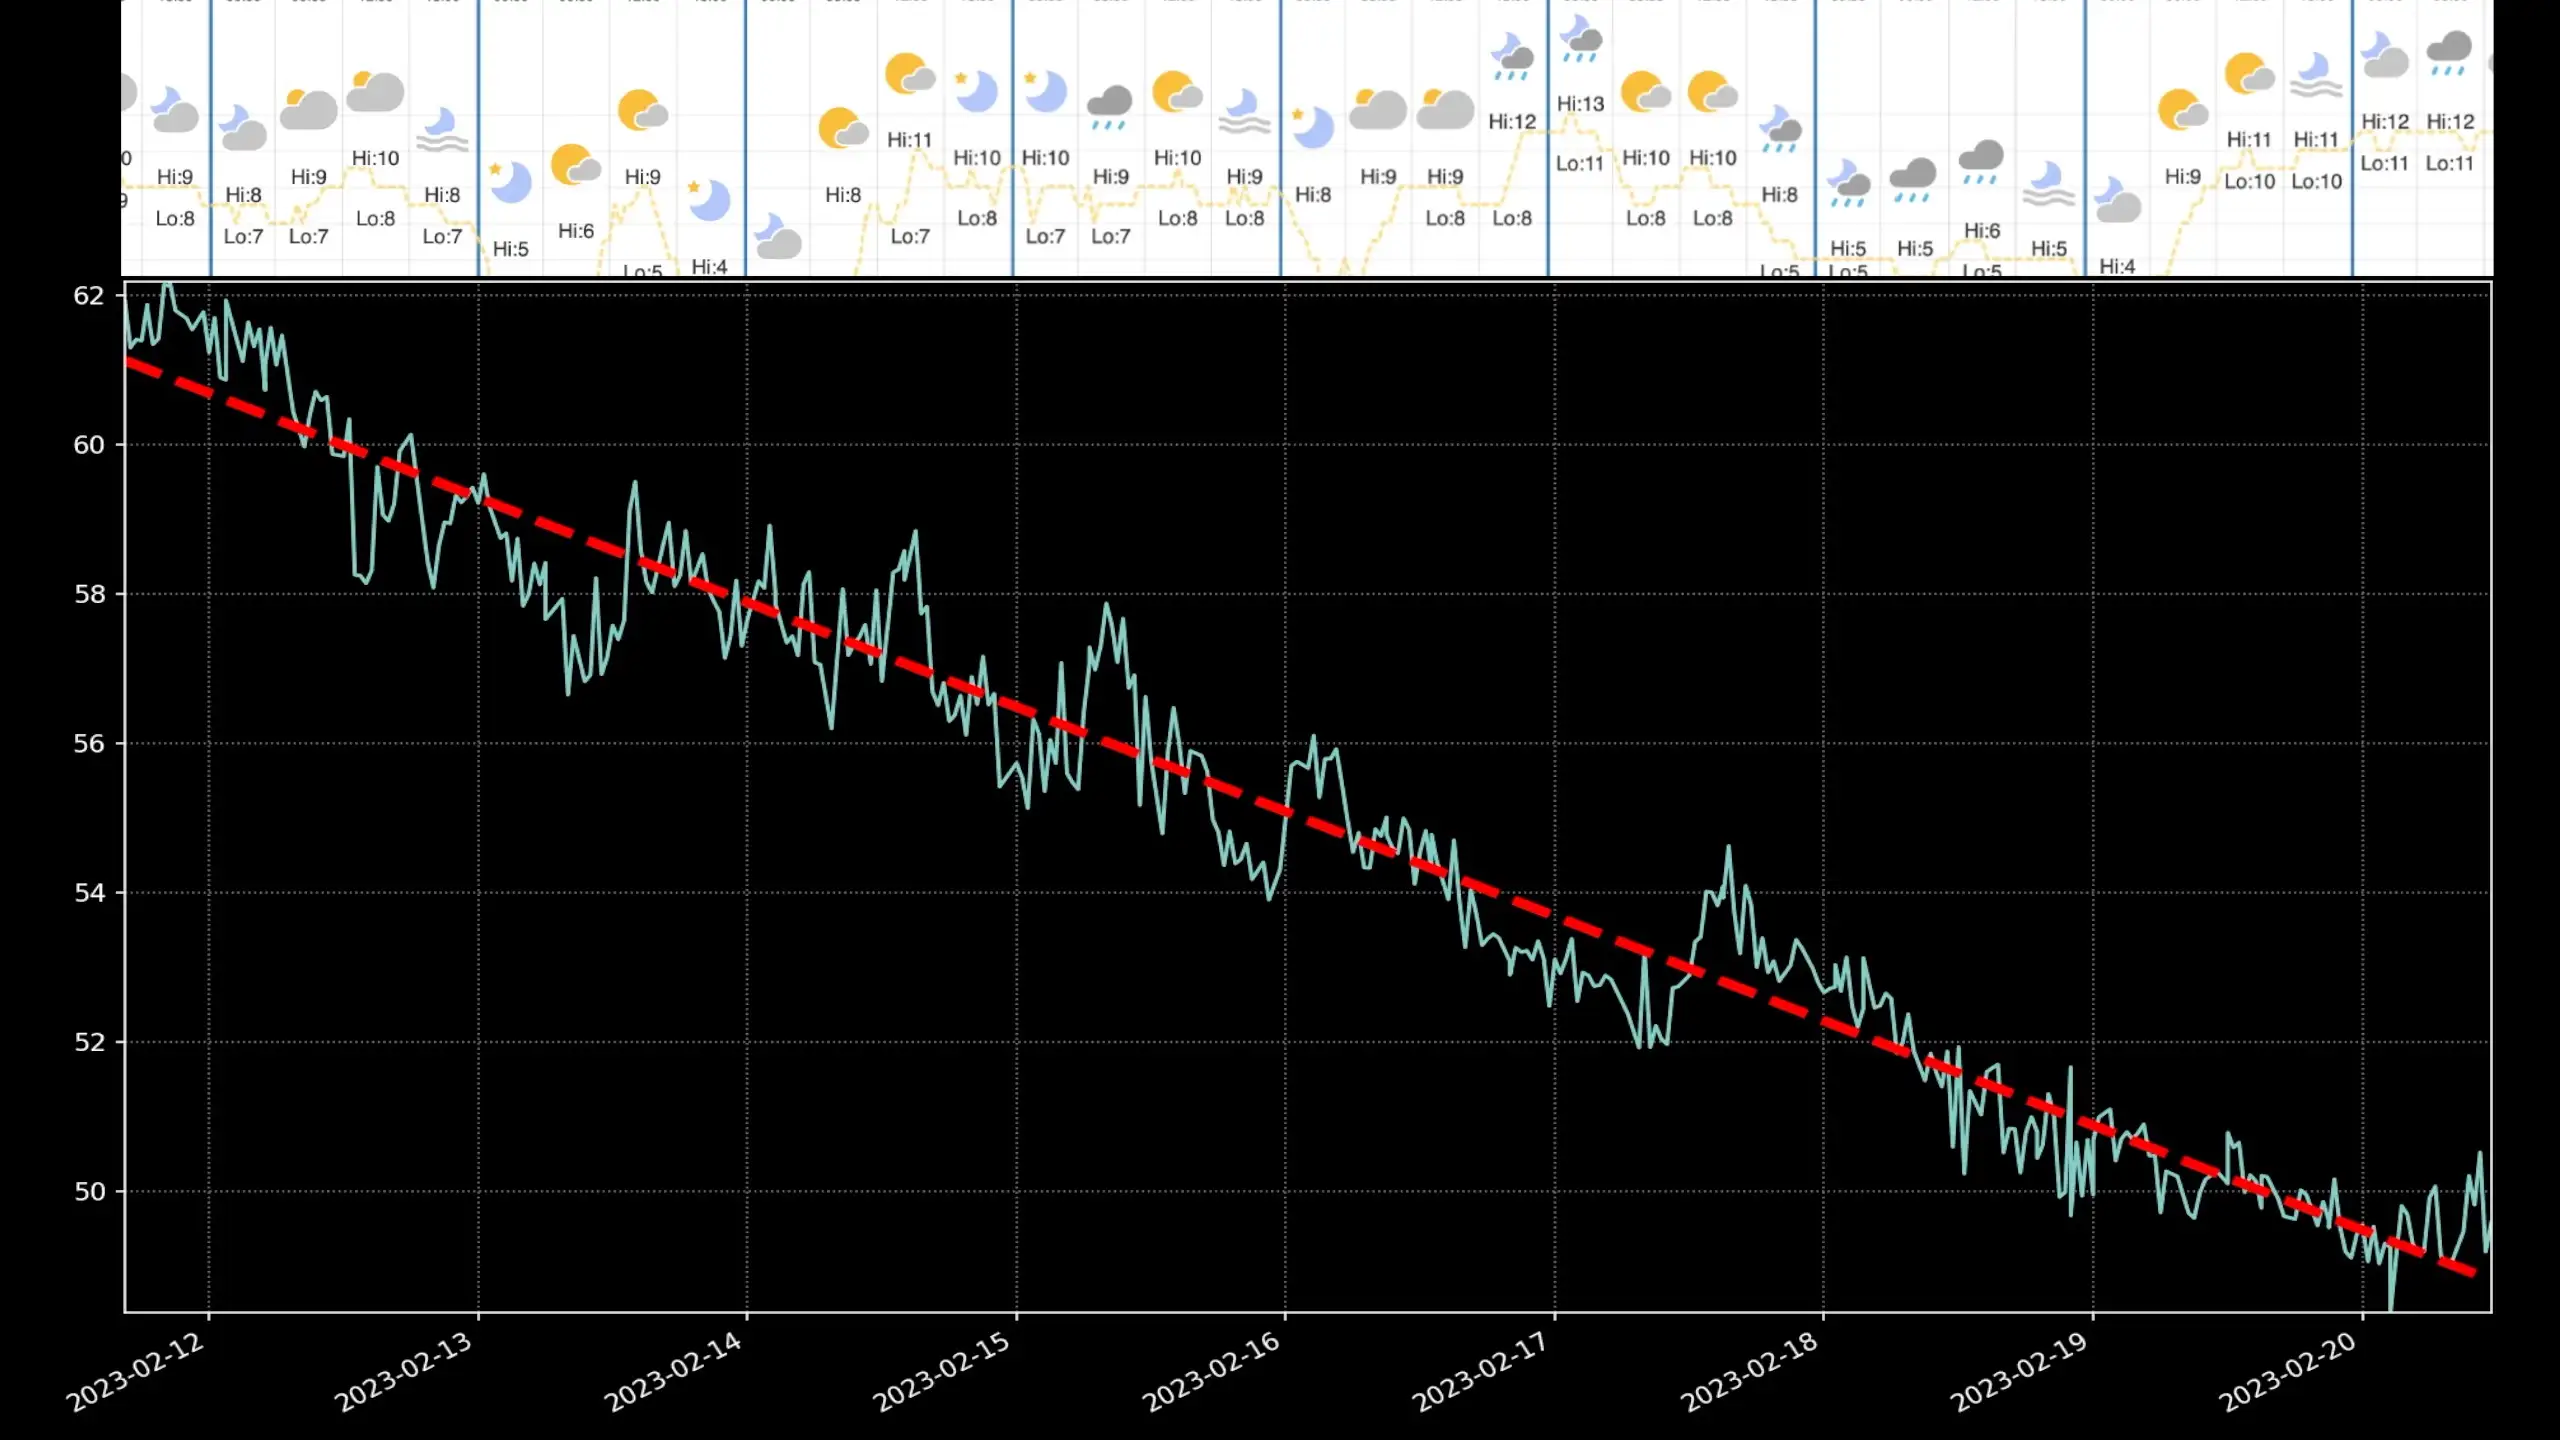
I left this running for a week or so in the usual position for the weather display and got some pretty interesting results. I was initially pretty dissapointed, the battery was still draining over time. But, the drain was now only 1.4% per day. So despite the graph looking pretty bad - we did actually make some progress. The slope is now 1.4% per day, which is a lot better than the 2.2% per day we were seeing before.

Battery Drain With Energy Scavenging

Making an obvious change

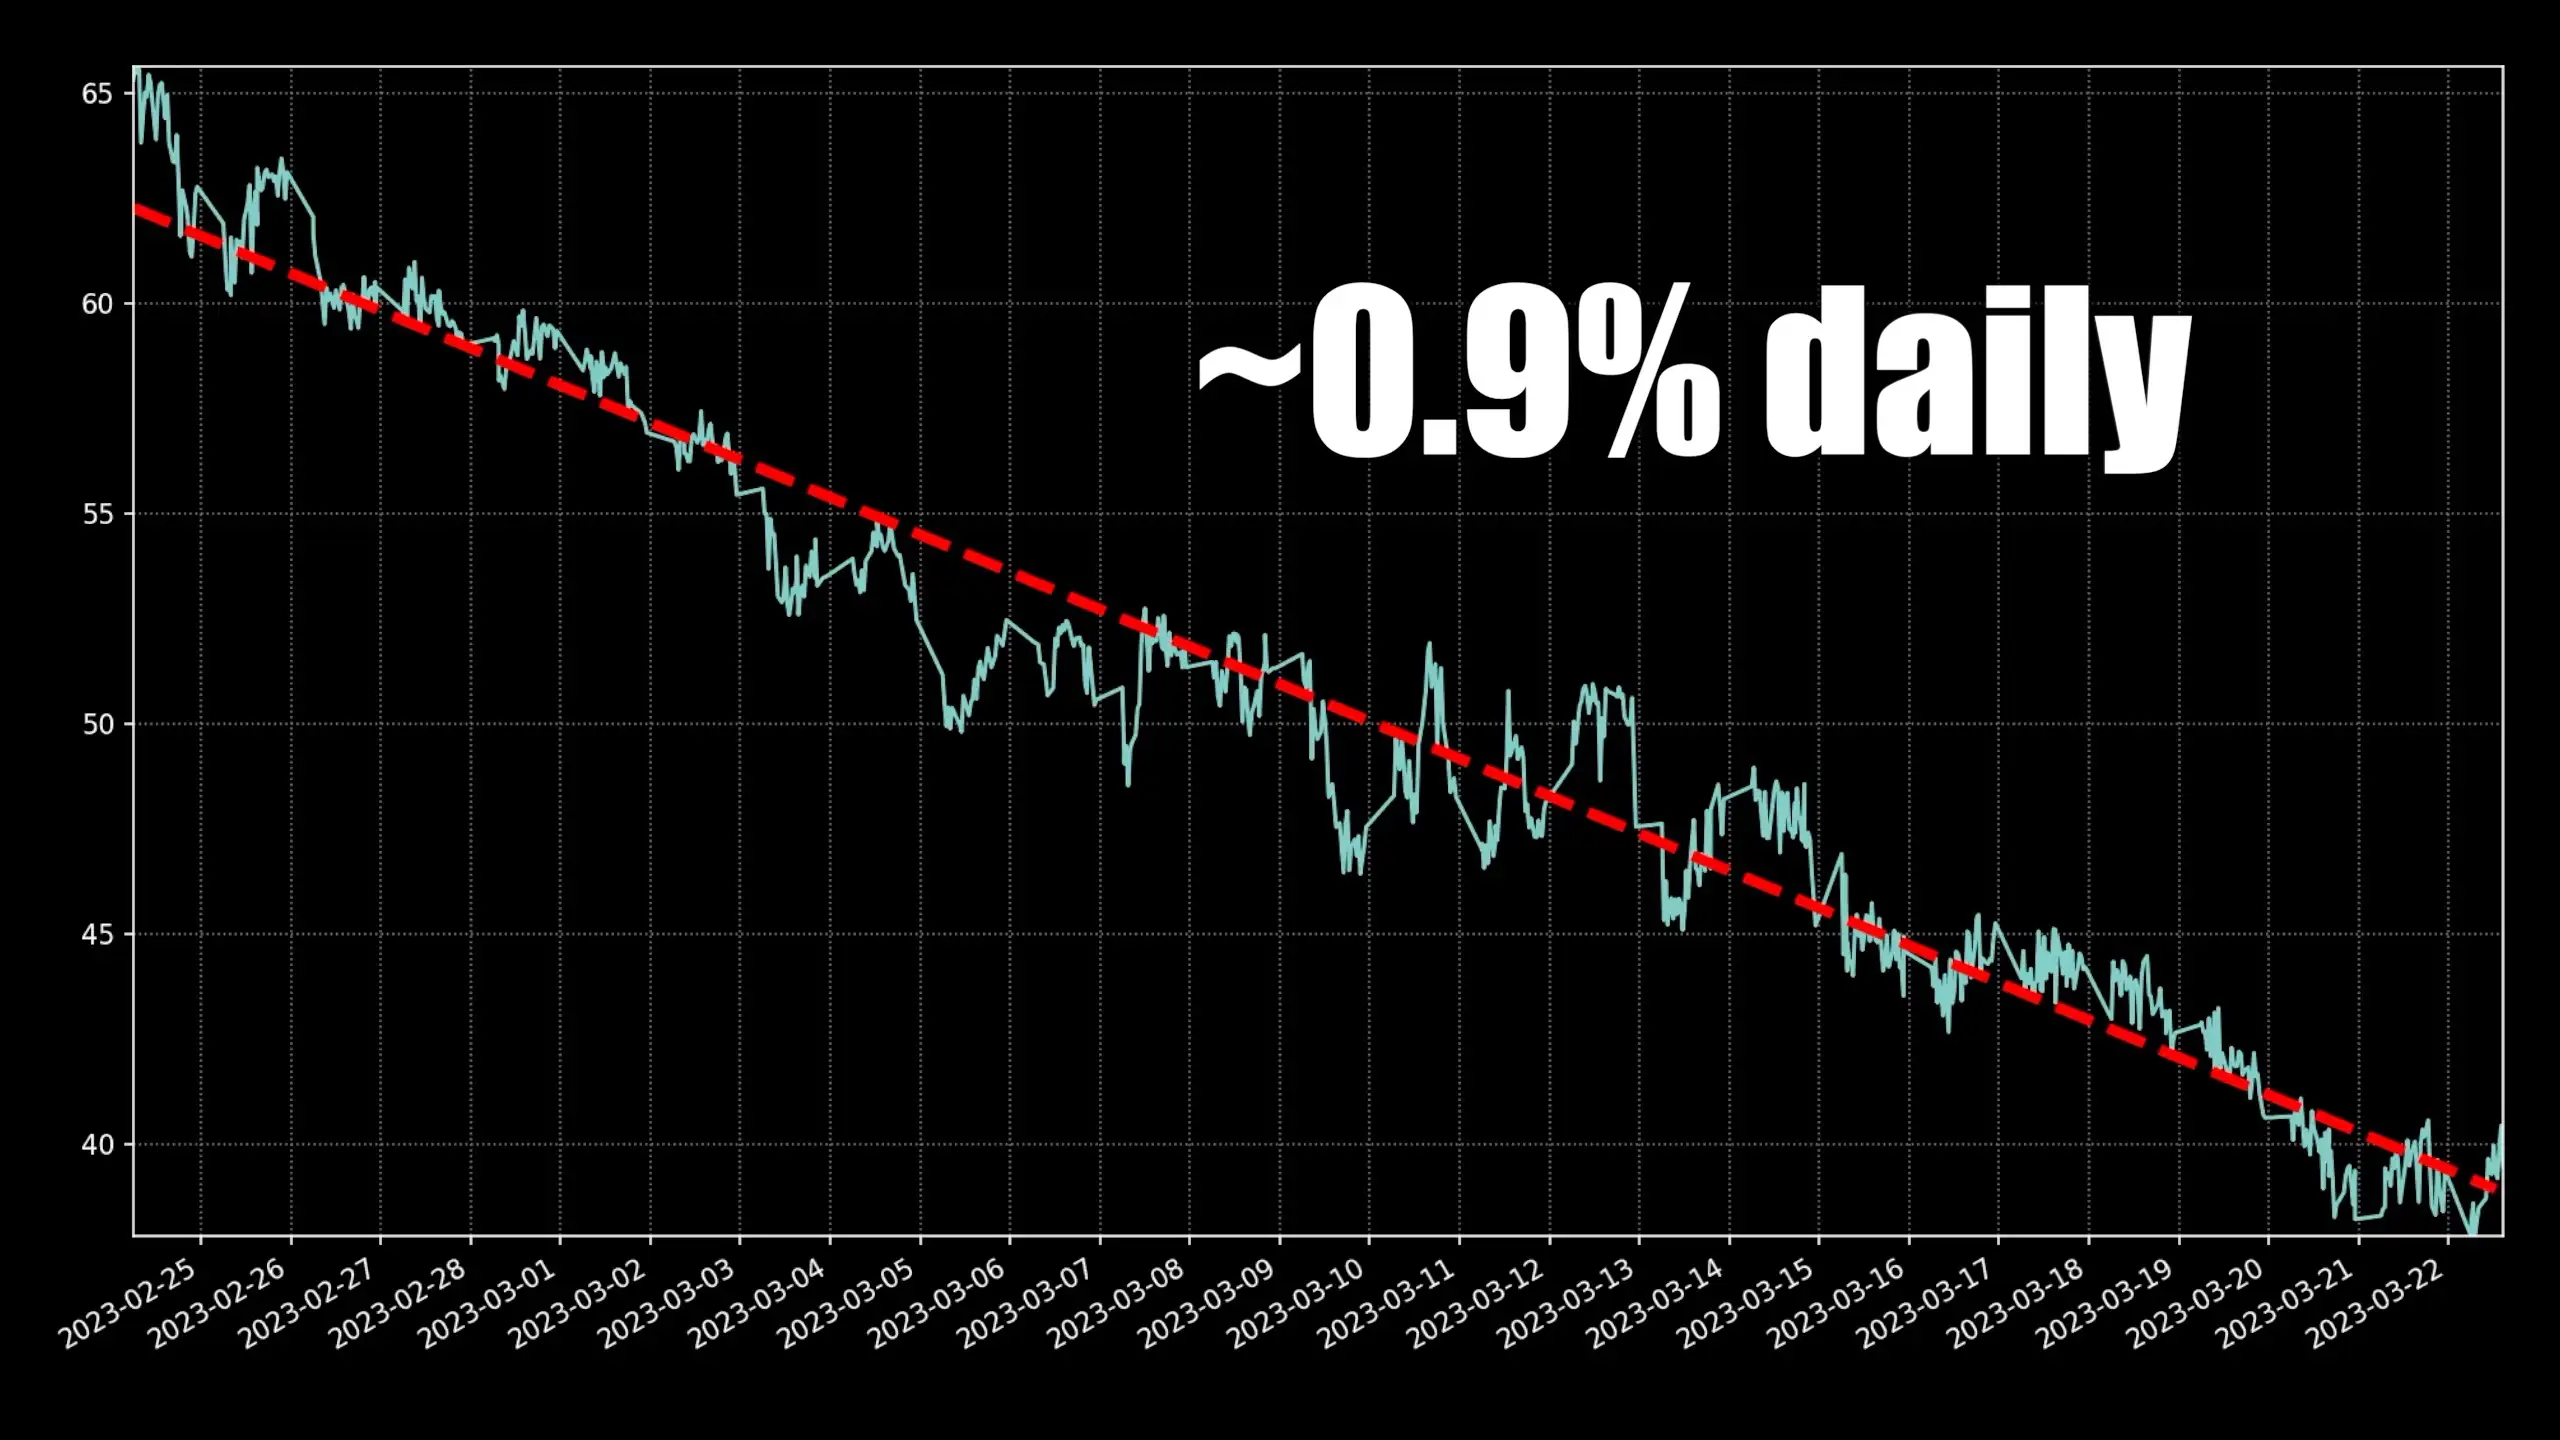
One smart idea to save battery life would be to let the weather display take a long nap overnight when everyone’s snoozing. I tweaked the code to make it deep sleep for 6 hours after 11pm and left the experiment running for a few weeks while I was away on holiday. The results are more promising. We still see the battery draining, but it’s now only 0.9% per day.

Battery Drain With Overnight Sleep

The Verdict

With this new code in place, I think that the battery could last through the winter months through to spring when the days start to get much longer. And I think during the summer months, the battery could get recharged up to 100%. I believe my weather display might just keep running forever and never need charging again.

Results

The only issue now is that I need a new box to put it in - it’s a bit of a mess right now…

What a mess

#BQ25570 #DEEP SLEEP MODE #DIY PROJECTS #ENERGY EFFICIENCY #ENERGY SCAVENGING #EPAPER DISPLAY #ESP32 #SOLAR POWER

Related Posts

I got this feeling bezos is watching - Discovered my Hue switch battery performance is correlated with room temperature after a nifty web scrape of Amazon's device usage history. While it's a given that batteries are temperature-sensitive, actual data from my own living room provided a neat confirmation, graphing a daily pattern. Wanted to go green with a rechargeable lithium coin cell, but the voltage risk to the ATmega256RFR2 on the PCB is a no-go. For now, it's back to the humdrum world of regular coin cells and unexciting battery charts. Dive into the video for a deeper geek-out on this!
75% Less Power! - Saving the Planet With Motion Sensing and Image Processing - In this blog, I was dealing with a conundrum on how to reduce the power consumption of my cool magic mirror that was always on, always drawing power. I considered options such as a PIR (Passive Infra Red) sensor and a doppler radar microwave motion sensor. The latter worked brilliantly except for a few too many false positives. Things got technologically fancy when I introduced a camera for motion detection and face recognition, even recognizing who is in front of the mirror! However, while it was fascinating, it upped the power consumption which was against our original goal. After combining everything into an impressive package and even forming simple state machine, I found that the sophisticated system needed more work. Conditions like lighting and screen turn-on time presented challenges. However, it did make a significant difference - nearly running at 25% of the original power consumption. Definitely a promising and interesting project worth looking into further!
DIY 20,000mAh Power Bank - Was it worth it? - In this blog post, I embarked on a fun project to create a DIY power bank using two 10,000mAh lithium cells I had lying around, and a charge control board. After some tinkering and tests, I learned that measuring power bank efficiency requires more than looking at amp-hours. With some help from a friend, I found out our power bank was actually over 93% efficient, a pretty fantastic result. Despite some challenges with certain devices not drawing their full potential power from my power bank, I concluded that while it was an enjoyable project, buying a ready-made power bank might be more convenient.
The PCBs are in production - what have I messed up? - After some stress and trepidation, I finally took the plunge and sent my PCB design off for manufacturing. My design centers around building a large seven-segment clock with LED filaments. Jumping hurdles such as voltages, pin usage, and limiting the load on my power supply, I've settled on the ESP32 as the system's heart and come up with a final circuit design. While doing this, I've quickly realized I could improve my layout and fixed a small mistake. Also, I've prepared for either types of LED filaments - the high-voltage ones or the larger, 3v ones. However, I did bungle up a couple of things on the enable line of the shift registers and board layout. But hey, this is a learning curve, right? Can't wait to get the boards and see what other exciting errors surface!
Self Organising WS2811 LEDs - I've successfully used addressable WS2811 LED strings and an ESP-CAM board to create an adjustable lighting system. The best part is that the image processing code can be duplicated in JavaScript which allows you to use a plain dev board to drive the LEDs instead of needing a camera on your ESP32 board. If you want to replicate this project, you'll need your own ESP32 dev board and some addressable LEDs. After figuring out the location of each LED in 2D space, it's easy to map from each LED's x and y location onto a pattern you want to show on the frame buffer. Desiring to keep it accessible, I've posted detailed instructions and my sample code on GitHub, making sure anyone with basic knowledge can undertake this fun technological DIY project!

Related Videos

Harvesting Solar Power for Low-Energy Electronics: Can We Run Forever on Scottish Winter Sun? - Discover an e-paper weather display experiment that uses solar energy and storage to achieve low-power functionality in the Scottish winter sun. The innovative project utilizes the ESP32's deep sleep mode and e-paper display to create an energy-efficient weather display device.
Can You REALLY Power Christmas Lights with Solar Panels in Winter!? - Find out if it's possible to power Christmas lights with solar energy during the Scottish winter, despite the short days and low sun. Discover how small solar panels can be used to charge a lithium cell and potentially provide a sustainable and eco-friendly option for your holiday decorations.
E-Paper Weather Display: Boost Battery Life with Deep Sleep Mode - Learn how to create a weather display using the LILYGO 2.7-inch ePaper Plus Module, featuring step-by-step instructions on programming in PlatformIO, designing an enclosure in Fusion360, and utilizing deep sleep mode for long battery life.
DIY eBook Reader - Build your own Kindle using an ESP32 - Build your own DIY e-Reader with an ESP32, an e-paper display, and some simple coding. This project decodes ePUB files, parses HTML files, and renders texts and images on an e-paper display, while optimizing battery usage.
Lovely High Res E-Paper Display - Just when we thought we'd done with our mailbag, some exciting new stuff tips up. This time, we've got a soldering kit, a fun-looking Dash, and extra bonus, an ink plate 10, which is a cool e-paper display from Soldered. We've unboxed it, pulling out a board with an esp32 module, an SD card, and a battery connector. One of the major selling points is its open-source nature, you can download all the schematics from GitHub, and for those inclined, learn about how to build pcbs. Also showcased a Simon Says game soldering kit, despite my modest soldering skills (we all need practice, eh?), it turned out to be good fun. Plus, we've got a Dev board fitted with an at Mega 328p and an ultra-bright ws2812 RGB LED. Let's see if I can turn this e-paper display into a weather display or maybe you have more exciting ideas, drop them down in the comments!
HELP SUPPORT MY WORK: If you're feeling flush then please stop by Patreon Or you can make a one off donation via ko-fi
Want to keep up to date with the latest posts and videos? Subscribe to the newsletter
Blog Logo

Chris Greening


Published

> Image

atomic14

A collection of slightly mad projects, instructive/educational videos, and generally interesting stuff. Building projects around the Arduino and ESP32 platforms - we'll be exploring AI, Computer Vision, Audio, 3D Printing - it may get a bit eclectic...

View All Posts