You can watch a video version of this post here:
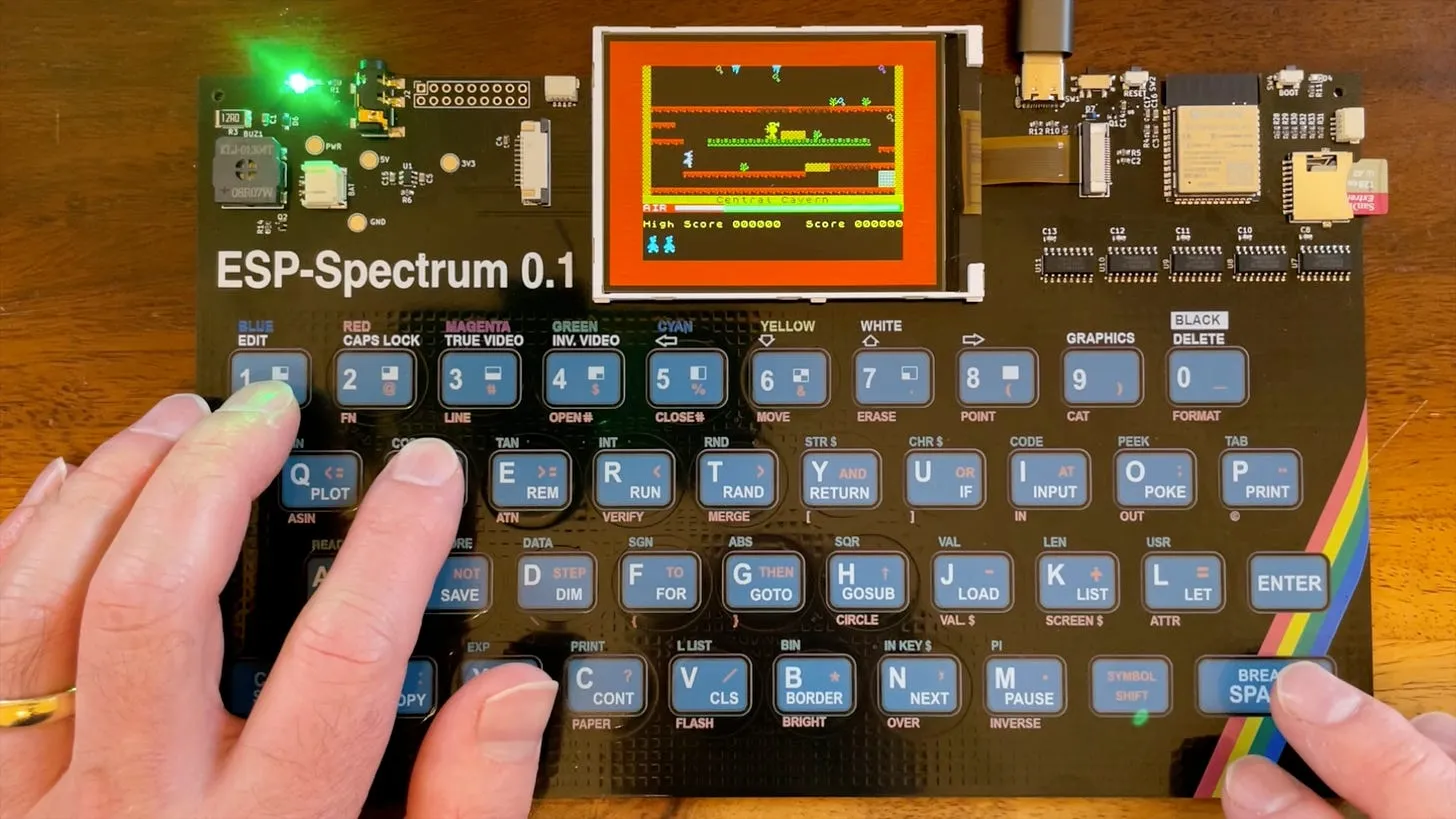
What did I make? It’s a really nice recreation of the Sinclair Spectrum using full colour UV silk screen printing and capacitive touch. The brains is an ESP32-S3 and it’s got a built in display and speaker.
Pretty nice, right? Well, enough people thought so that I was able to successfully crowdfund the project.
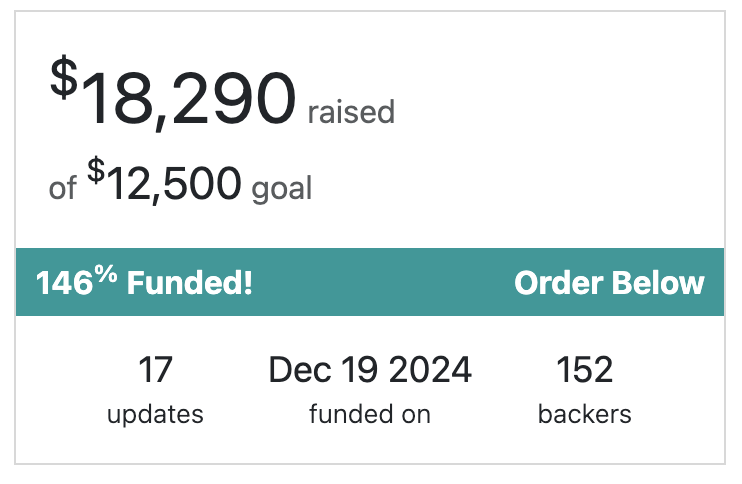 You can view the Crowd Funding page here - and order an ESP32 Rainbow for yourself!
1. He’s ripping us off!
Before I started selling things online, I used to wonder: “Why do hardware products cost so much when components and PCBs are so cheap?”
😡 You can get a PCB for \$5 and components are just a few cents each - this guy is ripping everyone off!!!
This post is my attempt to answer that - I’ll share actual numbers and lessons from my own experience building and selling a crowdfunded hardware device.
TL;DR – Yes, I made some money doing it - but I’ll leave you to decide after reading if it was really worth it.
2. Pricing Fundamentals
This post from Dave Jones on EEVBlog is really interesting and it’s a lot more reasoned out and detailed than my summary: The Economics of Selling Your Hardware Project
There’s a rule of thumb that you should be charging a minimum of 2.5x the Cost of Goods Sold (often abbreviated to COGS). COGS is what the goods cost you.
Basing your retail price on your COGS is an approach that is often called “Bottom-up pricing” - you base your price on your COGS + some margin.
The alternative is “Top-down pricing” - you work out what people would be willing to pay for the product, and use that as your price.
In general you’ll end up using some combination of these two approaches.
One caveat is if your top-down price (what you think people are willing to pay) ends up being less than your bottom-up price, you have to think seriously about whether your product is viable. Some things are just not worth doing.
3. Project Timeline
The project took just over a year (13 months) from initial idea to shipping to backers.
- Project start: Jun 14, 2024
- Campaign launch: Nov 21, 2024
- Funds Received: Jan 17, 2025
- Manufacturing completed: Jun 4, 2025
- Orders shipped: Jul 14, 2025
Here’s a more detailed timeline. You can also view all the project updates here:
| Stage | Date | Notes |
|---|---|---|
| Initial concept | Jun 14, 2024 | Started off as a random idea to try out full colour silk screen printing. |
| Prototyping completed | Aug 19, 2024 | A working version that supports multiple key presses using multiplexed touch. |
| Campaign Pre-Launch | Sep 21, 2024 | Pre-launch audience building on Crowd Supply |
| Campaign Launch | Nov 21, 2024 | Official crowd funding launch |
| CE/UKCA Certification | Dec 17, 2024 | Lab testing confirms compliance with EMC |
| Campaign 150% funded | Dec 24, 2024 | Campaign finishes overfunded |
| Funds received from Mouser | Jan 17, 2025 | Money received from Mouser |
| Production run started | Feb 5, 2025 | Production run of PCBs starts |
| PCBs arrive in UK | Apr 15, 2025 | Final assembly in the UK |
| Printed Manuals Arrive | Apr 30, 2025 | Bagging everything up final assembly and QA |
| Dispatched to Mouser US | Jun 4, 2025 | The mysterious journey begins |
| Shipping to backers | Jul 14, 2025 | Shipped out to all the backers and pre-orderers. |
4. Campaign Revenue
Total revenue from Crowd Supply: £12,839.57
There’s an important distinction on Crowd Supply that I’m sure some people are not aware of. If you order during the campaign phase, the creator gets the full price (\$99 minus various fees). For pre-orders and the “house” order placed after the campaign has finished the creator gets the agreed “distributor” price (\$56 in my case).
- Campaign orders: 118 × \$99 - fees
- Crowd Supply “house” order: 118 x \$56
The house order from Crowd Supply is really important - it pushes up the number of units you will manufacture which can make a big difference to your unit cost.
Here’s a breakdown of the fees in an easily readable form:
| Fee Type | Amount (\$) |
|---|---|
| Payment Processing Fees (2.9%) | \$338.79 |
| Crowdfunding Fee (11%) | \$1285.02 |
| Item Fees (flat rate per SKU) | \$590 |
| Total | \$2214 |
That’s a reasonably chunky amount - \$18.76 per item. Interestingly, these fees do have a knock on effect to the wholesale price - why would Crowd Supply pay more for the house order than the amount I am getting paid by backers (after fees)?
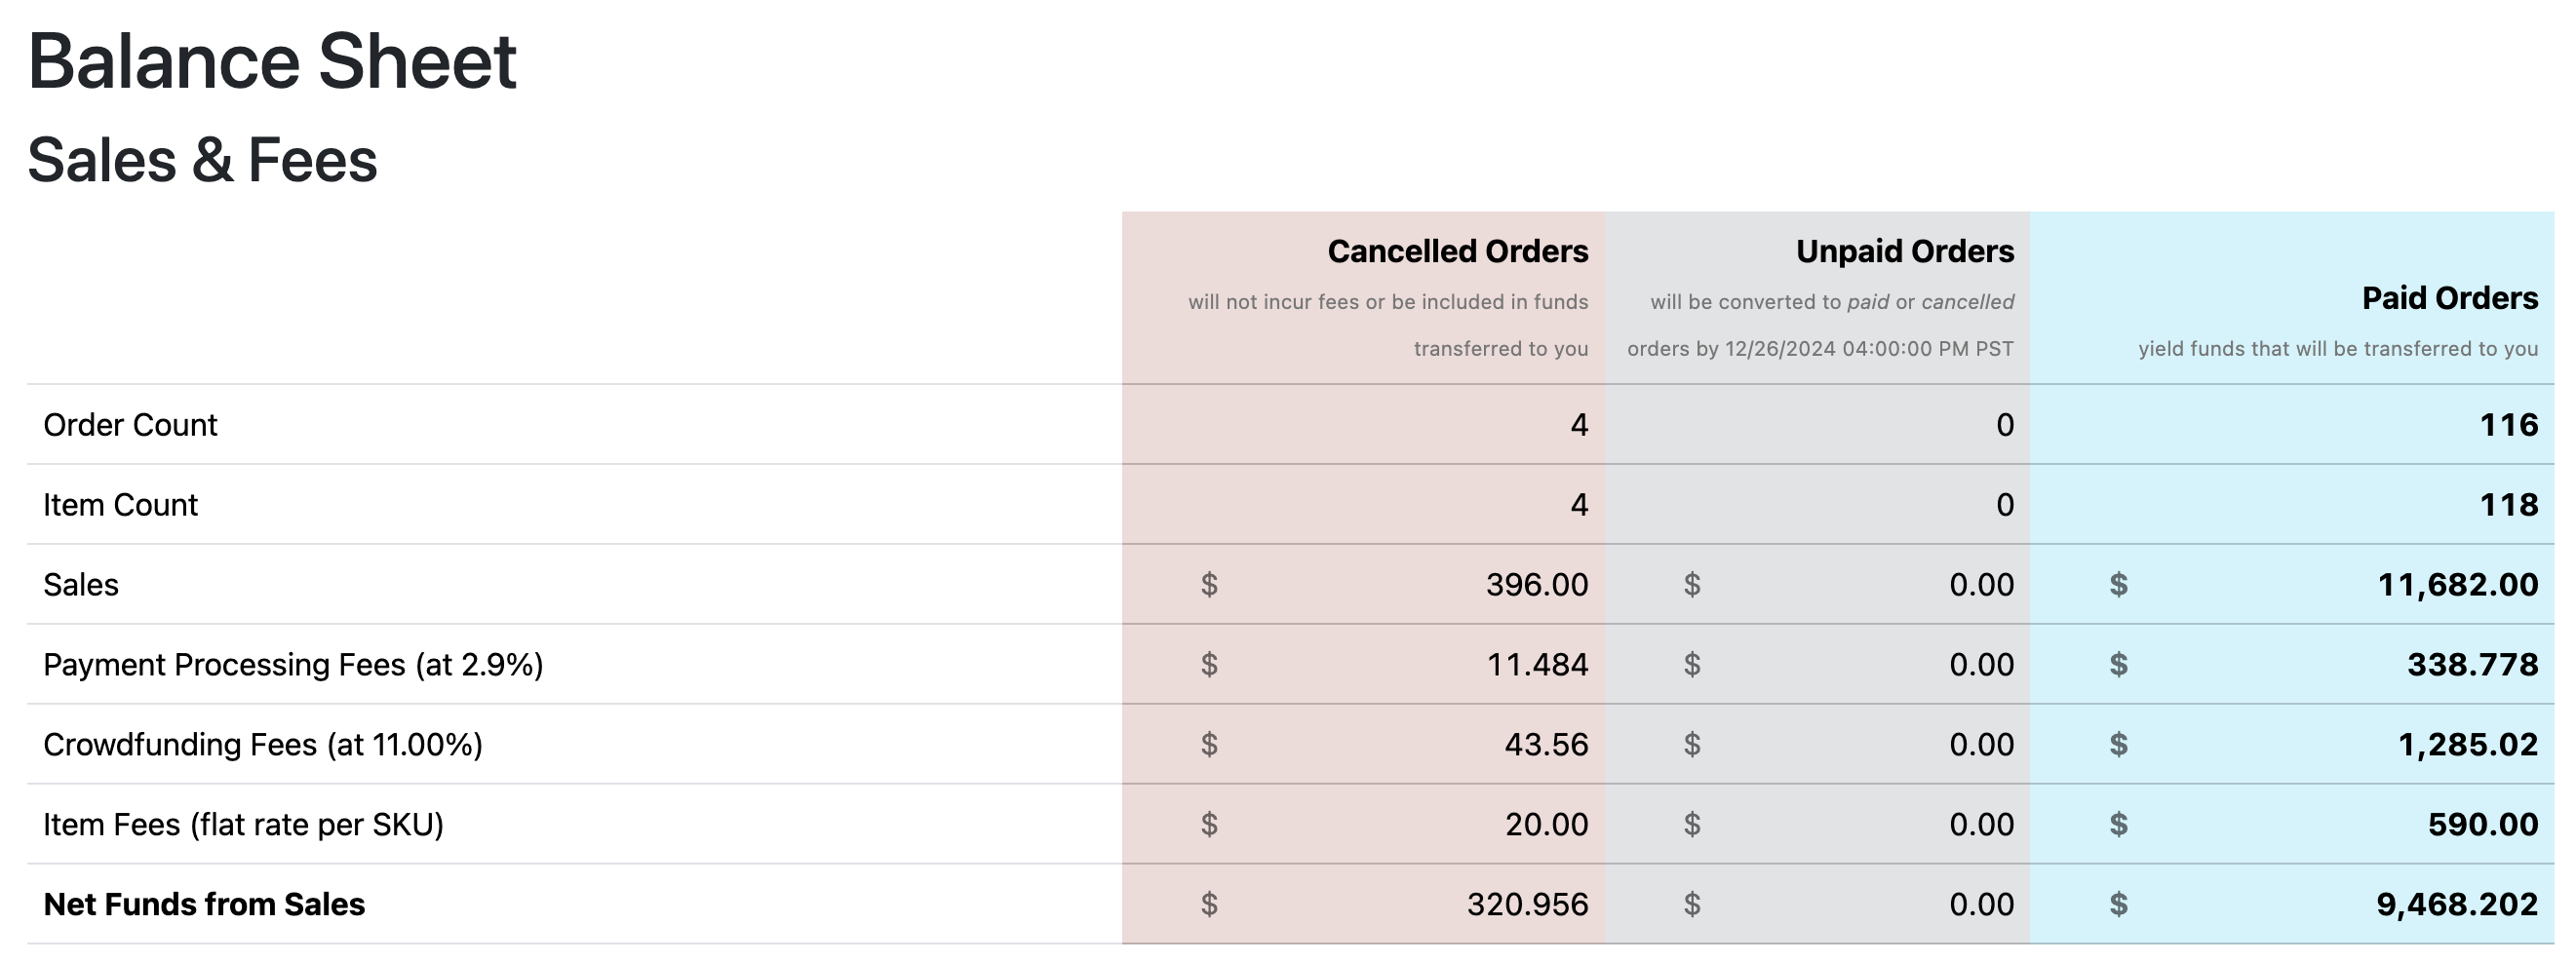
Here are the screenshots of my dashboards from Crowd Supply for the campaign backers:
 And for the Crowd Supply “house” order:

5. Cost of Goods Sold (COGS)
What did it cost to actually get everything made? £8,565.66
🛠 Breakdown
Here’s the breakdown of the costs - it’s highly likely there are things missing from here.
| Description | Amount | Currency | GBP |
|---|---|---|---|
| PCBs+Components+SMD Assembly | 5,449.31 | USD | 3,945.31 |
| Import Duty | 740.35 | GBP | 740.35 |
| Displays | 2,224.29 | GBP | 2,224.29 |
| Speakers | 270.68 | USD | 203.01 |
| Printed Manuals | 116.99 | GBP | 116.99 |
| Shipping | 470.79 | GBP | 470.79 |
| Certification Advice | 298.80 | EUR | 250.40 |
| CE EMC Certification | 1,800.00 | RMB | 206.55 |
| CE EMC Shipping | 49.10 | GBP | 49.10 |
| Prototypes | 1288.20 | USD | 966.15 |
| Total | GBP | 8,565.66 |
I had 300 units made. Around 1-2% were rejected at the QA stage plus I sent several samples out to people. I’m also expecting to have to send out some replacements.
Even though Crowd Supply only ordered 236 units, the real-world economics of hardware mean you can’t make exactly what was ordered. Between minimum order quantities, QA failures, sample units, and the need for replacements, it’s more realistic to base unit cost on the full batch of usable units — not just the ones shipped.
So I’m going to be pretty conservative and say I ended up with 280 sellable units.
That gives me a cost per unit of: £30.60 which is pretty close to my original guesses for costs (within a few dollars anyway).
- Total COGS: £8,565.66
- Units: 280
- Cost per unit: £30.60
6. Gross Profit
This one’s a bit tricky — I still have around 40-50 units in stock, so the final profit could change depending on future sales. But for now, let’s ignore the unsold stock and look at the numbers based on actual orders.
- Gross Profit = Revenue − COGS
- Gross Profit = £12,839.57 – £8,565.66 = £4,273.91
Not bad! Or is it…
7. Labour Cost
Here’s some very rough figures on how much time was spent on the project - these are very much guesses - I wasn’t religiously tracking my time.
| Task | Approx hours | Notes |
|---|---|---|
| Hardware design | 24 hours | Probably a lot more! |
| Firmware development | 200 hours | This is a definite guess. |
| Tool development | 160 hours | And so is this |
| Running the campaign | 20 hours | 1 hour per update? Plus some hours creating the initial content and dealing with paperwork. |
| Screen and Speaker Assembly | 16 hours | This felt like a very long time and includes bagging everything up. |
| Quality Assurance | 16 hours | Flashing the firmware and doing some basic checks that the screen, audio and keyboard work. |
| Total | 436 | 54 Man days at 8 hours a day? Maybe this is a bit high? |
- UK minimum wage: £12.21
- Imputed labour value: £5,323.56
- True profit after labour: £-1,049.65
Oh dear… well, I guess we do it all for love really.
However, if I do include my stock in hand and assume I can sell it all for the wholesale price, then I actually do get back into profit! Hoorah: £1,000.35.

8. Why I Priced It at \$99
As you’ll see from the following sets of tables, this is all a lot of guess work - which is why lots of the numbers seem fairly arbitrary and also differ slightly in places.
How do you even come up with a recommended retail price?

Crowd Supply use Mouser as a distributor - distributors want their profit margin. Typically, a distributor wants at least 40-60% markup on their side.
This means that the retail price needs to give me the buffer I need to cover unexpected costs/problems along with some profit AND it needs to be high enough that the distributor can have their markup.
And now I come to the really tricky bit - you need to work out what to charge before you know how many people will back the campaign. More backers will give you cheaper costs as components and PCBs become cheaper the more you order.
You can get some of these numbers from online quotation tools - but with components you need to make a few guesses.
Here are my rough guesses at the start of the project. I had made a few prototypes, so had a rough idea on component costs and could get pretty accurate PCB costs from the PCBWay online quoting tools.
| Units | 100 | 250 | 500 | 1000 |
|---|---|---|---|---|
| PCB Cost | \$664 | \$1,353.89 | \$2,364.43 | \$4,499.57 |
| Components | \$1,400 | \$3,500 | \$7,000 | \$14,000 |
| Assembly? | \$243 | \$319 | \$382 | \$545 |
| Tax? | \$461.4 | \$1,034.58 | \$1,949.29 | \$3,808.91 |
| Shipping? | \$165.16 | \$229 | \$447 | \$891.99 |
| Display Cost | \$700 | \$1,750 | \$3,500 | \$7,000 |
| Speaker Cost | \$100 | \$250 | \$500 | \$1,000 |
| Total | \$3,733.56 | \$8,436.47 | \$16,142.72 | \$31,745.47 |
| Unit Cost | \$37.33 | \$33.75 | \$32.29 | \$31.75 |
1000 units! Ahh the optimism…
It’s actually pretty impressive that I got with a few dollars of the actual cost!
Crowd Supply give you a very handy spreadsheet to help see if your project is viable.
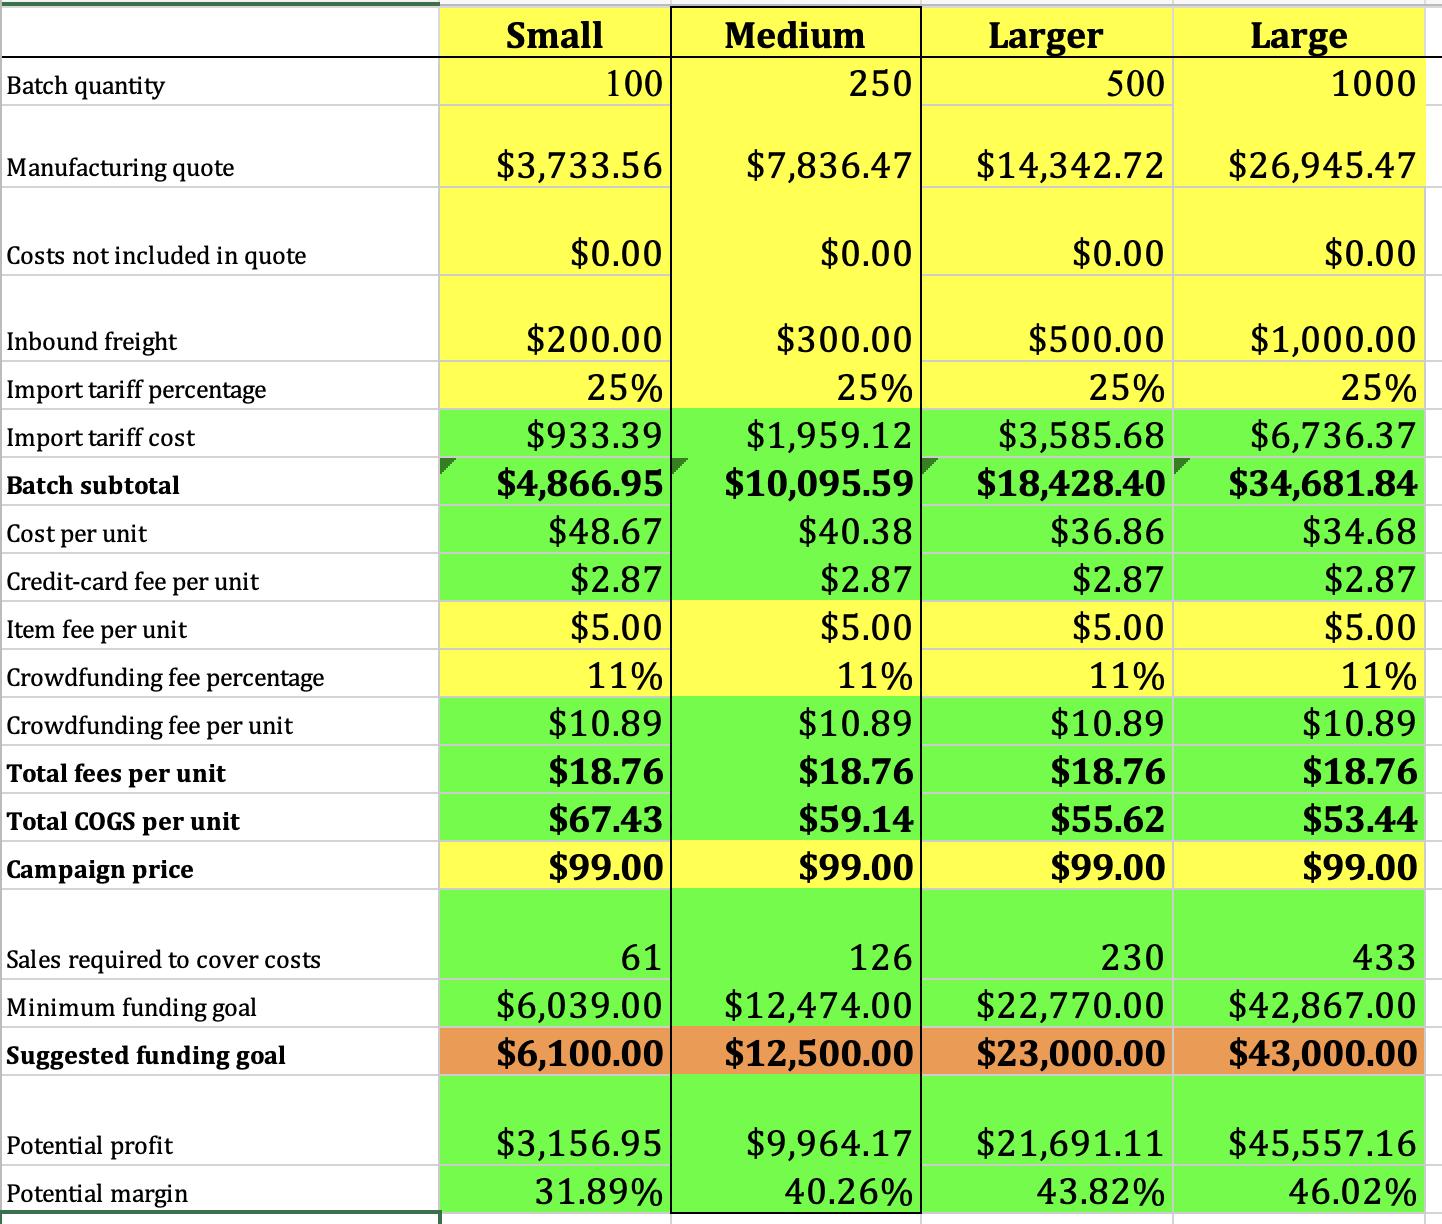 You can play around with the figures in the yellow boxes and see what actually works.
This gives a good idea of how many units and what price you need to set to be viable.
Then I needed to work out what to charge for orders post campaign. This is the price that I would charge a distributor.
Again, I needed to make some guesses on numbers. These are my finger in the air calculations. This table is based on an RRP of \$99.
| Units | COGS | Wholesale Price | Their Margin % | My Margin % |
|---|---|---|---|---|
| 100 | \$37 | \$56 | 43% | 34% |
| 250 | \$35 | \$54 | 45% | 35% |
| 500 | \$33 | \$52 | 47% | 37% |
| 1000 | \$31 | \$50 | 49% | 38% |
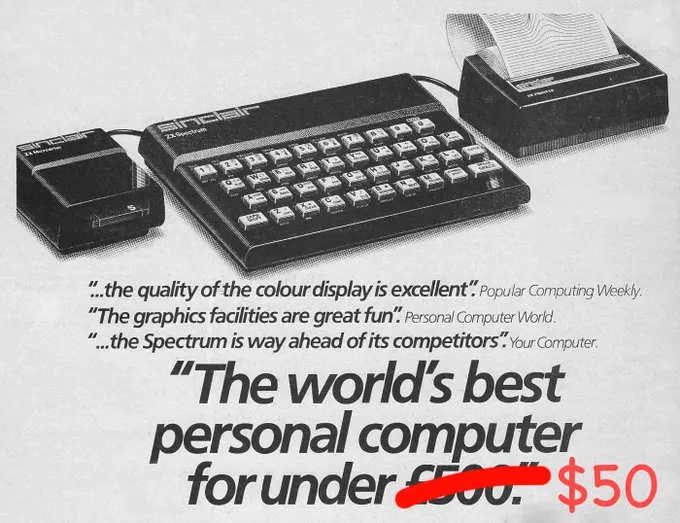
My original target price was \$49.99 - that felt like a very Clive Sinclair price to go for. This would have meant me losing money…
 I played with \$75, but after having a discussion with Crowd Supply around project viability and distributor price, I settled on the final \$99 RRP. That gave me a realistic number for the campaign backers and enough buffer for the distributors markup.
It was tough - I really wanted the board to be very affordable, but there’s no point doing something that just isn’t feasible and then feeling miserable.
9. Tariffs, Shipping & Fulfillment
One thing that no-one knew what was going to happen with tariffs. I started this project before the US elections, and Trump was already talking stupid on tariffs.

One thing that is probably not clear is that the tariffs are calculated on what the importer is paying for the goods. It doesn’t necessarily matter what the underlying cost is.
So, that means it should be calculated on what Mouser paid me: £12,839.57.
| Tariff % | Tariff \$ | Notes |
|---|---|---|
| 5% | 641.98 | Could be absorbed |
| 10% | 1283.96 | Painful, but not terrible |
| 20% | 2567.91 | More than half my margin gone |
| 30% | 3851.87 | Squeaky bum time - almost no contingency now |
| 100% | 12,839.57 | Well, this sucks. Losing a lot of money. |
Who pays the tariffs? Well, it depends…
| Term | Meaning | Who Pays Import Duties/Taxes? |
|---|---|---|
| DDP | Delivered Duty Paid | Seller pays all import duties, VAT, and customs clearance |
| DAP | Delivered at Place | Buyer is responsible for import duties and taxes |
Crowd Supply stipulate DDP for the shipments to Mouser. If I was a large manufacturer I would not sign up these terms. But I’m not…
As you can see from the table above, this had the potential to cost me a LOT of money. At a certain tariff level, I would have had to cancel the project and issue refunds to everyone. That would have meant eating the production costs, but I could probably have recouped some money by selling independently.
Fortunately, I was able to argue the product was sufficiently transformed in the UK to justify a change of Country Of Origin of the UK, but that’s entirely at the whim of the customs guys. Next time I may not be so lucky.
💡 Tip: If you’re outside the US, make sure you understand DDP vs DAP terms! And do you know what your COO (Country of Origin) is going to be?
10. CE / UKCA Certification
I’m not going to talk about FCC certification. In my case I certified the boards for EMC (Electro Magnetic Compatibility) (not RED - I may do this at some point though).
There’s a lot of confusion and incorrect information around CE certification. Many people will quite confidently tell you that you:
- Don’t need certification for a hobby or dev board
- Don’t need certification if you are using a prequalified module
Neither of these are actually true. If you’re selling your hardware to consumers it needs to be certified. And even if your module is already certified, you still need to certify your hardware.
What do I actually mean by certifying my hardware? Is there some special place where you take your hardware and they give you a big rubber stamp of approval?
Well, not really. CE is self certification. You, the manufacturer, certify that your hardware complies with various standards. Testing labs give you the evidence to confidently back this up.
When you self certify, you are basically saying to someone else: “if you test my hardware against these standards, it will pass”.
Some things you can be pretty confident of. You need to comply with RoHS (Restriction of Hazardous Substances). This should be as simple as making sure the company making your hardware do so in a compliant way.
Things like EMC (Electro Magnetic Compatibility) and RED (Radio Equipment Directive) are more difficult. My advice is to get your boards tested.
Depending on where you go this can get expensive quickly - especially if you keep failing and having to retest.
For EMC, use good design practice. Use a four layer board with ground planes. Add sufficient ESD protection. Put in a filter at the power input.
Unless you really know what you are doing, use USB-C for power - that way you don’t need to ship a power supply with your hardware.
I got some really useful advice using the simple start service from Smander. Based on my schematics and intended use case they were able to tell me exactly what standards I should be using.
This meant that when I spoke to a test lab I actually had a chance of understanding what they were talking about…
One very useful tip was that unless I was actually using the wireless capabilities of the ESP32 I did not actually need to get RED certification.
I was recommended a very affordable test lab in China. The downside of this is that you need to ship some hardware to China, and of course if your hardware fails you cannot just pop into the lab and try and fix it… If this is a concern, then you should find a local lab.
| Line Item | Cost | Currency | Approx GBP |
|---|---|---|---|
| Certification Advice | 298.80 | EUR | 250.40 |
| CE EMC Certification | 1,800.00 | RMB | 206.55 |
| CE Shipping | 49.10 | GBP | 49.10 |
It’s definitely worth getting some advice before splashing out on a lab and getting all sorts of random tests done. Once again, I’d recommend the simple start service from Smander as a good starting point.
The test lab I used is BCTC. They were very affordable and helpful.
💡 Tip: Certification is not optional, get advice, it doesn’t have to be insanely expensive.
What about UKCA (ahh, Brexit - the gift that keeps on giving). For now, the authorities in the UK have recognised that if you are CE certified then you are also UKCA certified. You also don’t need to have UKCA mark on your product (yet…).
11. Marketing & Campaign Management
Crowd Supply make a very big thing about sending updates - both during the campaign and post campaign. This is really important - people have trusted you with their money, and it’s not great if you take the money and go radio silent on them!
How do you get people to come to your campaign page? Crowd Supply help with this - there are already many people who have backed campaigns and receive the Crowd Supply newsletter. But really it is up to you to market yourself.
I’m very fortunate that I already have a semi popular YouTube channel, newsletter, and blog. This does give me an existing audience that I can tap into.
I also created a substack for the project before I even launched the Crowd Supply campaign. This let me build an audience before I was even accepted onto Crowd Supply.
 I’ve made sure to keep this audience in the loop on everything that’s happening. Updates that go out to Crowd Supply also go out to my own list of people.
💡 Tip: Don’t let someone else own your audience. These are people who want to hear from you directly.
If you don’t have an audience already, then you really need to get yourself out there and do some marketing - social media has to become your friend.
There are some good websites: HackerNews and Hackaday, to name a couple.
💡 Tip: Build your audience. Talk about your project. Get other people talking about your project.
I also realise that referring to people as “the audience” sounds absolutely awful. But I’m not sure community sounds any better…
12. Where can I buy one?
It’s still up on Crowd Supply - please order one! They’ve got stock right now and if they keep getting orders I’ll do another production run.
💡 Tip: Go buy one now!
13. Would I Use Crowd Supply Again?
✅ Pros
Up front cash from crowd funding and house order
They provide the platform for doing a crowd funded pre-sales campaign - they also add on their own “house” order so you get a decent order size and you get the money to actually do a reasonably sized production run.
This is very valuable - I would have had to seriously think about whether I wanted to do such a large production run without knowing there was sufficient demand. It would have been a significant investment on my part. Almost £9K — it may not seem much to some people, but it’s a lot of money for me!
Distributor benefits
Crowd Supply deal with all the complexities of selling to individual customers - I don’t need to worry about collecting sales tax, dealing with chargebacks, or all the problems that come with selling to individuals.
This is something that Tindie currently does not do, and they seem to have no intention of actually addressing it.
I just ship a bunch of big boxes to Mouser, and they handle it all. There’s a lot to be said for being able to hand that off to someone else.
Accountability
Crowd Supply have run a lot of campaigns. They know what makes a good campaign and what makes a bad campaign.
Things like regular updates to backers - even if you think you have nothing to say - send out an update so people know you haven’t just run off with the money.
Realistic shipping dates - they were very careful to make sure expectations with backers were set appropriately (see my international shipping complaints later!).
Having someone there to keep you going and doing the right things is really important.
❌ Cons
Costs of using a distributor
As mentioned earlier, distributors aren’t distributing products out of the kindness of their hearts - they want to make a profit. This impacts the amount of money you can make from your products and has a knock on effect to how much you need to charge.
Selling direct would mean I could charge quite a bit less and still break even.
You have to do things properly
You’re selling something through a distributor - they care about their reputation. Things like CE certification become important. Proper documentation with proper safety information is required (in multiple languages!).
Most products on Tindie don’t worry about these things.
Everything is shipped to the US and then sent out
This is great if the majority of your customers are US based. Not so great for the rest of the world. Shipping becomes a significant amount of money.
Tariffs
Related to the above. Shipping everything to the US so that it can be sent out makes sense in a low tariff world. It starts to make a lot less sense when tariffs are high.
For people outside the US this could be very bad. You could end up losing a lot of money.
💡 Tip: Can you afford a distributor? Can you afford to do it all yourself?
14. Lessons Learned
What went well?
Working with Crowd Supply was really useful - having someone keeping you accountable and on-track is invaluable. You could definitely do this without them, but you’d need good discipline.
CE certification turned out to be a lot less complex than I expected - mostly because I spent some money and got some advice. Don’t be afraid to do this, and make sure you allow for this in your pricing.
💡 Tip: If you’re not sure about something, pay for some advice. It’s worth it.
There’s now a really nice community forming around the product - this is really nice to see. Making everything open source is the way to go. Don’t be afraid of showing your terrible code to people.
What went better than expected?
I was very lucky that my hardware just worked. Every prototype I made moved things forward. The firmware seemed to fall into place without huge amounts of effort. AI tooling definitely helped with the website and building out the tools on that. There is no way I would have been able to build things using emscripten without the AI help.
What didn’t go so well?
Oh my God. International shipping. I had no idea this would be one of the most frustrating, opaque and mysterious parts of the project.
I have posted things internationally before, but nothing of this value. For over a month, I spent most of my time looking at the package tracking page, wondering why the boxes hadn’t moved for days. Raising support requests that go nowhere, but seem to magically unstick things. It’s crazy.
💡 Tip: International shipping is surprisingly easy to screw up. Follow the advice that Crowd Supply give you. Talk to other people who have shipped internationally.
If you are in the UK, make sure you get yourself an EORI number. There’s nowhere to put it in any form on the shipping site, but you’ll need it on the paperwork.
Would you recommend this to others?
It’s definitely an experience. Pricing is so difficult - you need to make sure that you can sell at a high enough price to make things work.
Crowd Supply have a lot of experience with Crowd Funding and delivering products. They know what works and what doesn’t.
15. Personal Reflection
I’m not going to pretend that I’ve come out of this process with new found wisdom or some great understanding of the world and how it works.
Was it financially worth it?
As with most fun things, if I’d worked those hours for my normal consulting rates, I would have made a lot more money. I think I’ve made a small profit, so I really can’t complain.
Would I do it again?
Honestly, I really couldn’t say for sure. I would need to have a very compelling idea with a large potential customer base.
16. Closing Thoughts
Thanks for reading! If you’re working on a hardware product and considering a crowdfunding launch, I hope this helped. Everything here is just my personal experience. Your own journey may differ considerably. There is ample scope to really screw up and either not deliver, causing backers to lose money, or to lose quite a bit of your own money!
🤔 “In the end, I didn’t get rich — but I built something real that people are using and having fun with, and that’s worth a lot.”