View All Posts
read
Want to keep up to date with the latest posts and videos? Subscribe to the newsletter
HELP SUPPORT MY WORK: If you're feeling flush then please stop by Patreon Or you can make a one off donation via ko-fi
#DIY #ELECTRONICS #ESP32 #TOUCH KEYBOARD #ZX SPECTRUM

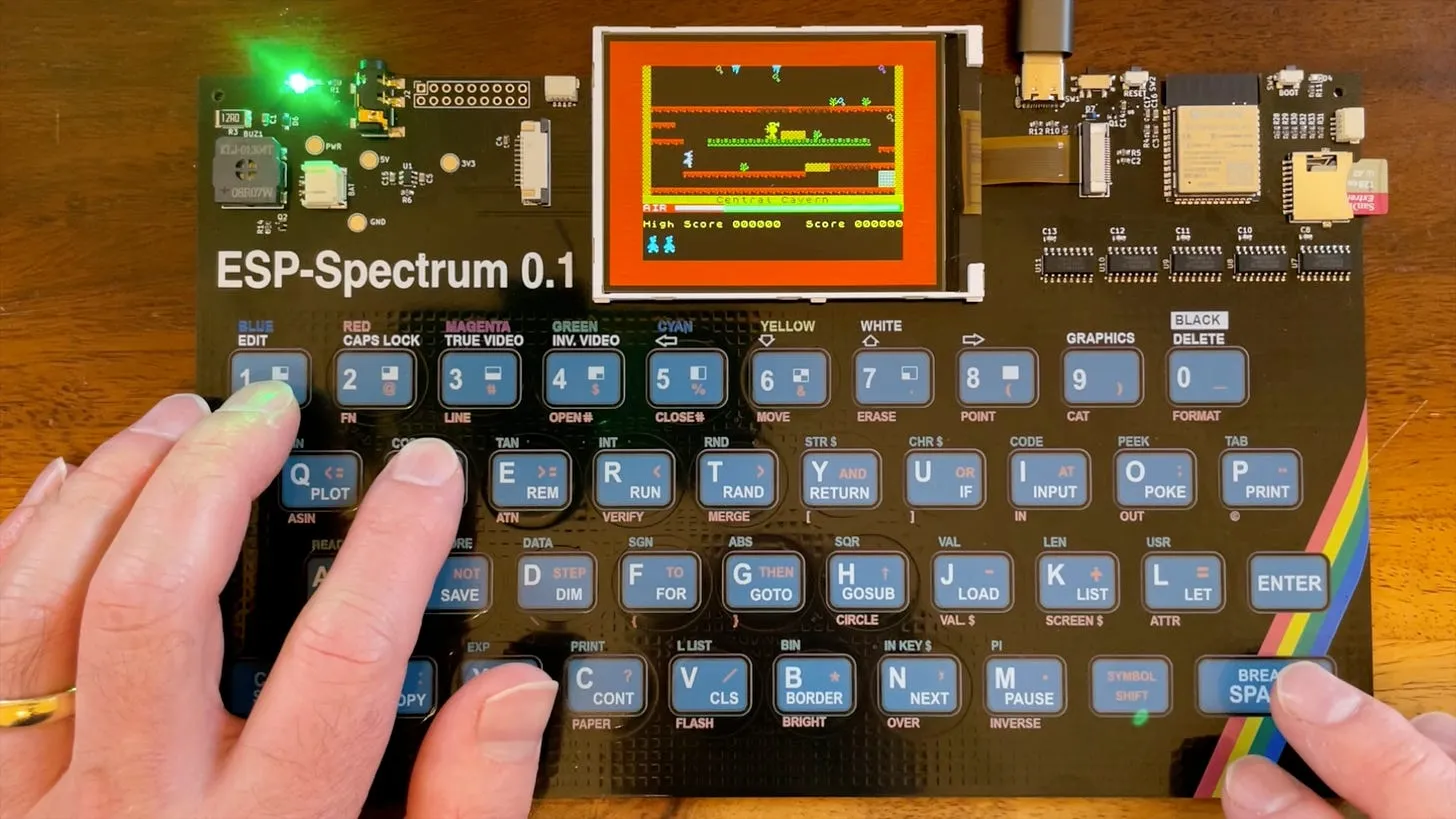
To make my ESP32 ZX Spectrum touch keyboard work even better I needed to make every single key completely independent.

So I need 40 touch pads. The ESP32-S3 only has 14 touch pins. For the current version I’ve been using a matrix approach. Which only needs 13 touch pins - which we’ve used for 5 columns and 8 rows.

Touch Matrix

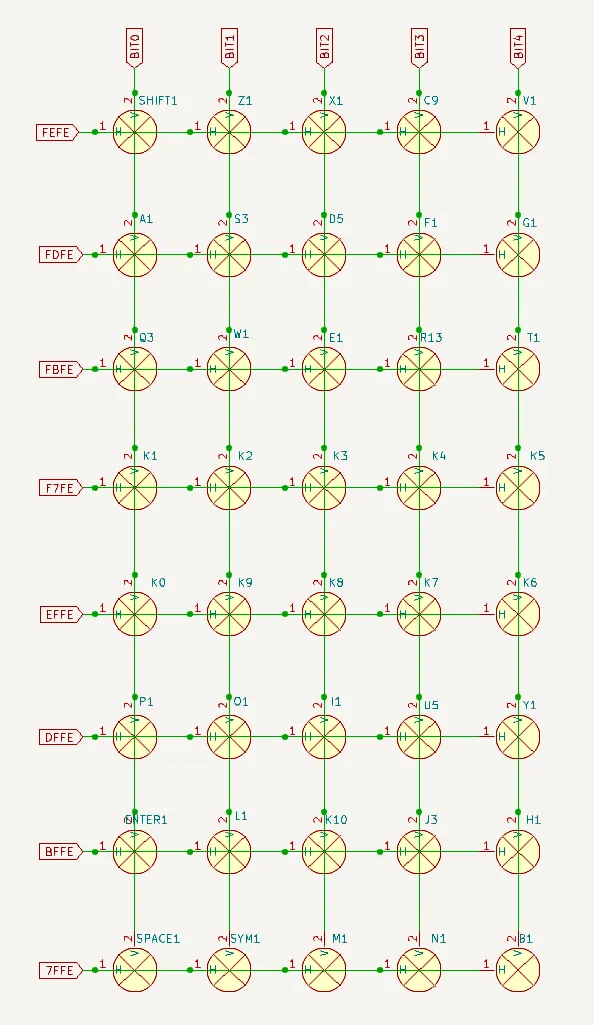
This actually works really well, but there is a problem. We detect some combinations of keys. And the ZX Spectrum relies on a lot of key combinations for BASIC - symbol shift being one of the most critical.

Also, a lot of games need to detect multiple key presses - if you can’t do this then you get some quite annoying behaviour.

So, let’s dig into how touch works.

If you hook up a touch pad to an oscilloscope you can see this pattern.

Touch Detection

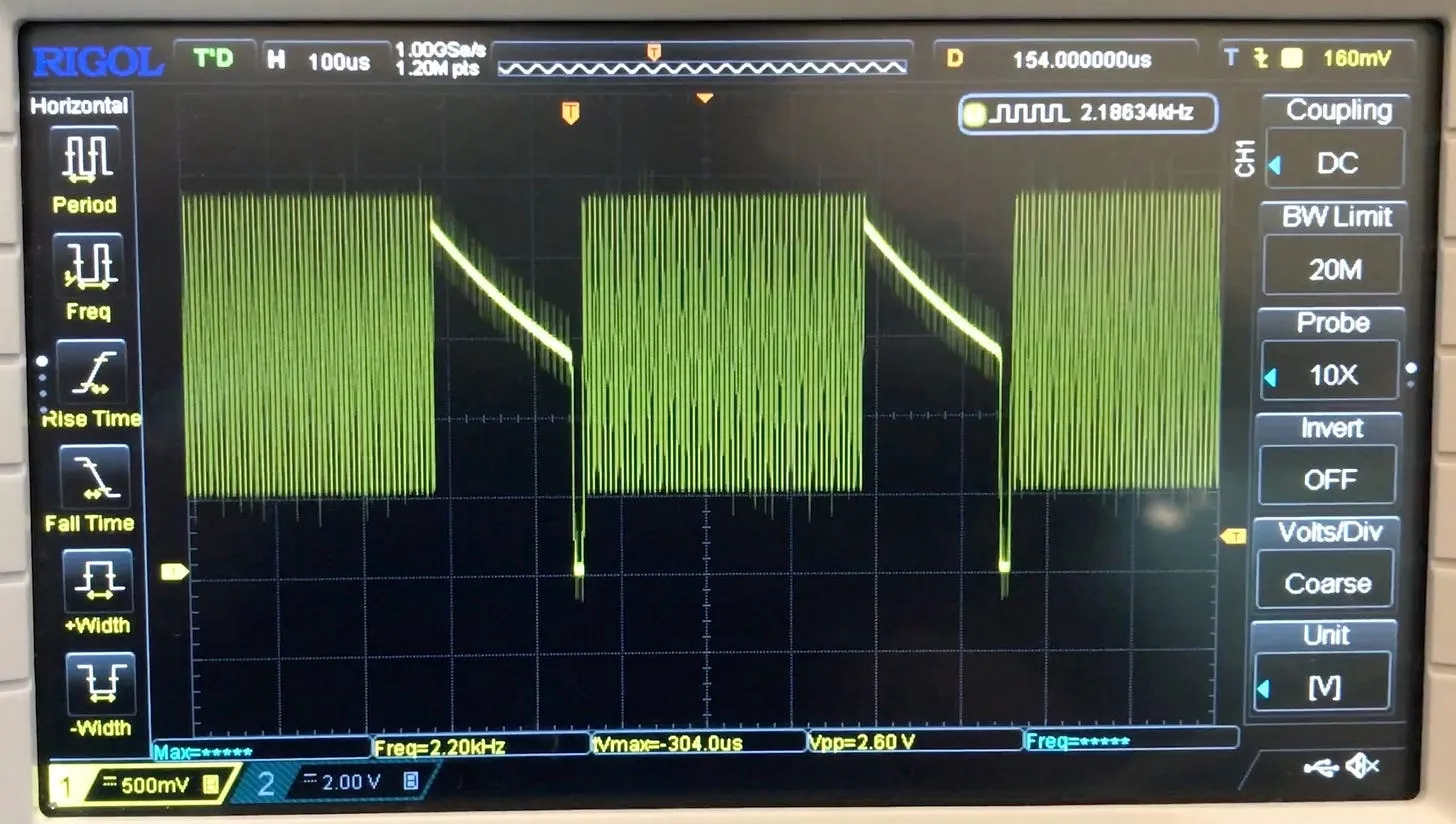
Zooming in on this, we can see this saw tooth pattern:

Touch Detection Zoomed In

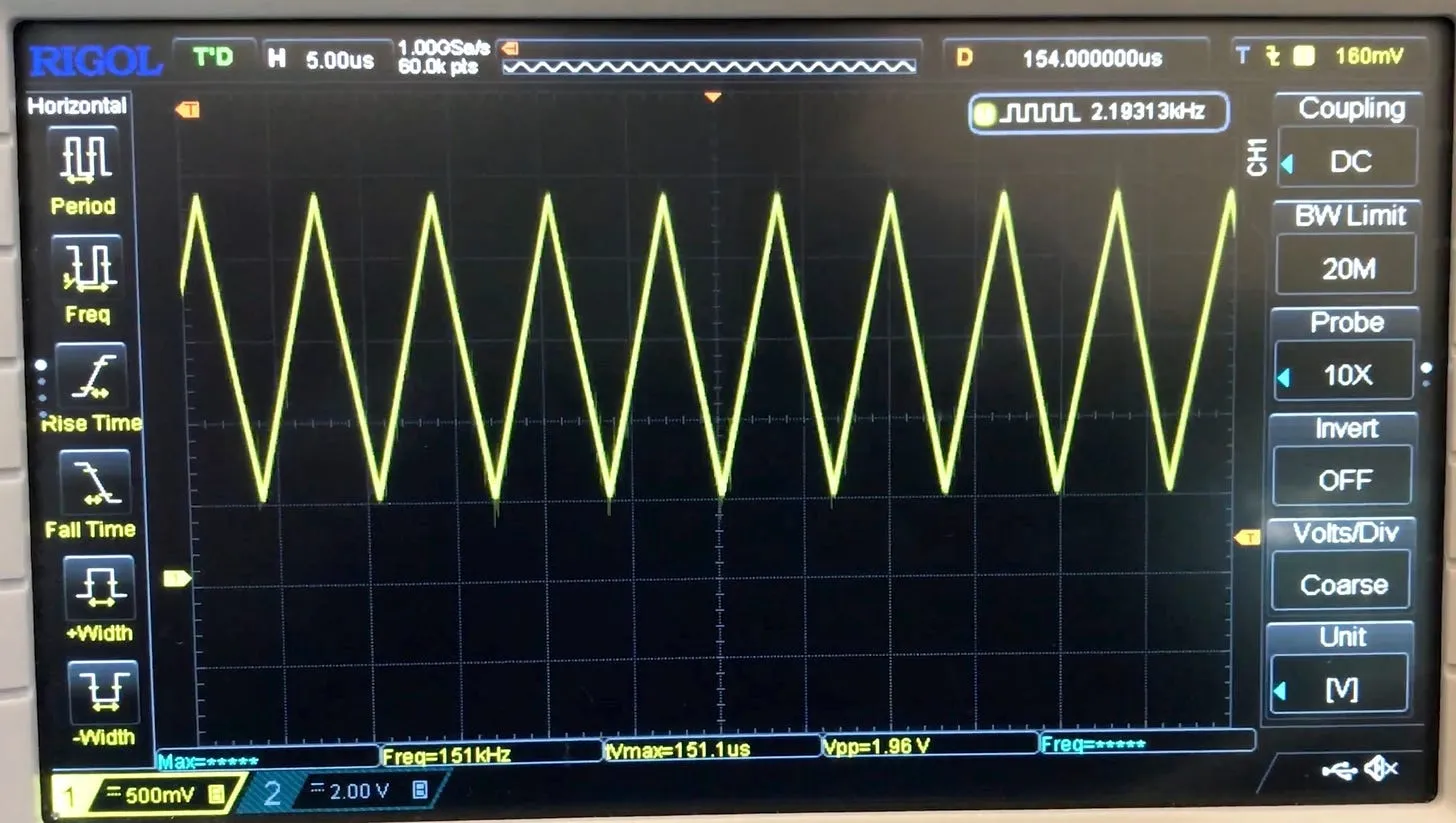
The way touch detection works is that the ESP32 times how long it takes to charge the pad up and down between two known voltages. The capacitance of the pad determines this. If we have a finger near or on the touch pad the capacitance increases - and thus the time increases.

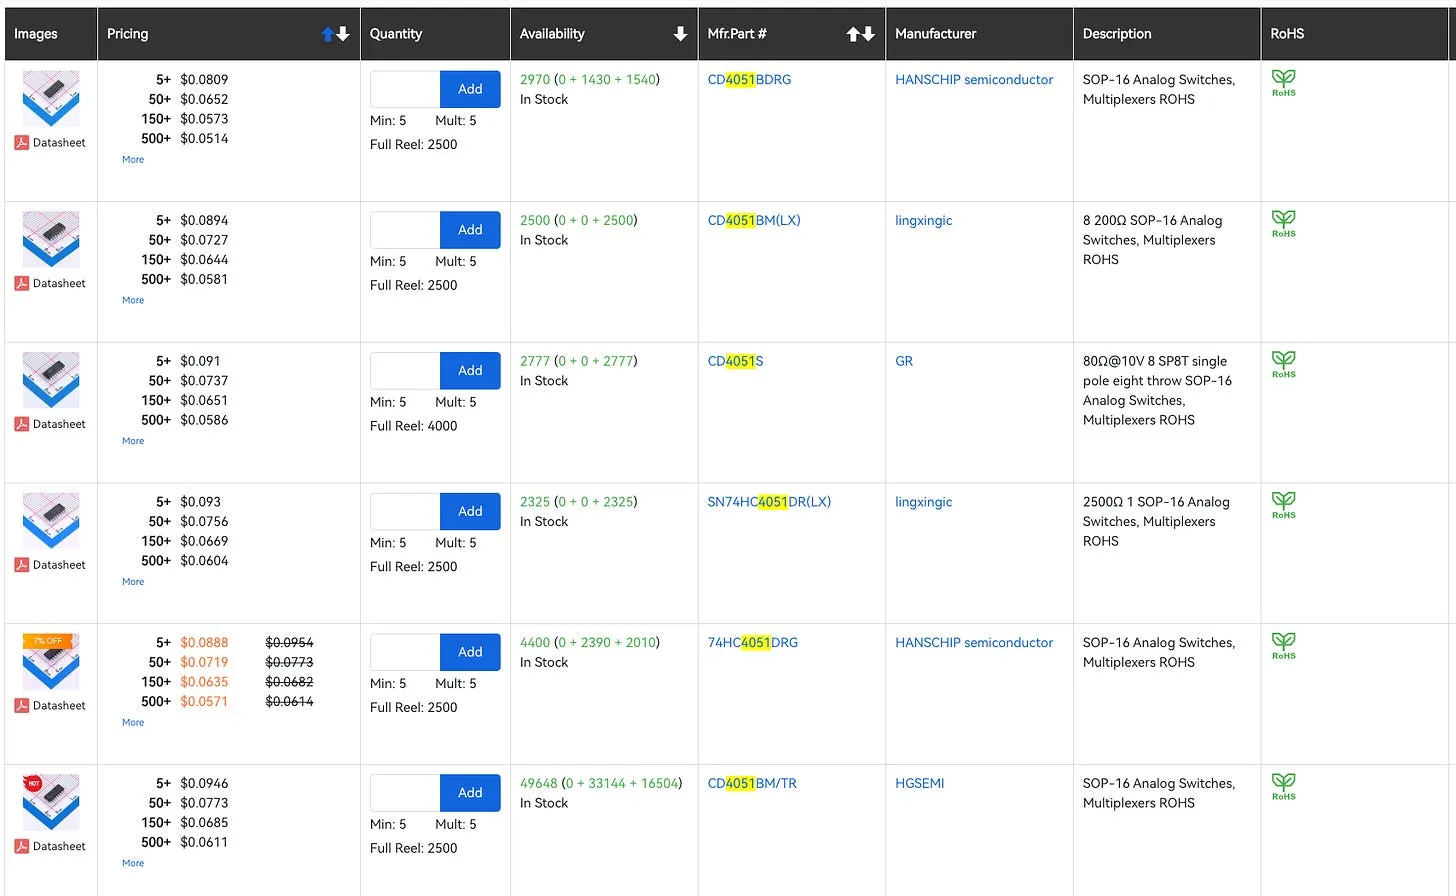
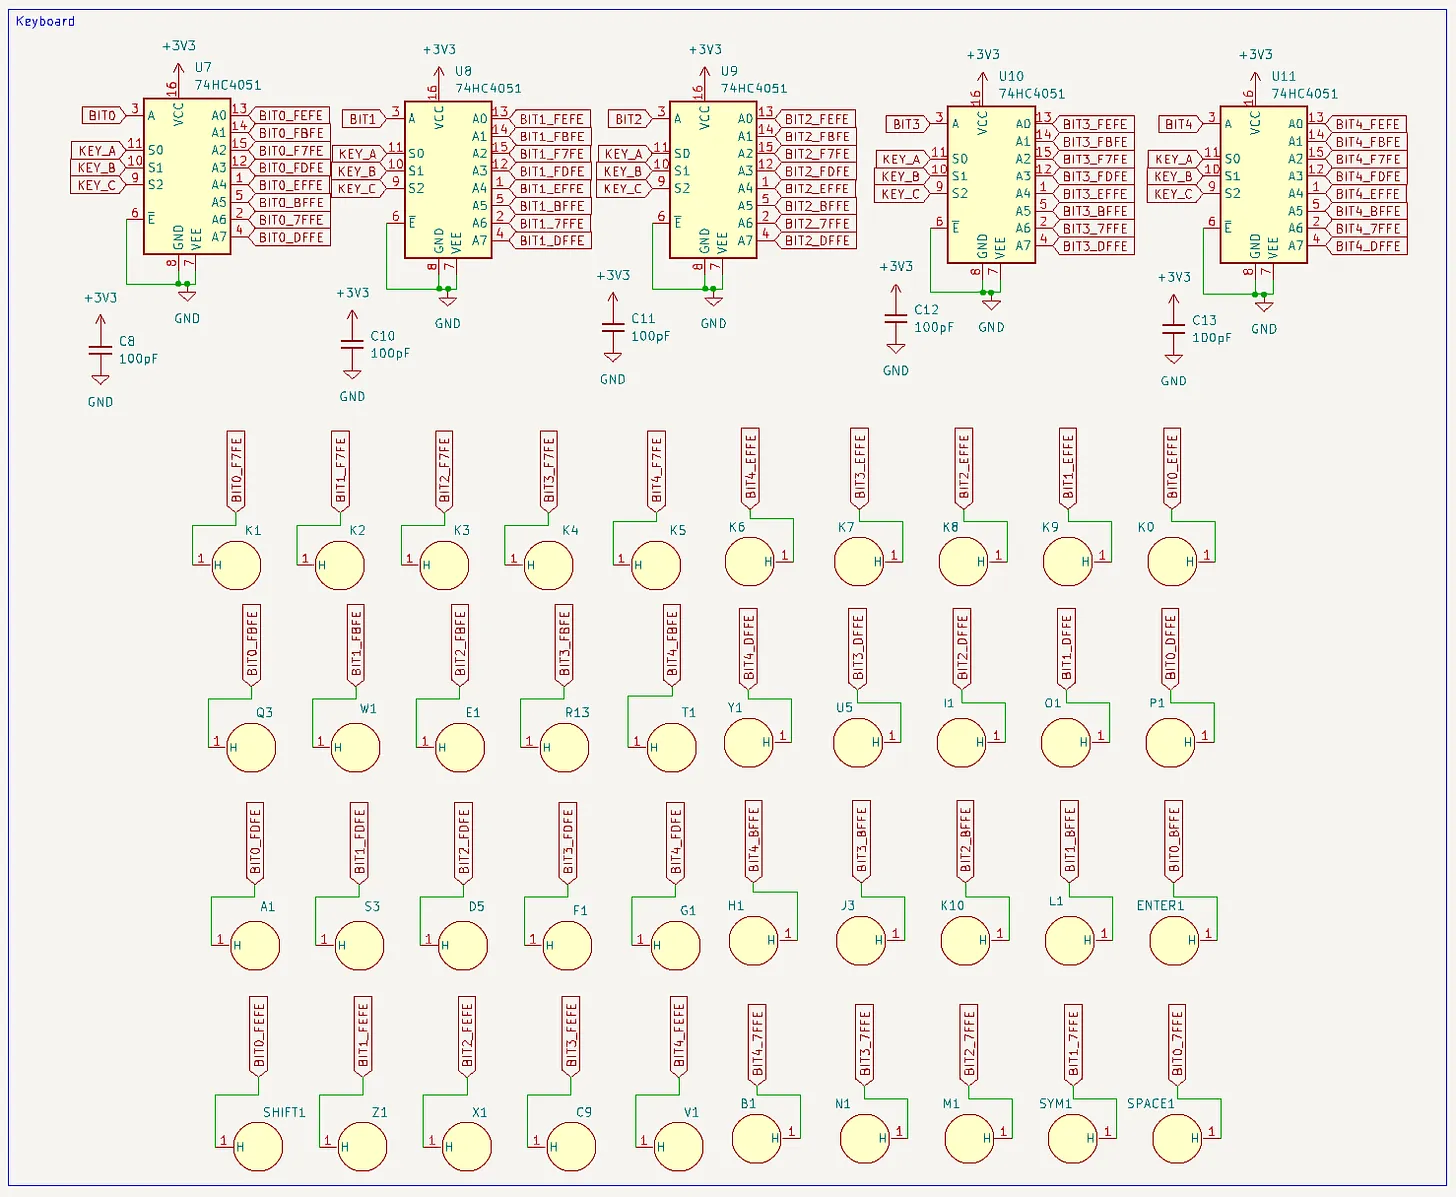
So, it’s just an analog signal. This got me thinking, there are some analog multiplexer ICs that have been around forever - the 4051 series of chips. There’s a whole bunch of manufacturers of these chips, so they are dead cheap (one could say, they are cheap as chips!).

Cheap as chips!

The only issue with this is that there is a quite high “on” resistance with these multiplexers.

Will this be the showstopper?

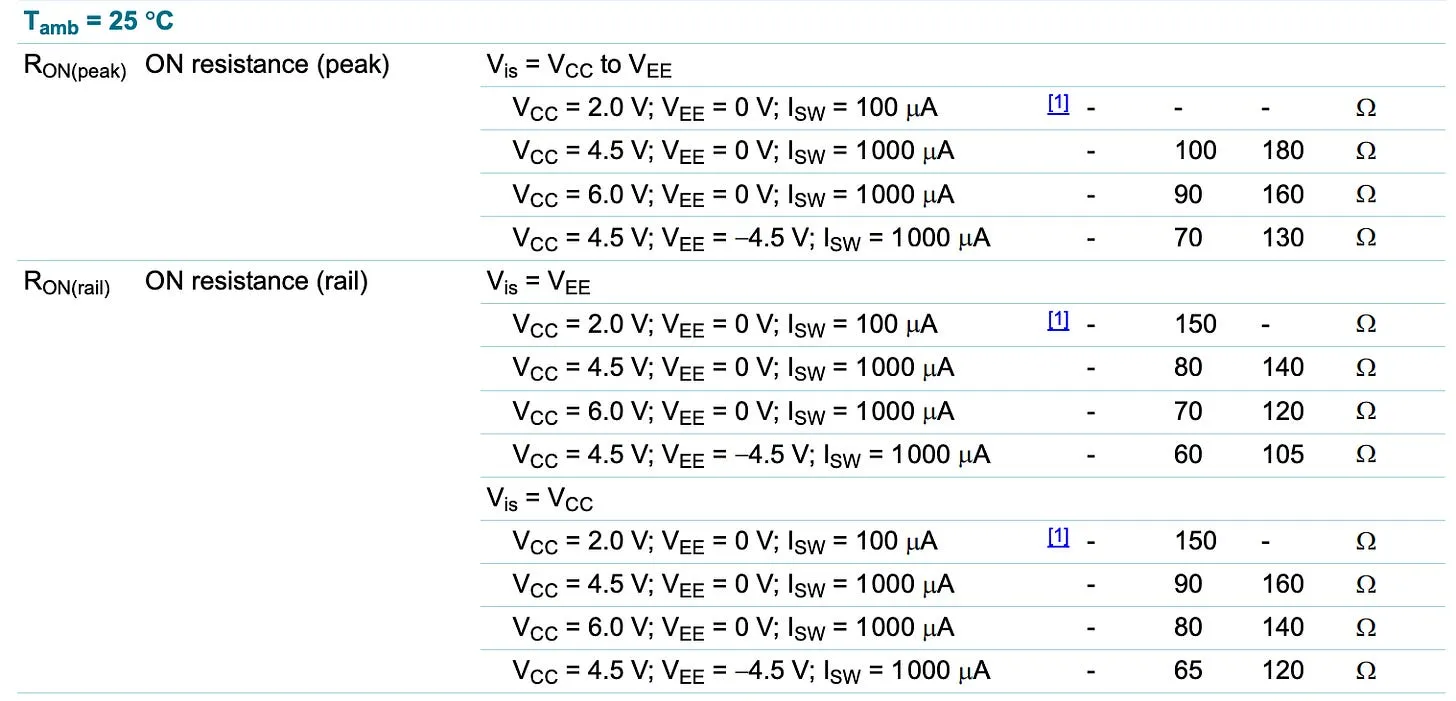
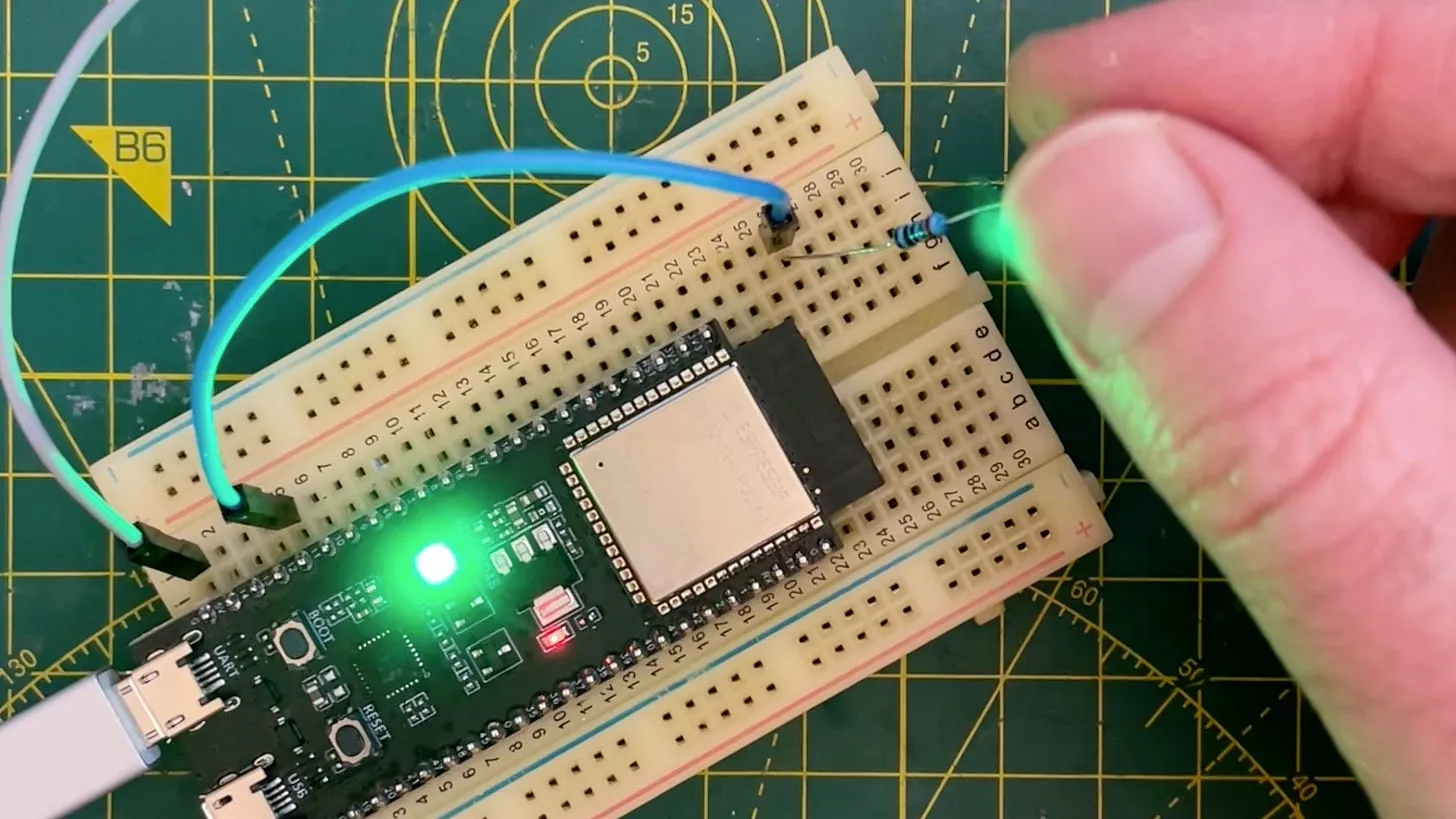
Will touch still work when there’s a resistance in series with it? My quick initial test seems to indicate that it will - this is with a 270ohm resistor and touch seems to work perfectly.

Touch still works with a resistor in series!

So, I ordered some breadboard friendly versions and cooked up this contraption:

Multi-touch touch - it works!

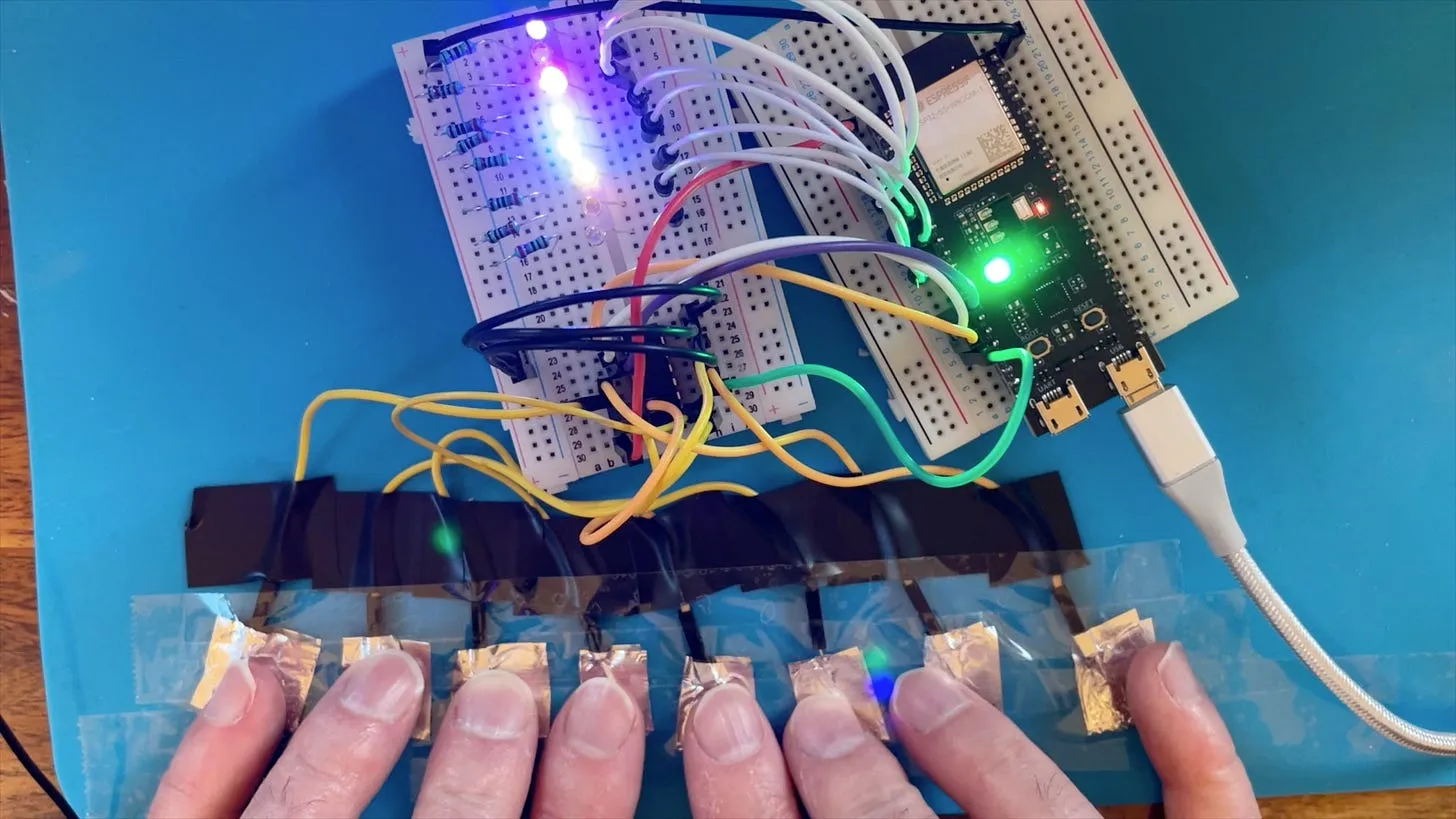
And it works! It works even better than I could possible imagine. It’s really cool.

With five of these ICs we can get 40 individual touch pads! And the BOM cost is only around $1! Amazing!

New keyboard schematic

I sent this off to PCBWay - and the boards came back a week or so ago. And - it works! The new keyboard is really good. We can detect every single combination of keys and it’s really responsive. Scanning the whole keyboard takes around 20ms.

We’re pretty much ready for production now - this was the last big challenge to solve.

It works! The new version is amazing!

#DIY #ELECTRONICS #ESP32 #TOUCH KEYBOARD #ZX SPECTRUM

Related Posts

Esp32 s3 zx spectrum - In a bid to quench my nostalgia and flex my ESP32 chops, I managed to get a ZX Spectrum emulator running on my ESP32-TV board! Then, spurred on by PCBWay's new full color silk screen service, I pursuit the audacious task of recreating the ZX Spectrum's iconic keyboard. It's been quite the joyride - wrangling touch pins, shrinking screens and creating a thing of beauty on PCB. It's not quite ready for the spotlight, but keep an eye on my newsletter for more eagerly-awaited updates. It's like the Spectrum is reborn!
Minimalist Microcontroller: Building a Bare-Bones Dev Board - In a thrilling DIY endeavour, I attempted to build the most minimalist ESP32 dev board possible. Diving deep into the schematic of the ESP32 S3 WROOM module, I chopped out the non-essentials and whittled our needs down to bare bones. The experiment saw me juggling USB data lines and voltage regulators, waving goodbye to an array of capacitors and connectors and boldly embracing the simplicity of direct connections. Despite a few hitches, the miniature Frankenboard came alive, proving that sometimes less is more...at least in the world of microcontrollers.
The PCBs are in production - what have I messed up? - After some stress and trepidation, I finally took the plunge and sent my PCB design off for manufacturing. My design centers around building a large seven-segment clock with LED filaments. Jumping hurdles such as voltages, pin usage, and limiting the load on my power supply, I've settled on the ESP32 as the system's heart and come up with a final circuit design. While doing this, I've quickly realized I could improve my layout and fixed a small mistake. Also, I've prepared for either types of LED filaments - the high-voltage ones or the larger, 3v ones. However, I did bungle up a couple of things on the enable line of the shift registers and board layout. But hey, this is a learning curve, right? Can't wait to get the boards and see what other exciting errors surface!
ESP32-S3: Which Pins Should I Use? - As an enthusiast of the ESP32-S3's versatility, I recognized the importance of understanding which pins are best to avoid. Inspired by the Random Nerds page for the classic ESP32, I've created a comprehensive pinout for the ESP32-S3 available on GitHub. The community's input is highly valued – suggestions and corrections are welcome to refine this resource into a dynamic guide for developers.
I broke it and then i fixed it - Started off on a techie adventure with an RP2040 DVI board from Adafruit, aiming to get the pico-zxspectrum going. Things started acting haywire once the USB hub got involved, ending in a complete shutdown, intuitive diagnosis showed the power pin was a ghost town! After pin-pointing (and removing) the dead IC, I performed a delicate soldering operation to bless it with a new 3V3 regulator. Working the kinks out with the resolution led to a thrilling revival and, voila, we were back in business with DVI output and SD Card support!

Related Videos

ESP32 - 40 Independent touch pins! - Wow! I'm absolutely thrilled with the results of this video - I've been experimenting with my ESP 320x Spectrum board and its touch Matrix keyboard. Had a bit of trouble with combined button inputs, so I took a deep dive into how touch works and discovered these old, but gold, ICs. After some testing, they turned out to be a perfect solution to my multiplexing problem! I then got a new board design shipped from PCB way - looks awesome and it didn't break the bank. Can't believe how responsive the keyboard is! Got the 'Hello World' program up and running, and even played Manic Miner. The final board's all set - can't wait to get this on sale! And keep watching because I've got some interesting plans for this expansion port!
ESP32-S3 ZX Spectrum - Full Color Silk Screen is really cool! - Super stoked to share this creation – an ESP32 ZX Spectrum emulator! Although it's still very much a proof-of-concept, it's looking pretty rad. I've got the classic games like Manic Miner, and yes, you can program in basic too! In perfect Sinclair fashion, I'm planning on selling this key piece of nostalgia for just £99. Work still needs to be done before the production phase, but rest assured, I'm meticulously working out the kinks, including tweaking the keyboard to ensure even better user experience. And on the technical side - a single ESP32S3 runs the show and we’ve multiplexed the keys exactly like the OG Spectrum. It's been great fun designing this piece of kit with the new full color silk screen printing from PCB way. Stay tuned for further updates!
ESP32-S3 - Which Pins Are Safe To Use? - In this video, I've decided to dive deep into the ESP32-S3, a module ruling my lab recently due to its plug-in-and-play functionality, and the flexibility offered by its GPIO matrix. However, working with it requires vigilance, especially with regard to the strapping pins and USB data pins, among others. Discovering such quirks, I've encountered unexpected values, short glitches and the occasional code crash. To help you avoid these bumps, I've documented everything I've learned on my GitHub repo, where I'm inviting you, my fellow makers and engineers, to contribute your valuable experiences and findings. After a minor hiccup with my ESP32-TV, expect an updated PCB design, courtesy of PCBWay. Explore the ESP32-S3 with me, and let's unravel its secrets together, one pull request at a time.
Lovely High Res E-Paper Display - Just when we thought we'd done with our mailbag, some exciting new stuff tips up. This time, we've got a soldering kit, a fun-looking Dash, and extra bonus, an ink plate 10, which is a cool e-paper display from Soldered. We've unboxed it, pulling out a board with an esp32 module, an SD card, and a battery connector. One of the major selling points is its open-source nature, you can download all the schematics from GitHub, and for those inclined, learn about how to build pcbs. Also showcased a Simon Says game soldering kit, despite my modest soldering skills (we all need practice, eh?), it turned out to be good fun. Plus, we've got a Dev board fitted with an at Mega 328p and an ultra-bright ws2812 RGB LED. Let's see if I can turn this e-paper display into a weather display or maybe you have more exciting ideas, drop them down in the comments!
Minimalist Microcontroller: Building a Bare-Bones Dev Board - Dive into the fascinating process of building a minimal ESP32-based dev board, beginning with the ESP32-S3 Wroom module, and eliminating unnecessary components. Through soldering, wire connecting, and voltage testing, we reach a product that's compact, efficient and fully functional.
HELP SUPPORT MY WORK: If you're feeling flush then please stop by Patreon Or you can make a one off donation via ko-fi
Want to keep up to date with the latest posts and videos? Subscribe to the newsletter
Blog Logo

Chris Greening


Published

> Image

atomic14

A collection of slightly mad projects, instructive/educational videos, and generally interesting stuff. Building projects around the Arduino and ESP32 platforms - we'll be exploring AI, Computer Vision, Audio, 3D Printing - it may get a bit eclectic...

View All Posts