🌈 ESP32-S3 Rainbow: ZX Spectrum Emulator Board! Get it on Crowd Supply →
View All Posts
read
Want to keep up to date with the latest posts and videos? Subscribe to the newsletter
HELP SUPPORT MY WORK: If you're feeling flush then please stop by Patreon Or you can make a one off donation via ko-fi
#ADAFRUIT #DVI BOARD #HARDWARE DIAGNOSTICS #PICO-ZXSPECTRUM #RP2040 #SD CARD #SOLDERING #USB #VOLTAGE REGULATOR

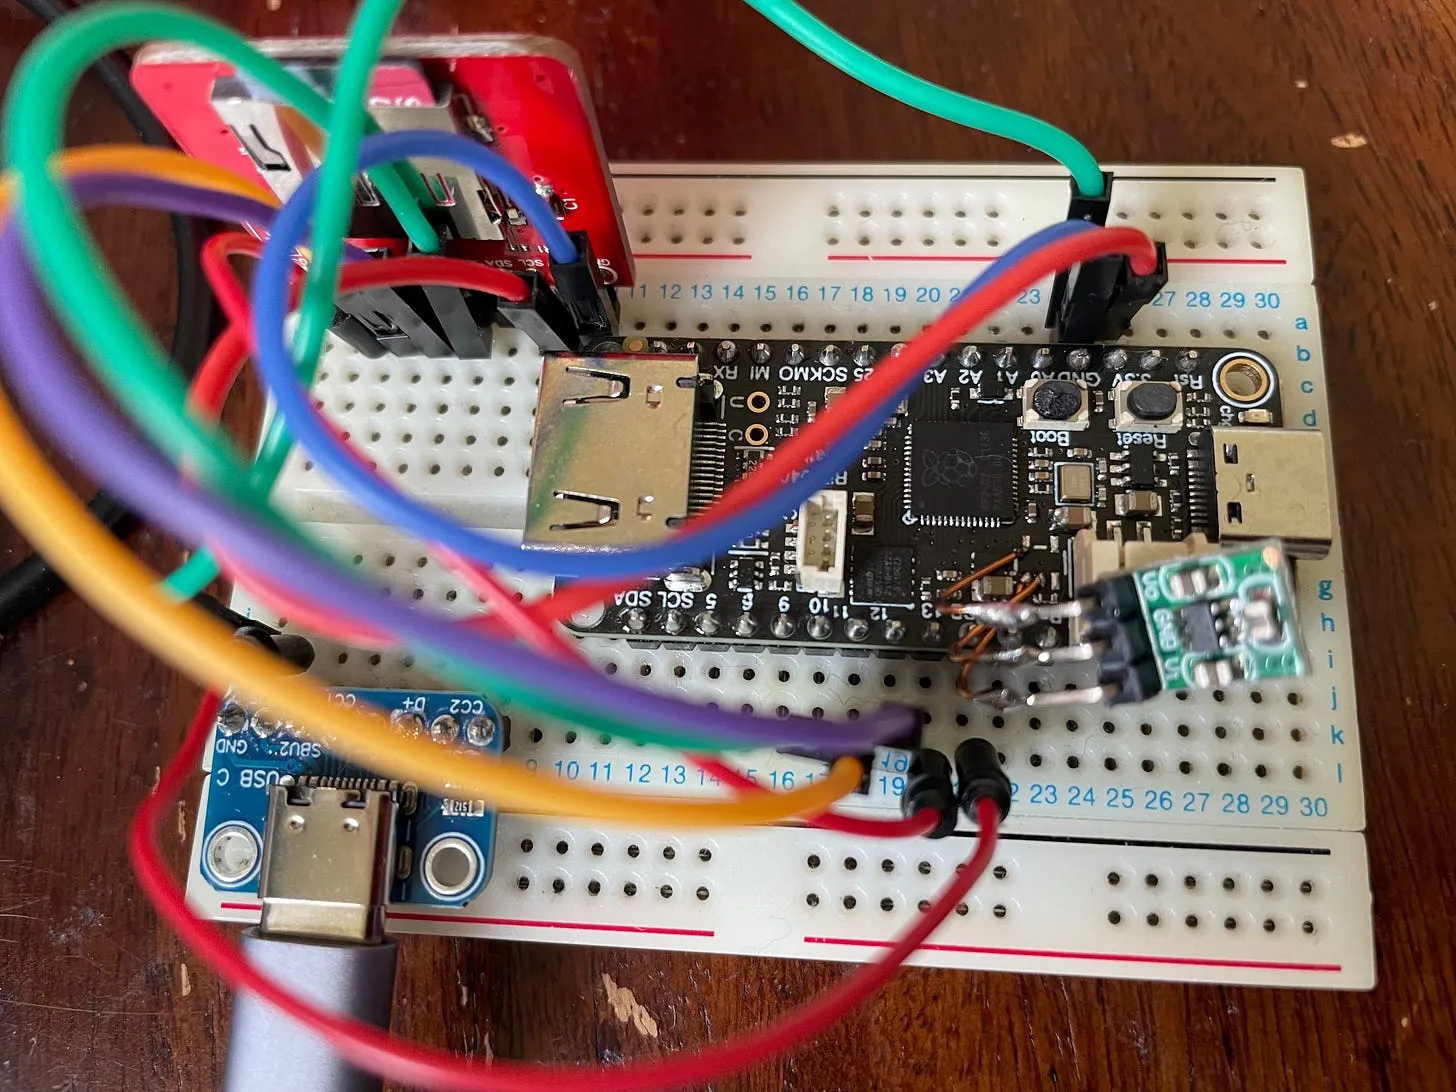
I’ve been playing around with DVI output from the RP2040 and I got one of these Feather DVI boards from Adafruit.

My intention was to get the pico-zxspectrum software running on it. Somewhat naively I just bought the first board that I found from googling RP2040 DVI - and unfortunately it wasn’t supported out of the box.

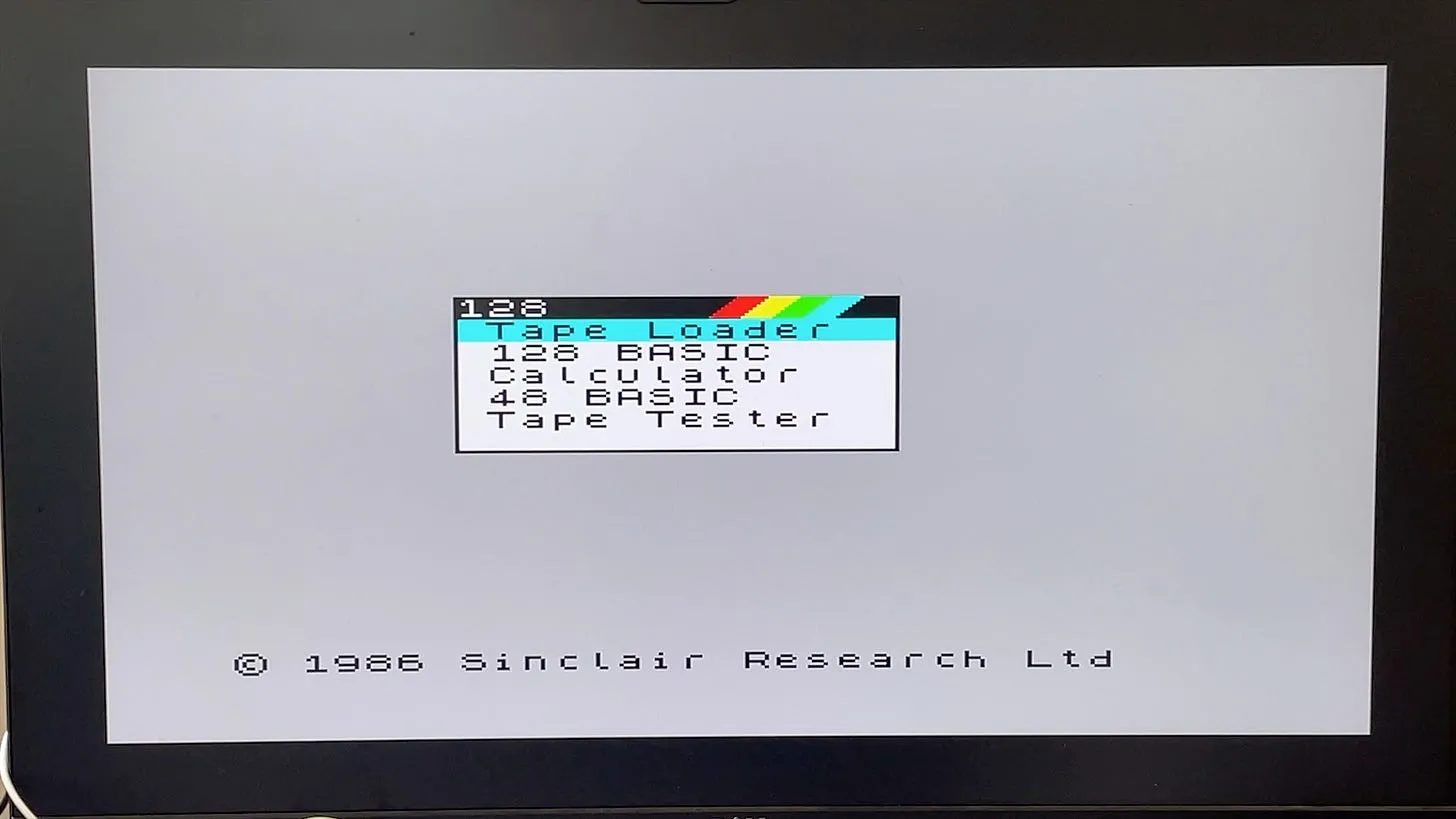
After a bit of hacking around and learning a bit about cmake, I was able to get it up and running.

It works! Or does it….

I had a handy USB-C friendly hub so the next step was to plugin in a USB keyboard. And this is where things started to go wrong.

The board started to behave very erratically, it would occasionally have a corrupt screen, and reboots with just freeze part way through booting. It was dreadful. Weirdly it seemed to be a lot better when the USB hub was not connected (I’ve since come to the conclusion that the USB hub may have been a red herring and I was actually driving things too hard with my chosen resolution).

But I persevered and continued trying to get the SC Card to work so I could test out some games.

And then, the board died. The board “was no more”, “had ceased to be”, “was bereft of life, it rests in peace”…

undefinedThis board is deceased…

Probing some of the power pins, I could see that 5V was definitely going in, but there was nothing on the 3V3 pin. In fact, the 3V3 pin was a dead short to ground. Definitely not what you want.

This is not supposed to beep…

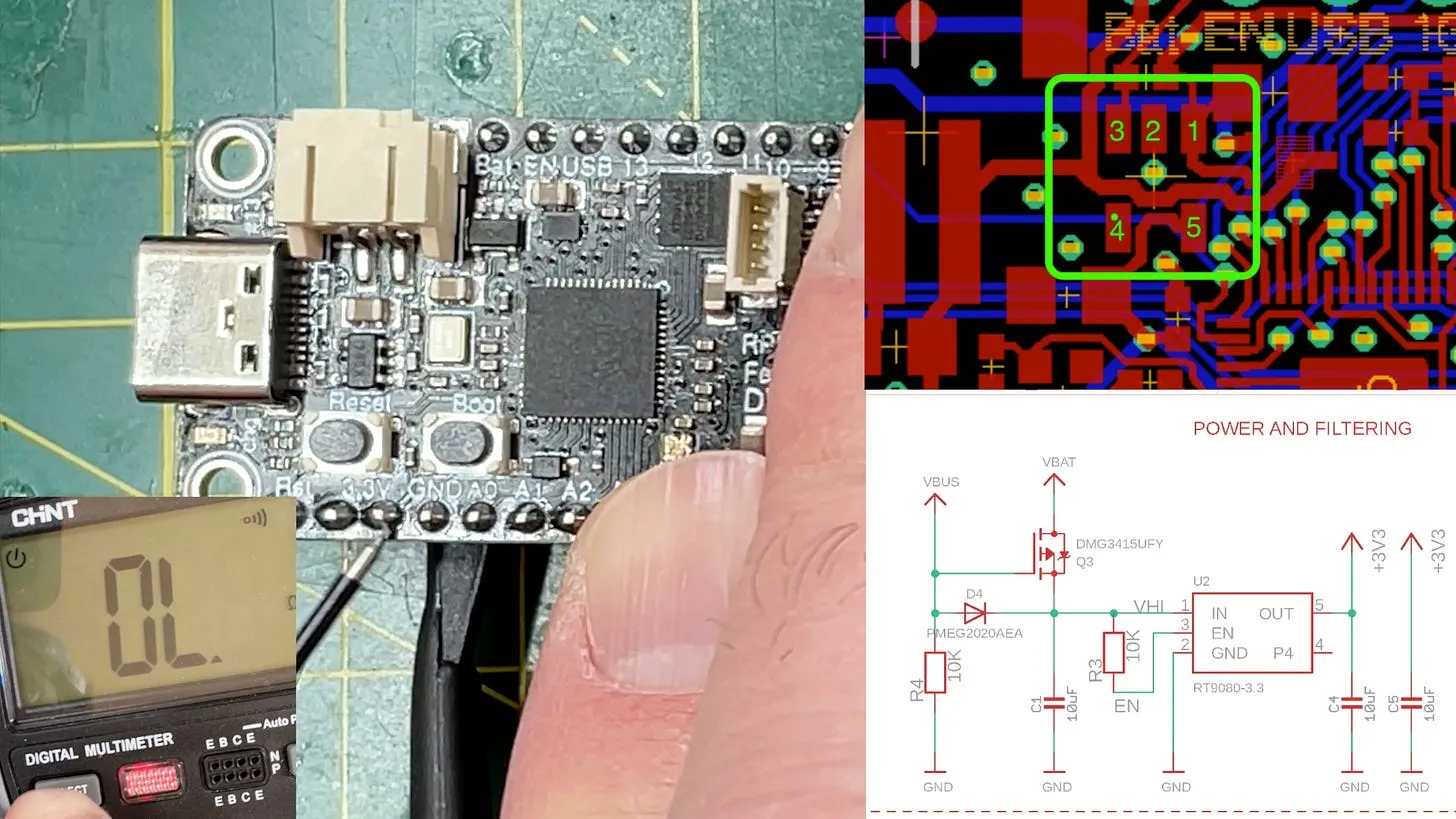
Probing the voltage regulator, my suspicion was raised when I found that the enable pin was also a dead short to ground.

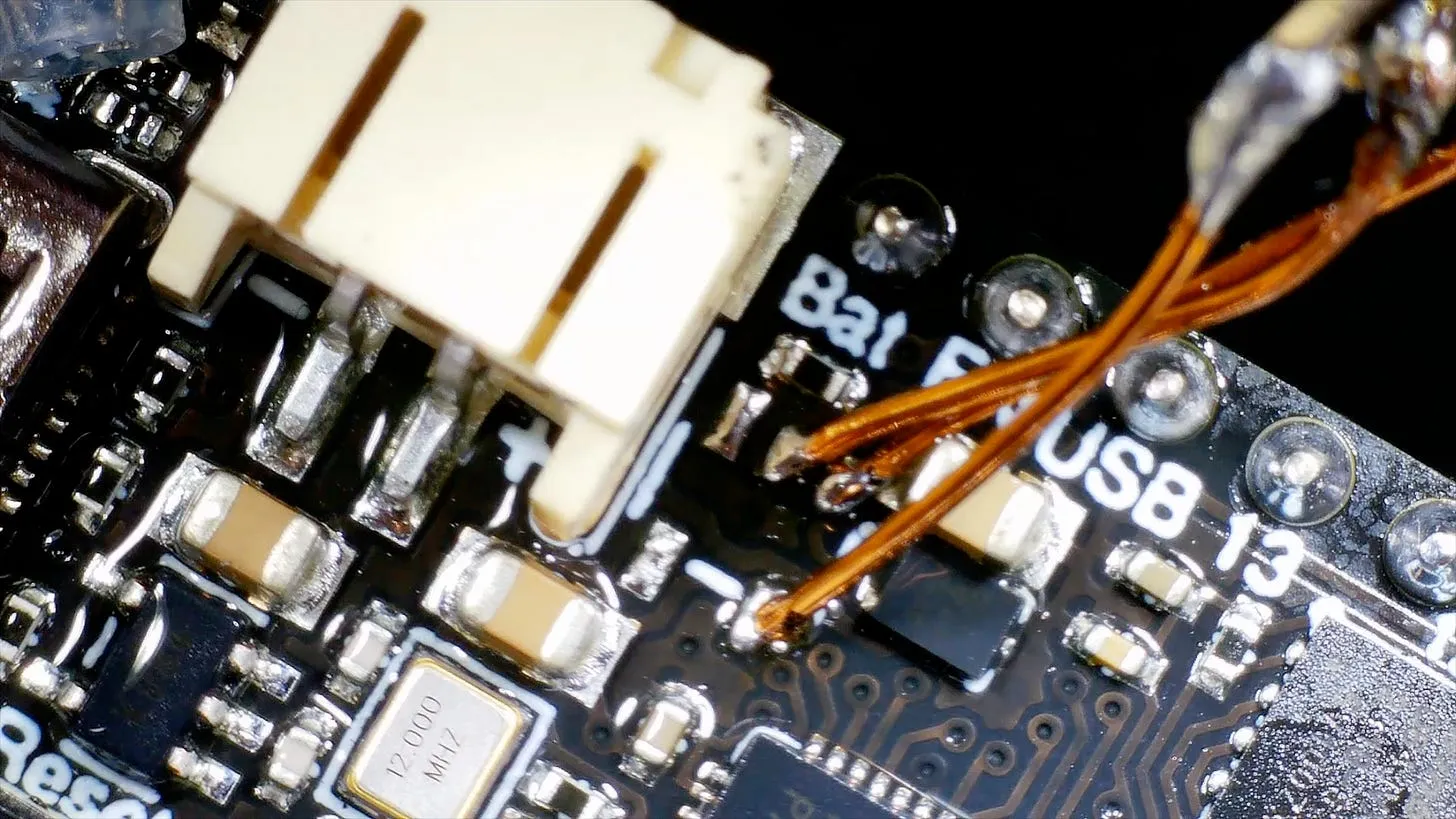
So I removed the pin. This was a bit of a pain due to all the plastic components surrounding the part, so I had to add quite a lot of protection from the hot air gun.

Major heart surgery

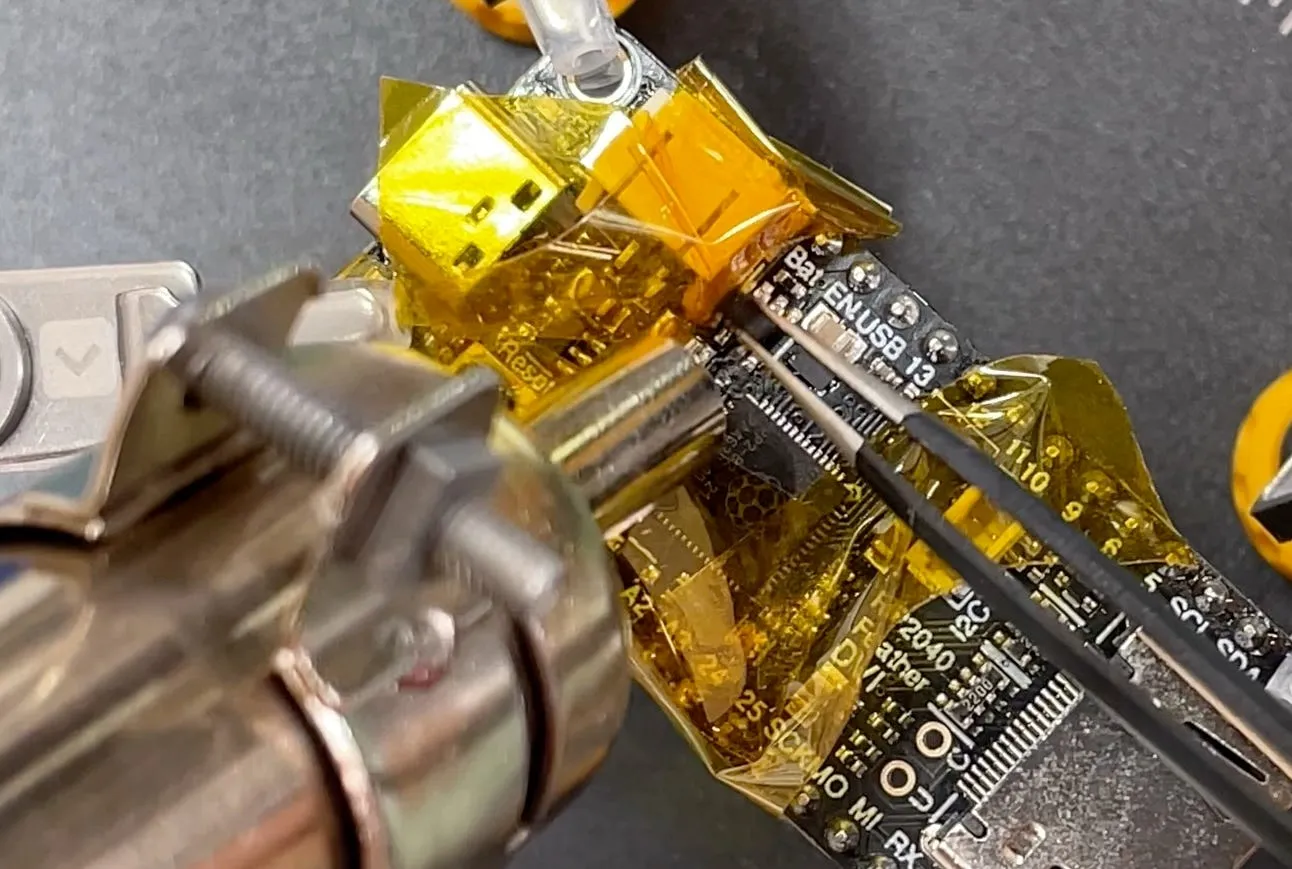
And with the dead IC removed I was able to solder on a little 3V3 regulator board.

Heart transplant…

With the new regulator soldered on, everything sprang back into life. I’ve changed the resolution I was trying to get out of the board and now things seem to be a lot more stable. I’m still not sure why the voltage regulator died - it’s a bit of a mystery…

But I now have everything working nicely with an SD Card and output going to the DVI.

It works!

#ADAFRUIT #DVI BOARD #HARDWARE DIAGNOSTICS #PICO-ZXSPECTRUM #RP2040 #SD CARD #SOLDERING #USB #VOLTAGE REGULATOR

Related Posts

Red Arcade Thing Repair - I resurrected a dead AliExpress arcade handheld by swapping the blown 3.3V regulator (I now own 99 spares), adding a TP4056 charger with Schottky diode isolation, and nursing a 0V LiPo back to life. A bit of hot-plate rework, tidier wiring, and—flip the switch—boom: it boots! It’s not pretty, but it’s alive again.
Minimalist Microcontroller: Building a Bare-Bones Dev Board - In a thrilling DIY endeavour, I attempted to build the most minimalist ESP32 dev board possible. Diving deep into the schematic of the ESP32 S3 WROOM module, I chopped out the non-essentials and whittled our needs down to bare bones. The experiment saw me juggling USB data lines and voltage regulators, waving goodbye to an array of capacitors and connectors and boldly embracing the simplicity of direct connections. Despite a few hitches, the miniature Frankenboard came alive, proving that sometimes less is more...at least in the world of microcontrollers.
It blew itself up! - I recently got my hands on a cheap mini handheld game console from AliExpress that gave up the ghost a bit sooner than expected! After some detective work with a multimeter, I found a dead battery and a suspicious burn mark on the PCB. Looks like the culprit was a failed capacitor, with some diodes to blame too. I managed to jump-start the board, though it lost its voice in the process. Replacement parts are on the way; stay tuned for the next round of electronic surgery!
Vibing a PCB - surprisingly good - In my latest adventure, I challenged AI to design a working ESP32-S3 development board from scratch using Atopile and Claude. The idea was as simple as vibe-coding actual hardware without diving into the code. It was a chaotic yet fascinating journey, with some misses like unwired components and a forgotten capacitor. After a few prompts, the AI delivered a surprisingly functional board featuring USB-C, an AMS1117 regulator, and status LEDs. While not yet perfect, vibe-coding feels like a glimpse into the future of hardware design.
A Potentially Explosive Error - Just received the new PCBs for the ESP32-TV project and they're looking sharp with only a tiny resistor tweak needed. But I discovered a sneaky, undocumented resistor causing a conflict between the ESP32 and USB2244 over the USB connection. Fixed that, but there's a bigger issue lurking in the design - check the schematic in the video and see if you can spot it before I reveal the explosive mistake!

Related Videos

I blew up my dev board - and then fixed it! - So, in my latest experiment with an 8 feather DVI board, I was greeted with a strange smell and a board that stopped working flat. After some hair-raising debugging, I discovered that our villain might be a dodgy Voltage Regulator, throwing a tantrum and refusing to output voltage steadily. After removing it, I conscripted an external 3.3 volt regulator and voila! The board sprang back to life, and we have a happy ending. But the mystery continues: what wreaked havoc in the first place? I'm pinning the blame on a rebellious USB hub. So, next on the agenda, shopping for a new hub before it sends another board to its early grave.
Dodgy circuit could have caused a fire! - So, I got this red mini handheld game thing from AliExpress and it died pretty quickly. After a bit of tinkering, I found that it still draws current but isn't turning on because of a dead battery and a burnt voltage regulator. I removed the faulty components and injected 3.3 volts directly into the system, and guess what? The screen lights up and it works, but there's no sound. Despite the hiccup with my microscope, which stopped recording some interesting bits, you get the picture. It's partly revived but not quite there yet. Big shout out to PCB way who help us out with PCBs!
Making the Arcade Thingy Safe - I’ve got all the bits to bring this little arcade game back to life: swapped the dead 3.3V regulator (had to buy 100… oops), tried and successfully revived the totally flat Li‑ion with a trusty charger board, and I’m adding a couple of Schottky diodes to handle USB vs battery power. Used the mini hot plate to reflow the regulator (not my finest soldering and, of course, the microscope didn’t record), confirmed 5V in and 3.3V out, and the screen actually boots. Next up: stick the charger board down with Kapton, wire B+/B− to the test points, cut the right track, and tidy the power routing.
ESP32-S3 - Which Pins Are Safe To Use? - In this video, I've decided to dive deep into the ESP32-S3, a module ruling my lab recently due to its plug-in-and-play functionality, and the flexibility offered by its GPIO matrix. However, working with it requires vigilance, especially with regard to the strapping pins and USB data pins, among others. Discovering such quirks, I've encountered unexpected values, short glitches and the occasional code crash. To help you avoid these bumps, I've documented everything I've learned on my GitHub repo, where I'm inviting you, my fellow makers and engineers, to contribute your valuable experiences and findings. After a minor hiccup with my ESP32-TV, expect an updated PCB design, courtesy of PCBWay. Explore the ESP32-S3 with me, and let's unravel its secrets together, one pull request at a time.
Can You Spot the Problem? - Buckle up folks, this video is a thrilling one! There's everything from unboxing my new ESP32 TV boards that arrived from PCB Way to discovering some hidden issues. We're talking about some pesky problems, surprises, and even a potential catastrophic error that could've led to a disaster. The main dish is the high-speed SD card access over USB - ultimately achieving a whooping transfer rate! But, the journey is a roller-coaster ride, from the project completely failing initially, to some smart hacks and triumphant moments. All the peripherals worked well, from the display to the sound amplifier and even the infrared receiver. Despite the ups and downs, there's a lot to learn and that's what makes this video exciting! Can't wait to share the improvements I have in mind for turning the prototype into the ultimate all-in-one device. But first, let's address the elephant in the room - an ill-placed diode that's a ticking bomb, because you know, safety first!
HELP SUPPORT MY WORK: If you're feeling flush then please stop by Patreon Or you can make a one off donation via ko-fi
Want to keep up to date with the latest posts and videos? Subscribe to the newsletter
Blog Logo

Chris Greening


Published

> Image

atomic14

A collection of slightly mad projects, instructive/educational videos, and generally interesting stuff. Building projects around the Arduino and ESP32 platforms - we'll be exploring AI, Computer Vision, Audio, 3D Printing - it may get a bit eclectic...

View All Posts