🌈 ESP32-S3 Rainbow: ZX Spectrum Emulator Board! Get it on Crowd Supply →
View All Posts
read
Want to keep up to date with the latest posts and videos? Subscribe to the newsletter
HELP SUPPORT MY WORK: If you're feeling flush then please stop by Patreon Or you can make a one off donation via ko-fi
#ALIEXPRESS #ELECTRONICS #KICAD #LI-ION CHARGER #LP4054 #REVERSE ENGINEERING #TP4054 #USB-C

I saw these on AliExpress and thought - “blimey - these are very small, let’s but some!”

You can find the board here.

And they are really small, the PCBs are barely wider than the USB socket and are a couple of mm shorter. They come in at 10mm x 6mm.

The PCBs

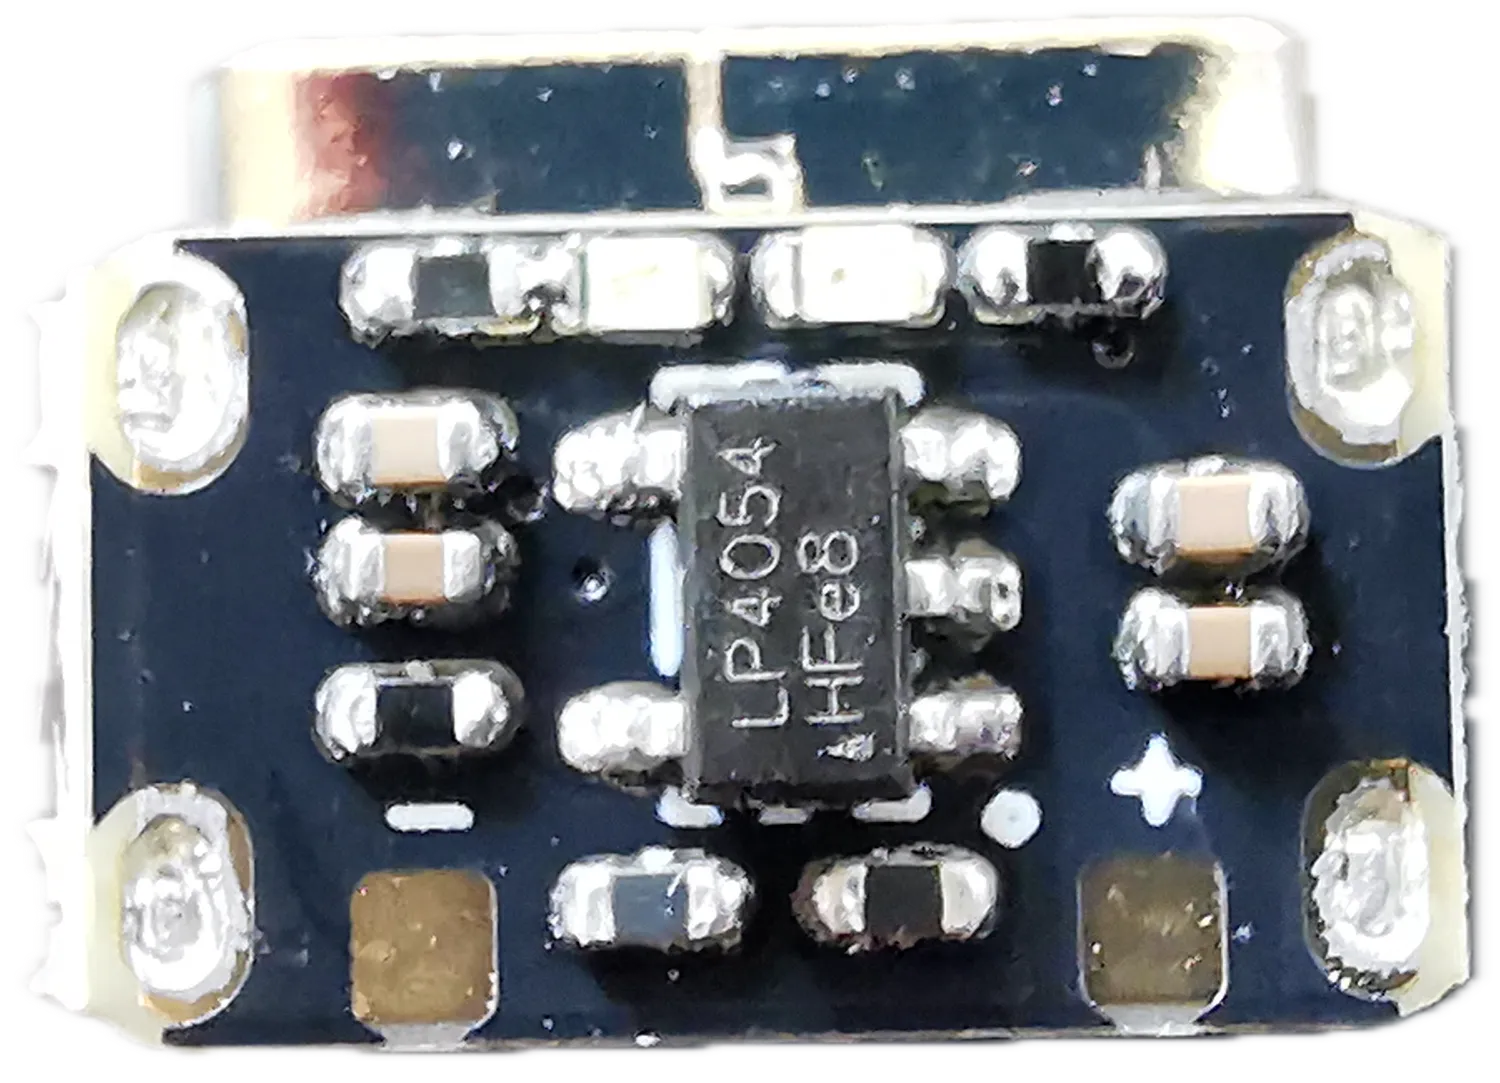
The boards are based around the LP4054 (also available as TP4054). This is a linear lithium ion battery charger.

Reverse engineering the schematic, we end up with this:

The schematic

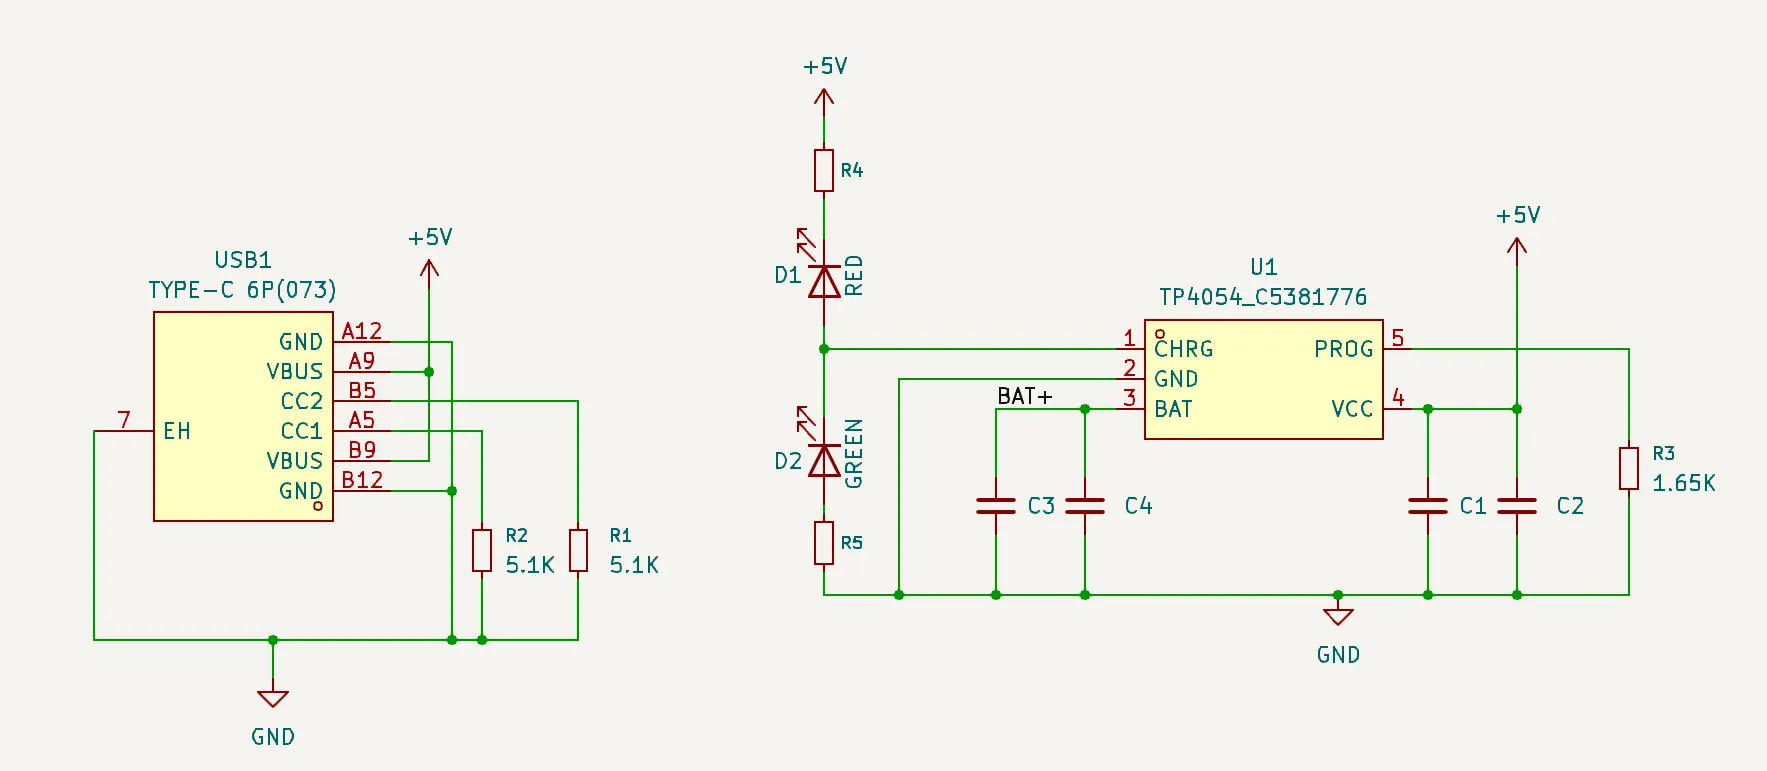
We have the standard 5.1K resistors on the CC lines - these are pretty important - without these a lot of USB-C power sources won’t actually deliver any power.

There are decoupling capacitors on the VCC and the battery pins of the IC.

And the programming resistor on this board is 1.65K - this gives us a charging current of approximately 600mA. This matches up with what we see when charging up a flat battery.

600mA charging current

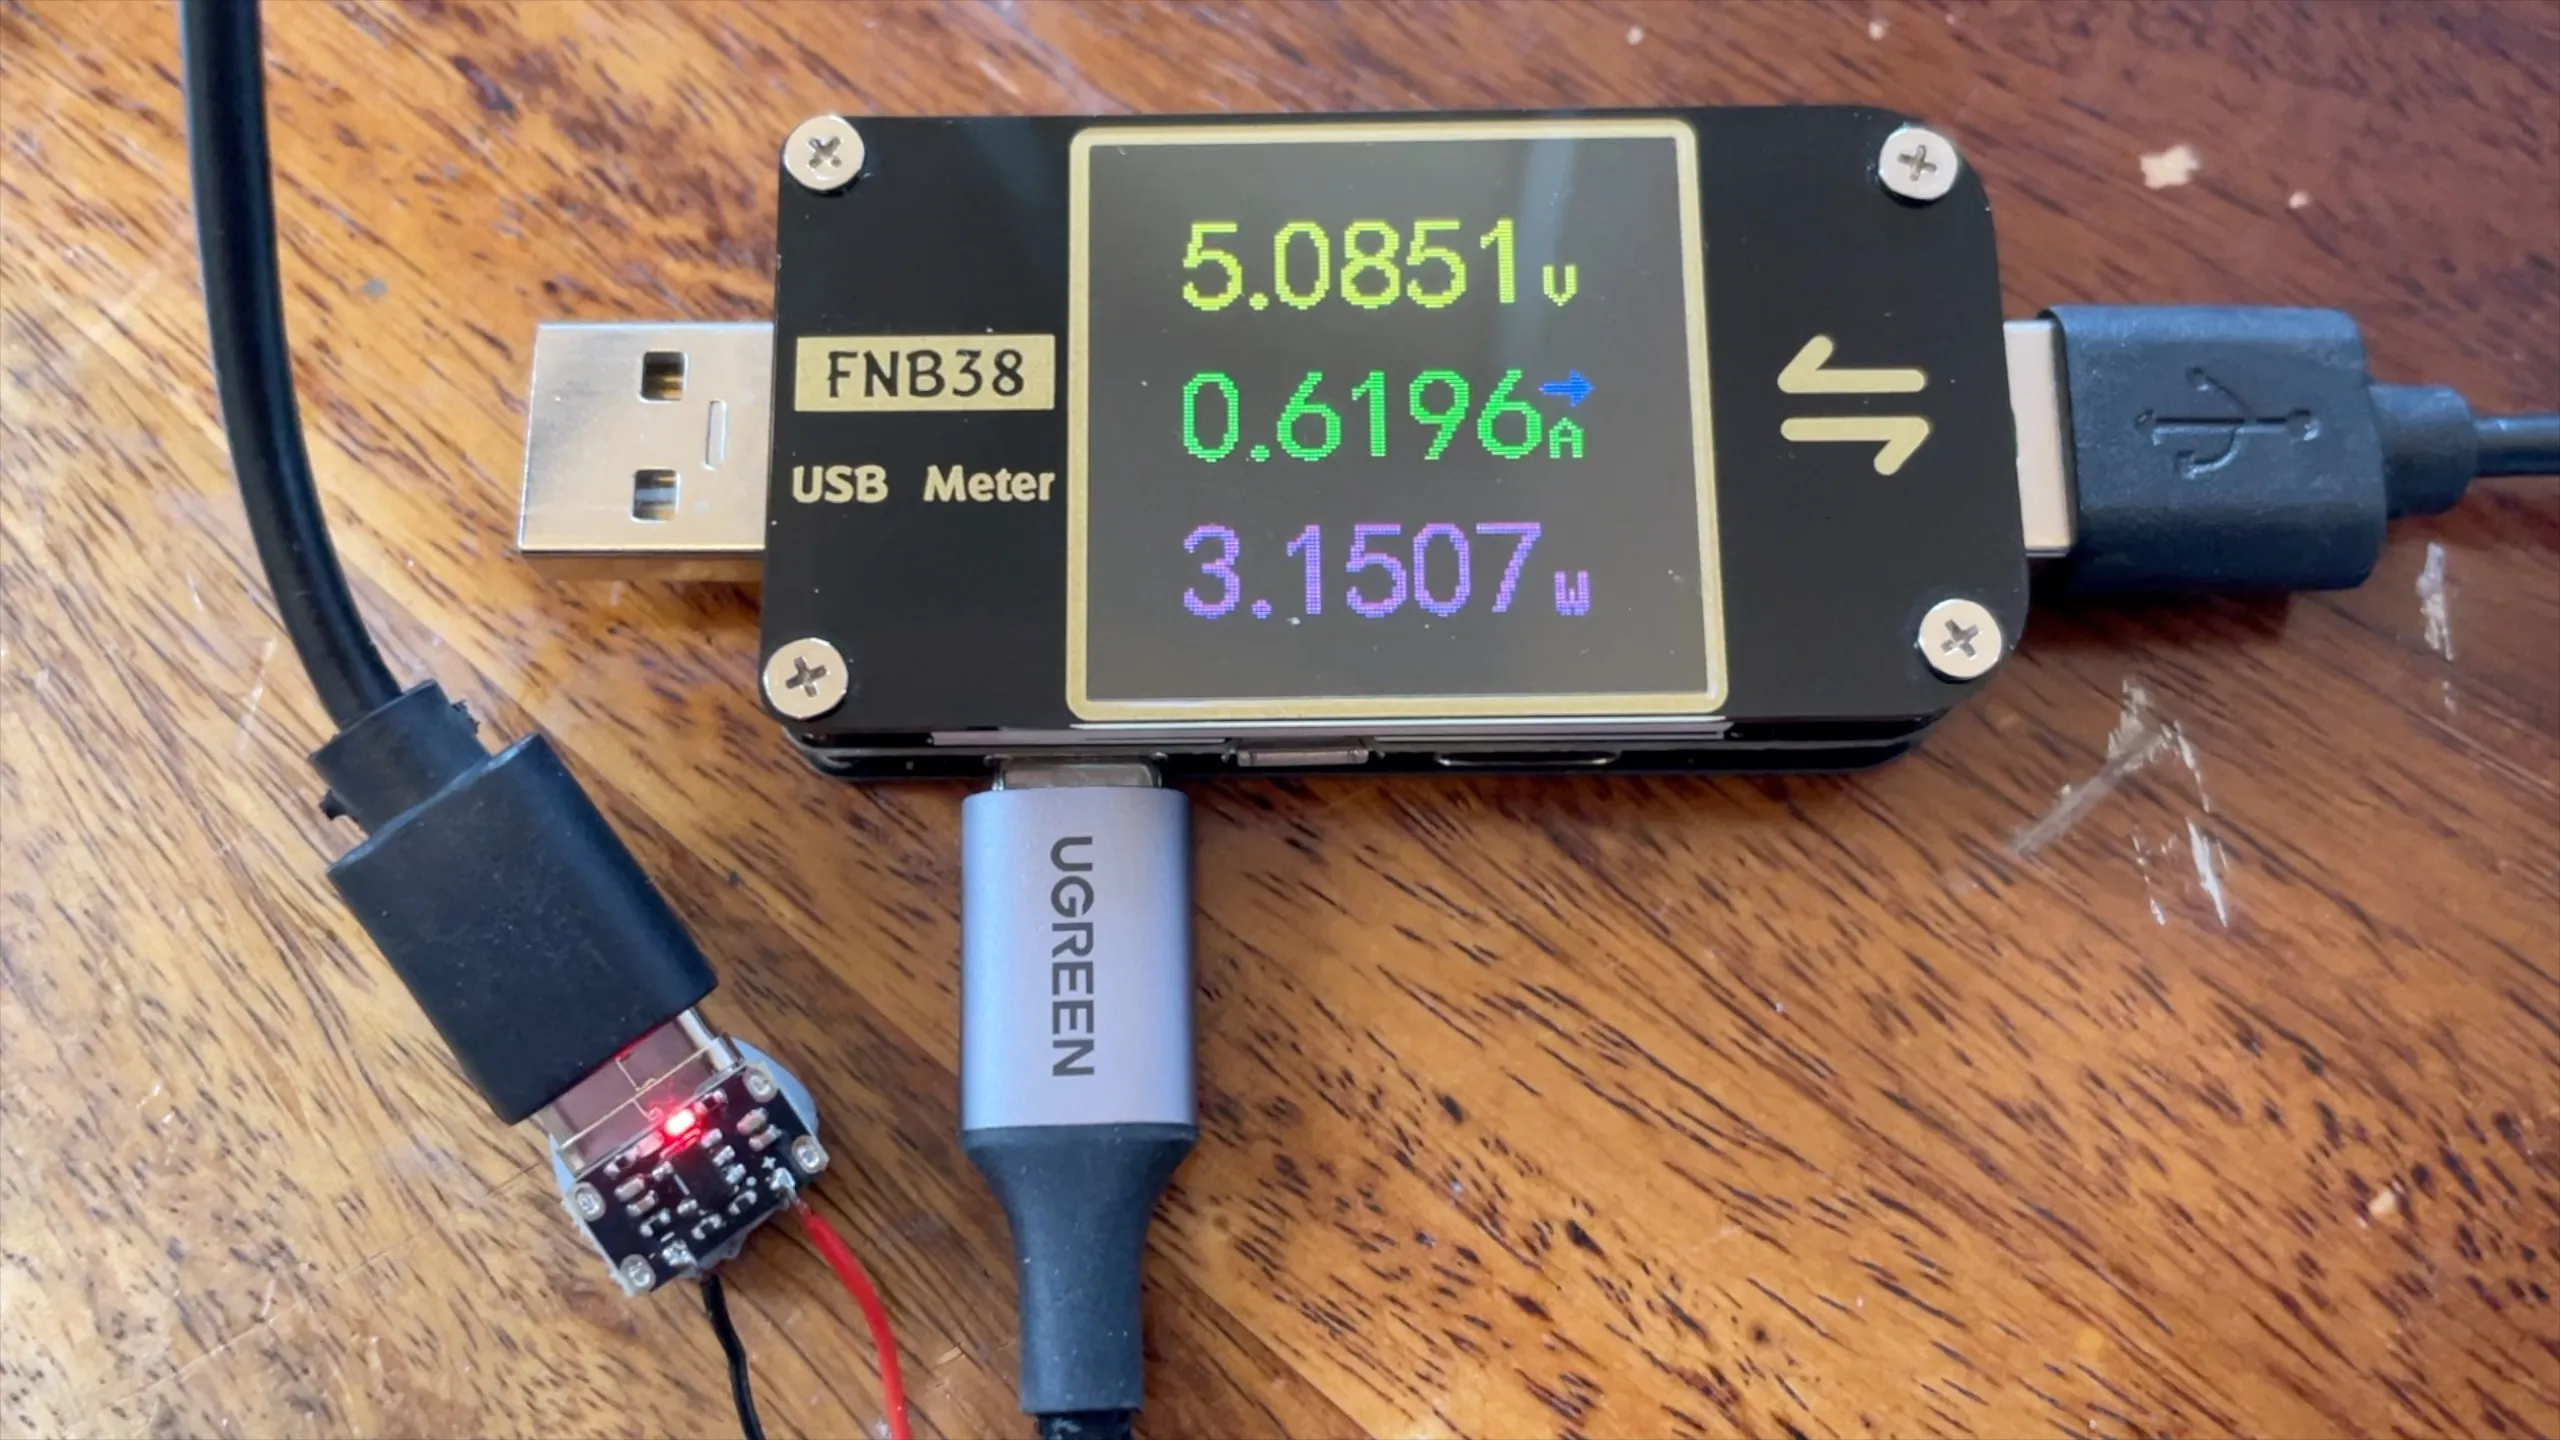
This does decrease as the battery charges and once the battery is almost full it will drop right down.

One thing to be aware of - which is true for all linear chargers - is that the IC has to dissipate a lot of power. So it can get quite warm. In my tests the temperature topped out at around 92-93C.

Quite toasty

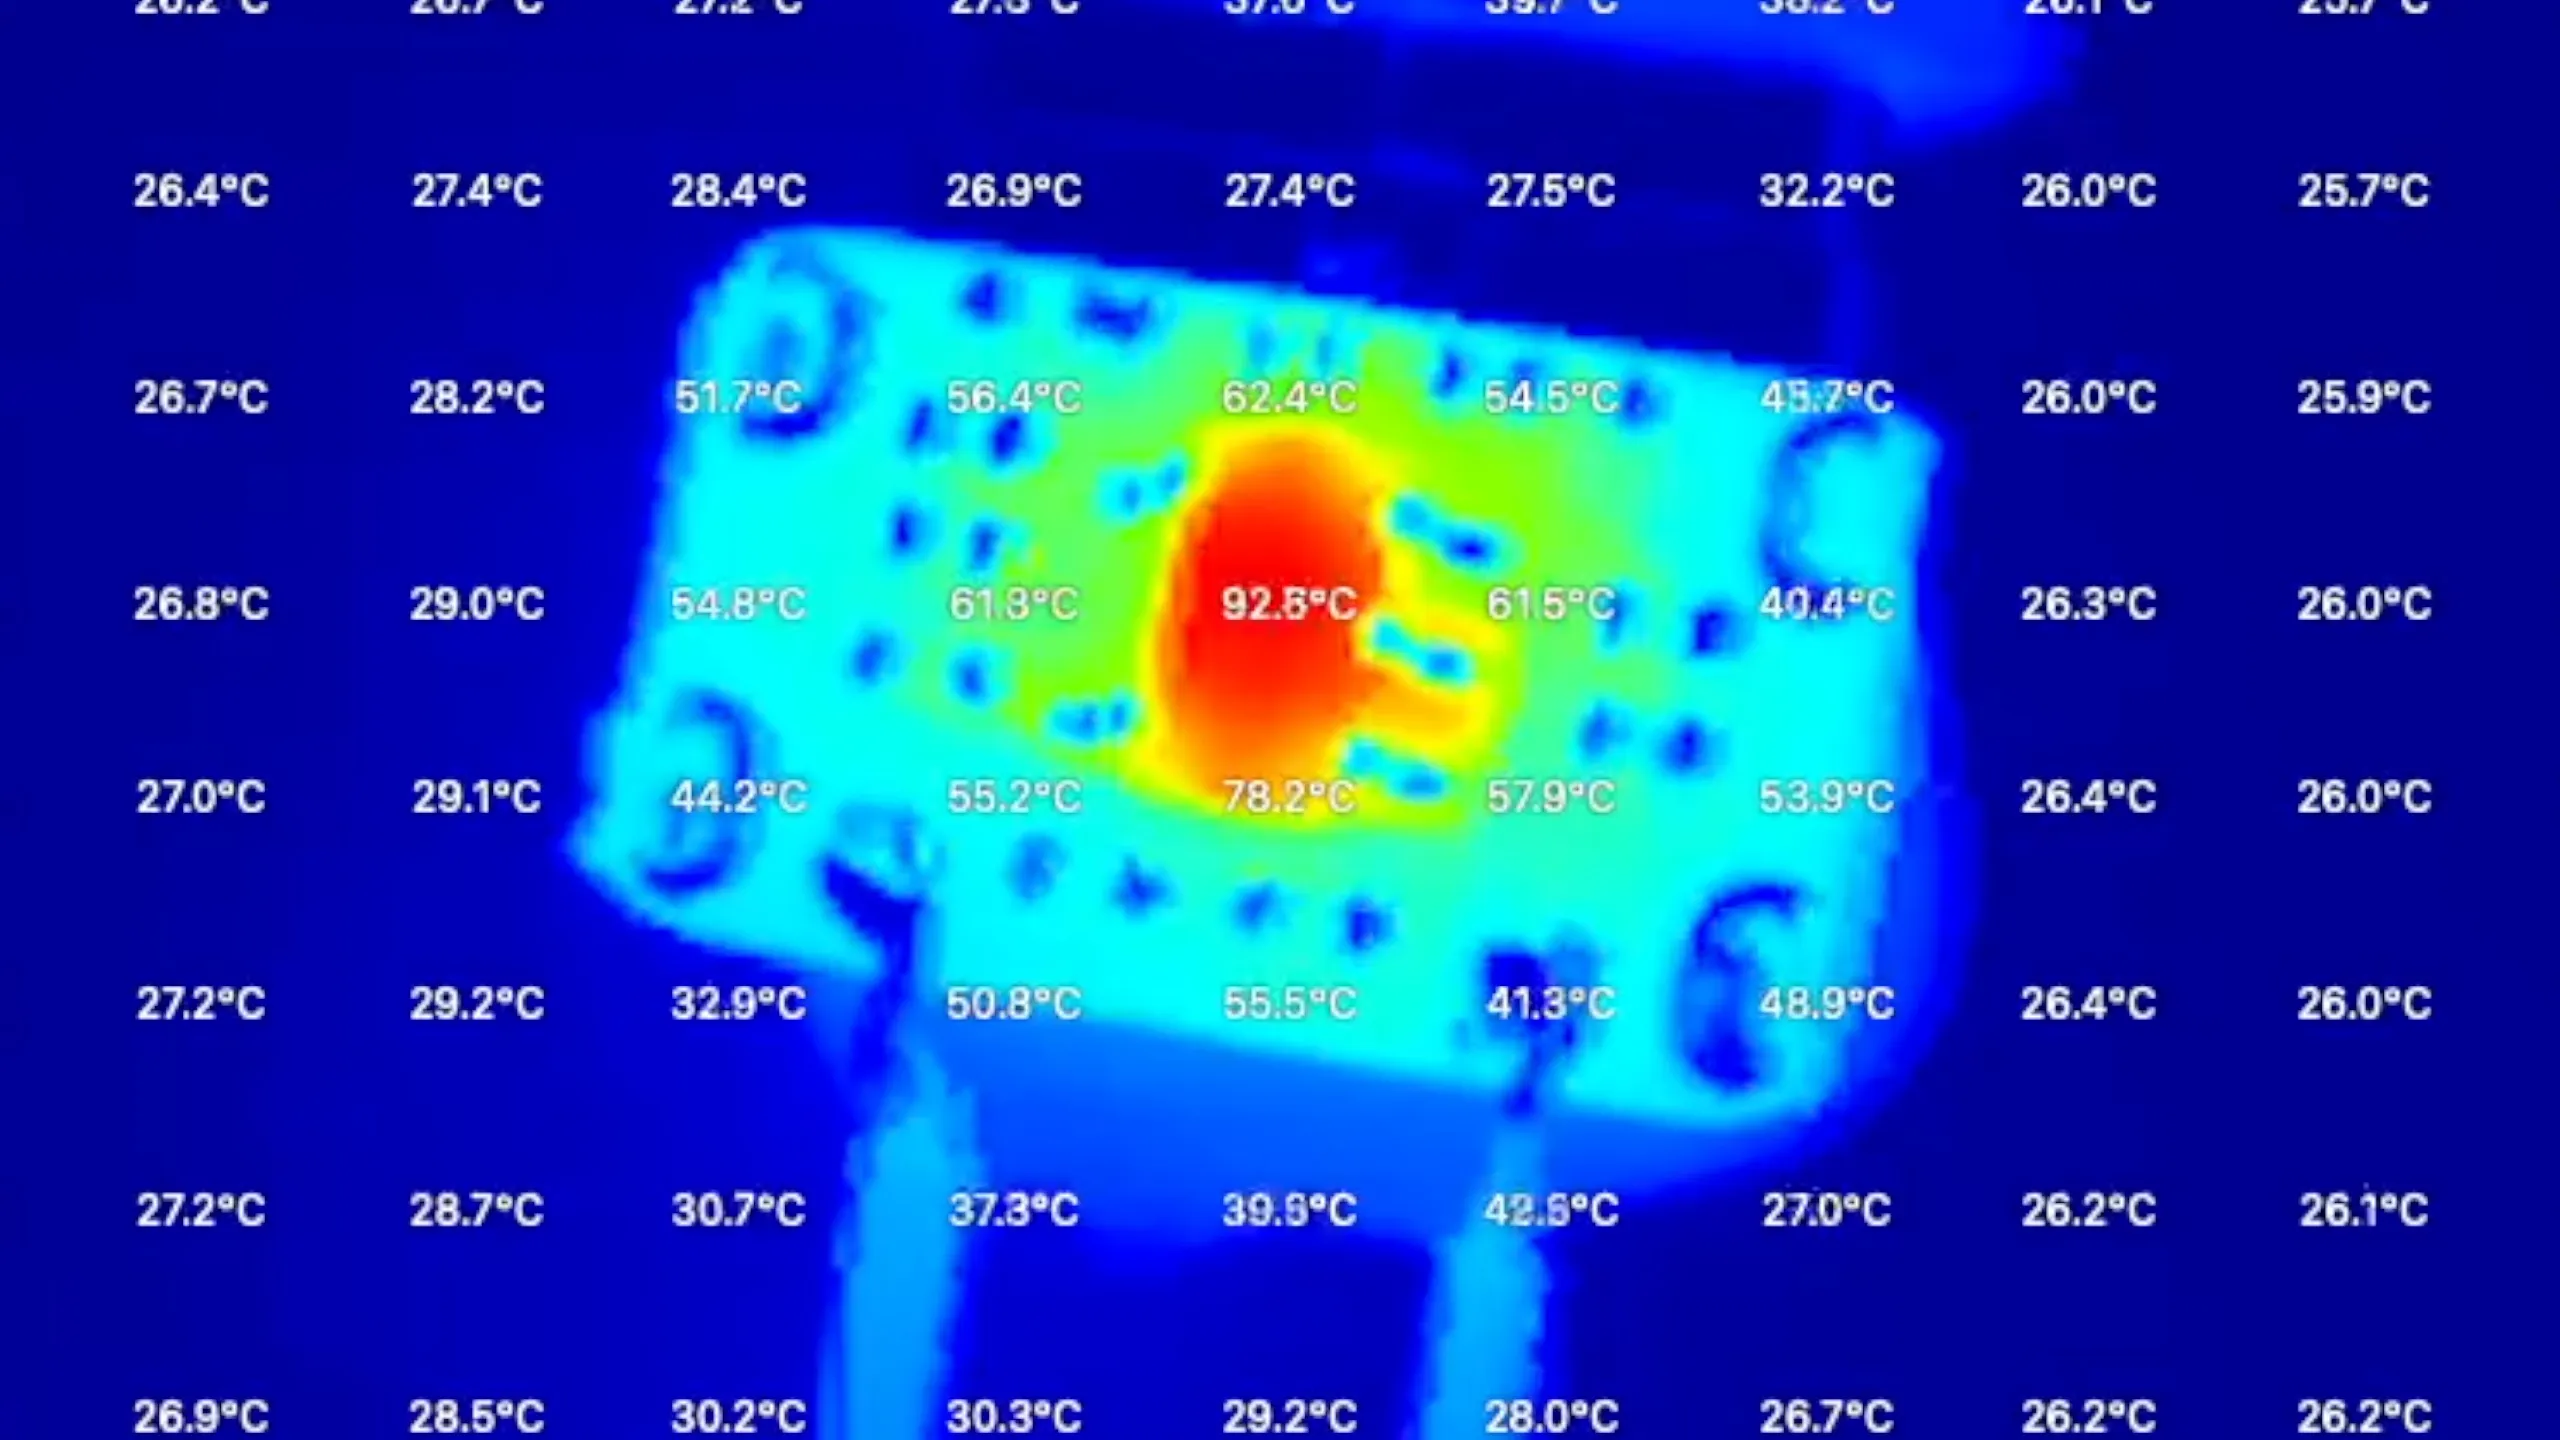
It’s worth being aware of this - you probably don’t want to be placing your battery in direct contact with the IC.

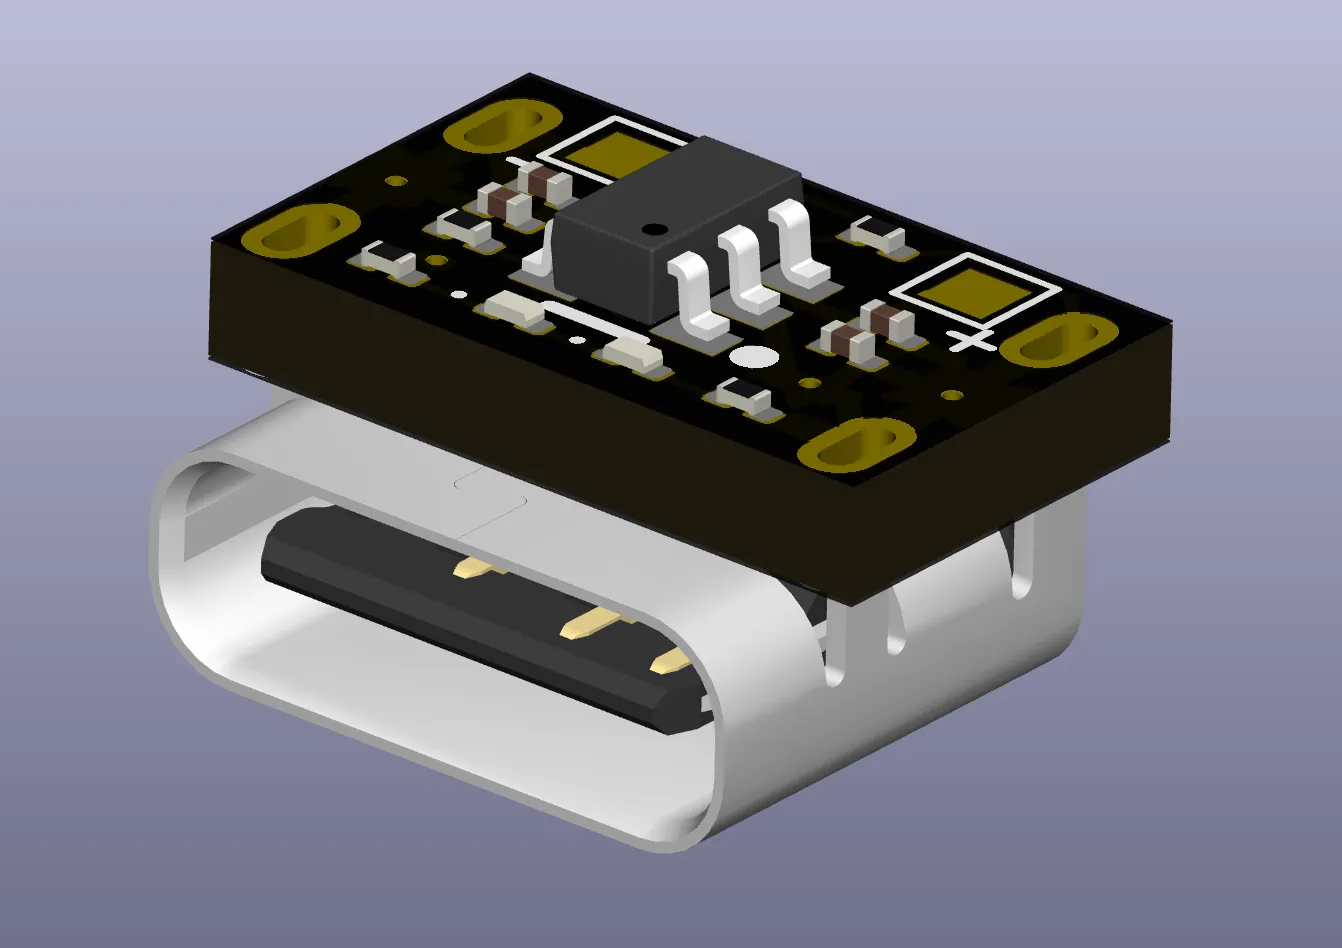
I thought it would be quite fun to try and recreate the board in KiCad - turned out to be not that hard.

Turned out to be fairly easy to place and route

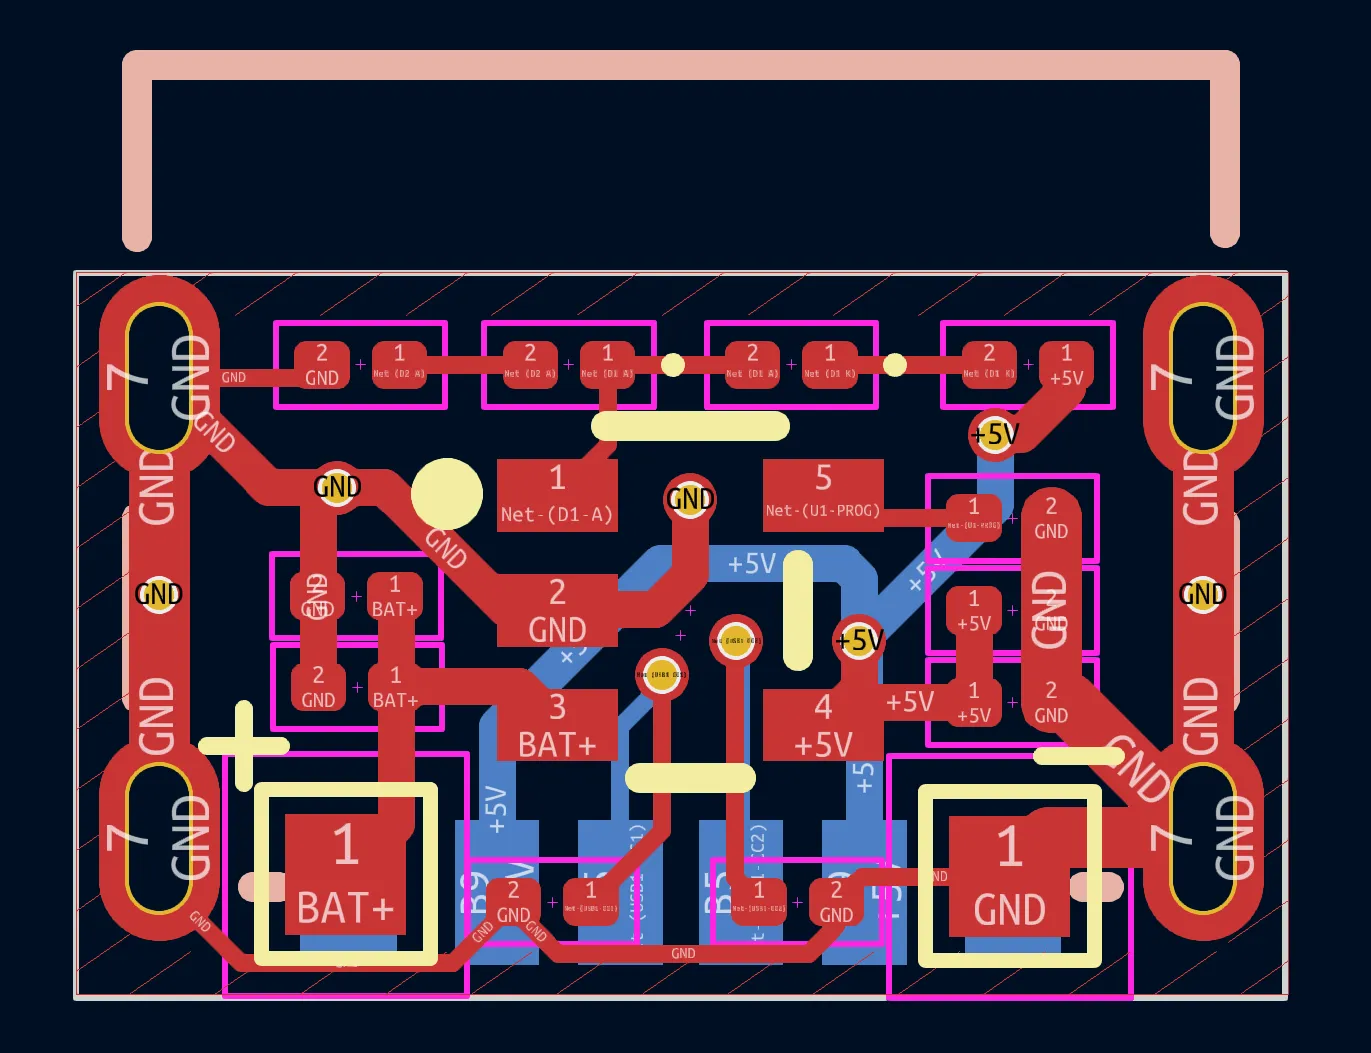
And looks just like the real thing!

Just like the real thing!

#ALIEXPRESS #ELECTRONICS #KICAD #LI-ION CHARGER #LP4054 #REVERSE ENGINEERING #TP4054 #USB-C

Related Posts

Red Arcade Thing Repair - I resurrected a dead AliExpress arcade handheld by swapping the blown 3.3V regulator (I now own 99 spares), adding a TP4056 charger with Schottky diode isolation, and nursing a 0V LiPo back to life. A bit of hot-plate rework, tidier wiring, and—flip the switch—boom: it boots! It’s not pretty, but it’s alive again.
I Need More USB Power! - I've been accumulating more and more USB powered devices for my workbench lately, and my single 65W USB-C supply just isn't cutting it anymore. So, I've decided to source a new solution. After some digging, I stumbled upon a remarkable board on AliExpress with four USB standard sockets and four USB-C ports, which support just about every protocol there is! Oh, it easily delivers a solid 65 Watts. With this, I am finally able to fully power my gear. From mini hotplates to soldering irons, my workbench is more juiced up than ever!
Electronic chopsticks - I recently got my hands on the HT140 Solder Tweezers from Sequre, adding an exciting new piece to my toolkit. Powering it via USB-C, these electronic chopsticks heat up fast thanks to a robust 65W power supply. Testing on a Raspberry Pi Pico board proved successful with a little flux help. Despite hoping for minimal use due to my PCB order, these tweezers are a handy backup for precise soldering work.
No Power? No Problem! A Wireless Pi Doom Machine - In my latest wireless charging experiments, I got my hands on a set of wireless charging PCBs and dove into testing different voltage inputs and their efficiency levels. It was interesting to realise that the 5V input managed to provide a decent efficiency of 73%, while 12V input struggled and heated the receiver board excessively. With the perks and limits of this setup explored, I took a whirl at creating a wireless Pi Doom machine. It worked like a charm! However, I quickly noticed the need to split charging and boost board into two different modules - a project to look forward to. Half the fun is getting there! Check out the video [here](https://youtu.be/glCIuOoFm7U) for more detail on the project.
Just Vibe It - I crafted a whimsical single key keyboard ideal for vibe coding! It's powered by a TPS2117-equipped PCB, offering slick battery-to-USB switching. Tried out low profile Cherry switches, but faced some stabilizer challenges with bigger keycaps. Check out the final fun in my GitHub repo and video!

Related Videos

World’s Smallest USB-C Li-Ion Charger?! - I found some super compact USB-C lithium battery chargers on AliExpress, and they're tiny! The PCB is just 10mm by 6mm, but it packs a punch with a linear lithium-ion battery charger chip, LP 4054. It's equipped with indicator LEDs for charging status and includes essential resistors and capacitors. Be cautious, though, as it can get warm during use. I've decided to recreate this neat design in Keycad, showing you each step, paying tribute to our Patreons and PCB Way along the way. Let's see how the design translates and if it passes all checks!
DIY Power Bank: 20,000mAh? - Discover the efficiency of a DIY 20,000mAh USB-C power bank compared to commercial versions, as a control board and lithium batteries charge up an array of devices, including a soldering iron and mini-hotplate, while also considering the project's overall cost.
Simple Multi USB-C Power Module - With my growing list of USB-C powered devices and just one cable, I found myself underpowered on my bench. My solution? Scouring the depths of AliExpress for USB-C power delivery, QC2, and QC3 step-down converters. After initially purchasing individual boards, I struck gold with an ultra-convenient 4-in-one board. Paired with a Meanwell power supply, I enjoyed pushing my new setup to its limits with the MiniWare electronic load tester. Although managing to pull a decent 65W, I'm dreaming up a 3D printed enclosure and eyeing up MiniWare's display modules for future improvements. I reckon, while I'm battling delayed PCBs and dodgy components, it's certainly a fun way to help power up my bench!
Mysterious Battery Drain Solved: Rechargeable LED Lights Mystery - Discover the intriguing issue of faulty tp4056 chips causing battery drainage and how to solve it using a DIY power board. Learn how a customized PCB, created with PCB way, can be designed to improve battery life and ensure a stable voltage output.
Dodgy circuit could have caused a fire! - So, I got this red mini handheld game thing from AliExpress and it died pretty quickly. After a bit of tinkering, I found that it still draws current but isn't turning on because of a dead battery and a burnt voltage regulator. I removed the faulty components and injected 3.3 volts directly into the system, and guess what? The screen lights up and it works, but there's no sound. Despite the hiccup with my microscope, which stopped recording some interesting bits, you get the picture. It's partly revived but not quite there yet. Big shout out to PCB way who help us out with PCBs!
HELP SUPPORT MY WORK: If you're feeling flush then please stop by Patreon Or you can make a one off donation via ko-fi
Want to keep up to date with the latest posts and videos? Subscribe to the newsletter
Blog Logo

Chris Greening


Published

> Image

atomic14

A collection of slightly mad projects, instructive/educational videos, and generally interesting stuff. Building projects around the Arduino and ESP32 platforms - we'll be exploring AI, Computer Vision, Audio, 3D Printing - it may get a bit eclectic...

View All Posts