🌈 ESP32-S3 Rainbow: ZX Spectrum Emulator Board! Get it on Crowd Supply →
View All Posts
read
Want to keep up to date with the latest posts and videos? Subscribe to the newsletter
HELP SUPPORT MY WORK: If you're feeling flush then please stop by Patreon Or you can make a one off donation via ko-fi
#DIY #EDUCATION #ELECTRONIC PROJECTS #ESP32-S3 #GITHUB #HARDWARE #MICROCONTROLLER #OPEN SOURCE #PINOUT

The ESP32-S3 is pretty flexible, but there are still pins that should not be used. I’ve always found the Random Nerds page page really useful for the old ESP32.

So I’ve made one for the ESP32-S3 - You can find it here on GitHub

Feel free to open up PRs/Issues if you see something wrong or think it can be improved. It would be good to make this a “living” document.

ESP32-S3 Pinouts

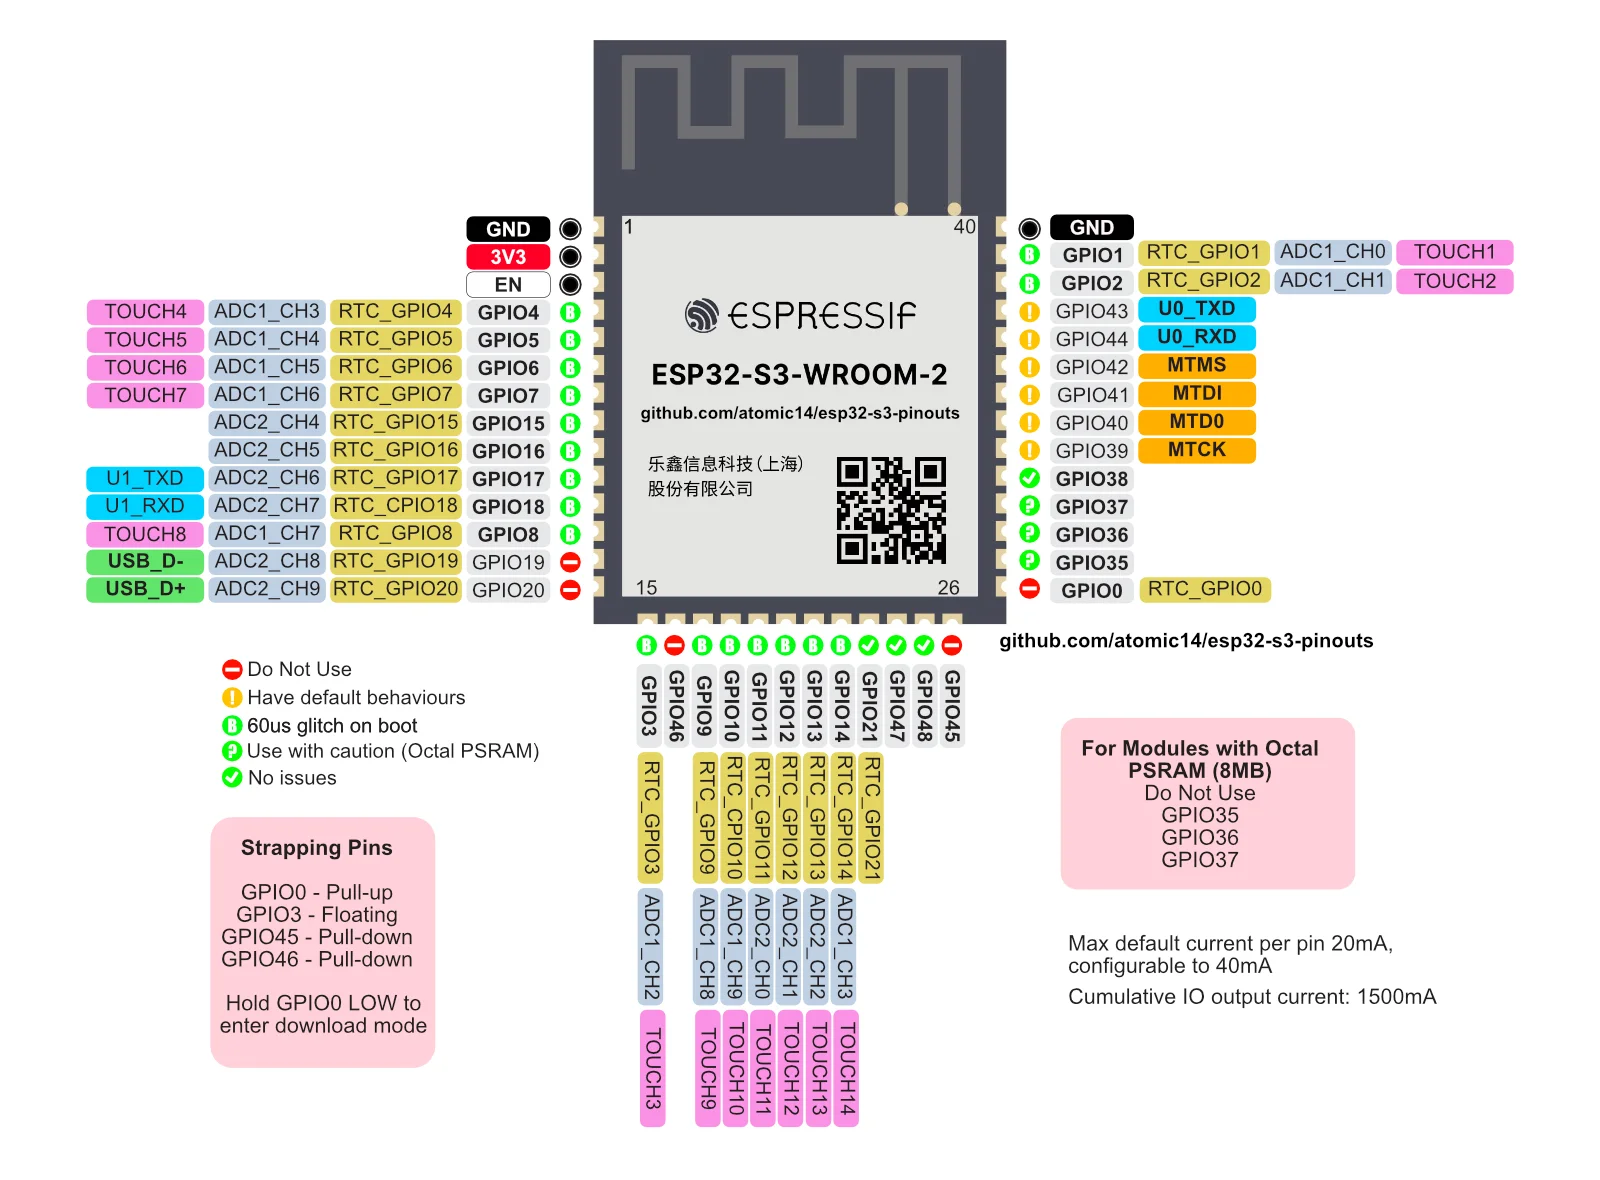
There’s a lot more info at the GitHub repo, and this image is available as a high res PDF.

#DIY #EDUCATION #ELECTRONIC PROJECTS #ESP32-S3 #GITHUB #HARDWARE #MICROCONTROLLER #OPEN SOURCE #PINOUT

Related Posts

Minimalist Microcontroller: Building a Bare-Bones Dev Board - In a thrilling DIY endeavour, I attempted to build the most minimalist ESP32 dev board possible. Diving deep into the schematic of the ESP32 S3 WROOM module, I chopped out the non-essentials and whittled our needs down to bare bones. The experiment saw me juggling USB data lines and voltage regulators, waving goodbye to an array of capacitors and connectors and boldly embracing the simplicity of direct connections. Despite a few hitches, the miniature Frankenboard came alive, proving that sometimes less is more...at least in the world of microcontrollers.
Easy esp32 s3 dev board - Quick recap: I’m putting together a super simple ESP32-S3 dev board—there’s a video walkthrough, the full KiCad project on GitHub, plus the schematic and a slick 3D render of the assembled board.
ESP32-S3 Dev Board Assembly - I finally assembled our ESP32-S3 dev boards—used a stencil for easy SMD work, fixed a few tiny USB solder bridges with flux, and even hand-built one for fun. The EPAD isn’t required (per the datasheet), power LEDs look good, and on macOS you can spot it under /dev before flashing. A quick boot-button dance and the blink sketch runs great—full build and walkthrough in the video.
1 touch pin 8 touch pads - To make my ESP32 ZX Spectrum touch keyboard work even better, I needed to ensure every key was independent. The ESP32-S3 only has 14 touch pins, so I’ve been using a matrix approach. While this works well, it struggles with key combinations, critical for the ZX Spectrum. I explored touch detection and experimented with analog multiplexer ICs (4051 series) to expand the touch pins. Initial tests were promising. After prototyping with breadboard-friendly versions and ordering parts, the new keyboard was not only functional but exceeded my expectations. Scanning the keyboard now takes around 20ms, and the solution is ready for production. This was the last big challenge, and I’m thrilled with the results!
ESP32 Audio Input - MAX4466, MAX9814, SPH0645LM4H, INMP441 - In this blog post, I've delved deep into the world of audio input for ESP32, exploring all the different options for getting analogue audio data into the device. After discussing the use of the built-in Analogue to Digital Converts (ADCs), I2S to read ADCs with DMA, and using I2S to read directly from compatible peripherals, I go on to present hands-on experiments with four different microphones (MAX4466, MAX9814, SPH0645, INPM441). This comprehensive look at getting audio into the ESP32 should be a valuable resource for anyone hungry for a deep-dive into ESP32's audio capabilities, complete with YouTube videos for an even more detailed look!

Related Videos

ESP32-S3 - Which Pins Are Safe To Use? - In this video, I've decided to dive deep into the ESP32-S3, a module ruling my lab recently due to its plug-in-and-play functionality, and the flexibility offered by its GPIO matrix. However, working with it requires vigilance, especially with regard to the strapping pins and USB data pins, among others. Discovering such quirks, I've encountered unexpected values, short glitches and the occasional code crash. To help you avoid these bumps, I've documented everything I've learned on my GitHub repo, where I'm inviting you, my fellow makers and engineers, to contribute your valuable experiences and findings. After a minor hiccup with my ESP32-TV, expect an updated PCB design, courtesy of PCBWay. Explore the ESP32-S3 with me, and let's unravel its secrets together, one pull request at a time.
Super Easy ESP32-S3 Dev Board - Making an ESP32-S3 dev board is way easier than it looks. I simplify the datasheet reference: skip the external crystal, wire native USB D+/D− (pins 19/20) straight to a USB-C with 5.1k CC pulldowns, add a BOOT switch and an EN RC reset, and power it with an LD117 LDO that’s happy with ceramic caps. In KiCad I build the schematic with Espressif libraries, add LEDs for 5V, 3V3, and a blink GPIO, set up net classes, route a clean USB differential pair, stitch a solid ground plane, and label everything. It’s a bit wide—just gang breadboards together—and you end up with a neat, professional S3 dev board you can flash and debug over USB.
I Designed My Own ESP32-S3 Dev Board… and It Actually Worked! - I finally assembled my super simple ESP32‑S3 dev board—voltage regulator, reset button, three status LEDs (5V, 3.3V, and a GPIO blinker), and all pins broken out. I showed two build methods: stencil + hot-plate reflow (quick, with a few USB bridges to clean up) and full hand-solder under the microscope, complete with the rigorous ‘solid’ test. Soldered the ESP32‑S3 module (skipping the center thermal pad unless you need it), plugged in, got power LEDs, confirmed USB enumeration, flashed a blink sketch, and we’ve got a blinking LED. Next up: turning this basic dev board into something more professional for production.
Minimalist Microcontroller: Building a Bare-Bones Dev Board - Dive into the fascinating process of building a minimal ESP32-based dev board, beginning with the ESP32-S3 Wroom module, and eliminating unnecessary components. Through soldering, wire connecting, and voltage testing, we reach a product that's compact, efficient and fully functional.
Arduino Nano ESP32 - It's nice - But probably not for me. - In this video, I took a deep dive into the Arduino Nano ESP32 and compared it with other available boards in the market. Despite its seemingly high cost as compared to the options on AliExpress, its overall quality, fantastic documentation, and the fact that it fits neatly into the Arduino ecosystem makes it a good buy, especially if you've already invested in the Arduino Nano and its shields. The board has a few interesting peculiarity, including the use of a NORA-W106 module, a switch mode step-down converter for power, and an RGB LED. However, I was disappointed to find out it doesn't come with built-in battery charging. The pin labelling and remapping could definitely cause some confusion, especially if you're transitioning from other ESP32 boards. It's a fairly decent ESP32-S3 board if that's what you're after. But given a choice, I'm keener on the Unexpected Maker boards or the cheap boards on AliExpress.
HELP SUPPORT MY WORK: If you're feeling flush then please stop by Patreon Or you can make a one off donation via ko-fi
Want to keep up to date with the latest posts and videos? Subscribe to the newsletter
Blog Logo

Chris Greening


Published

> Image

atomic14

A collection of slightly mad projects, instructive/educational videos, and generally interesting stuff. Building projects around the Arduino and ESP32 platforms - we'll be exploring AI, Computer Vision, Audio, 3D Printing - it may get a bit eclectic...

View All Posts